Small Farm Big Life

  • Recipe Index
  • Subscribe
  • Resources
menu icon
go to homepage
  • Home
  • Recipe Index
  • Subscribe
  • My Story
  • Resources
  • Free Guides
    • Email
    • Facebook
    • Instagram
    • Pinterest
  • subscribe
    search icon
    Homepage link
    • Home
    • Recipe Index
    • Subscribe
    • My Story
    • Resources
    • Free Guides
    • Email
    • Facebook
    • Instagram
    • Pinterest
  • ×

    Gluten Free Canned Peach Cobbler

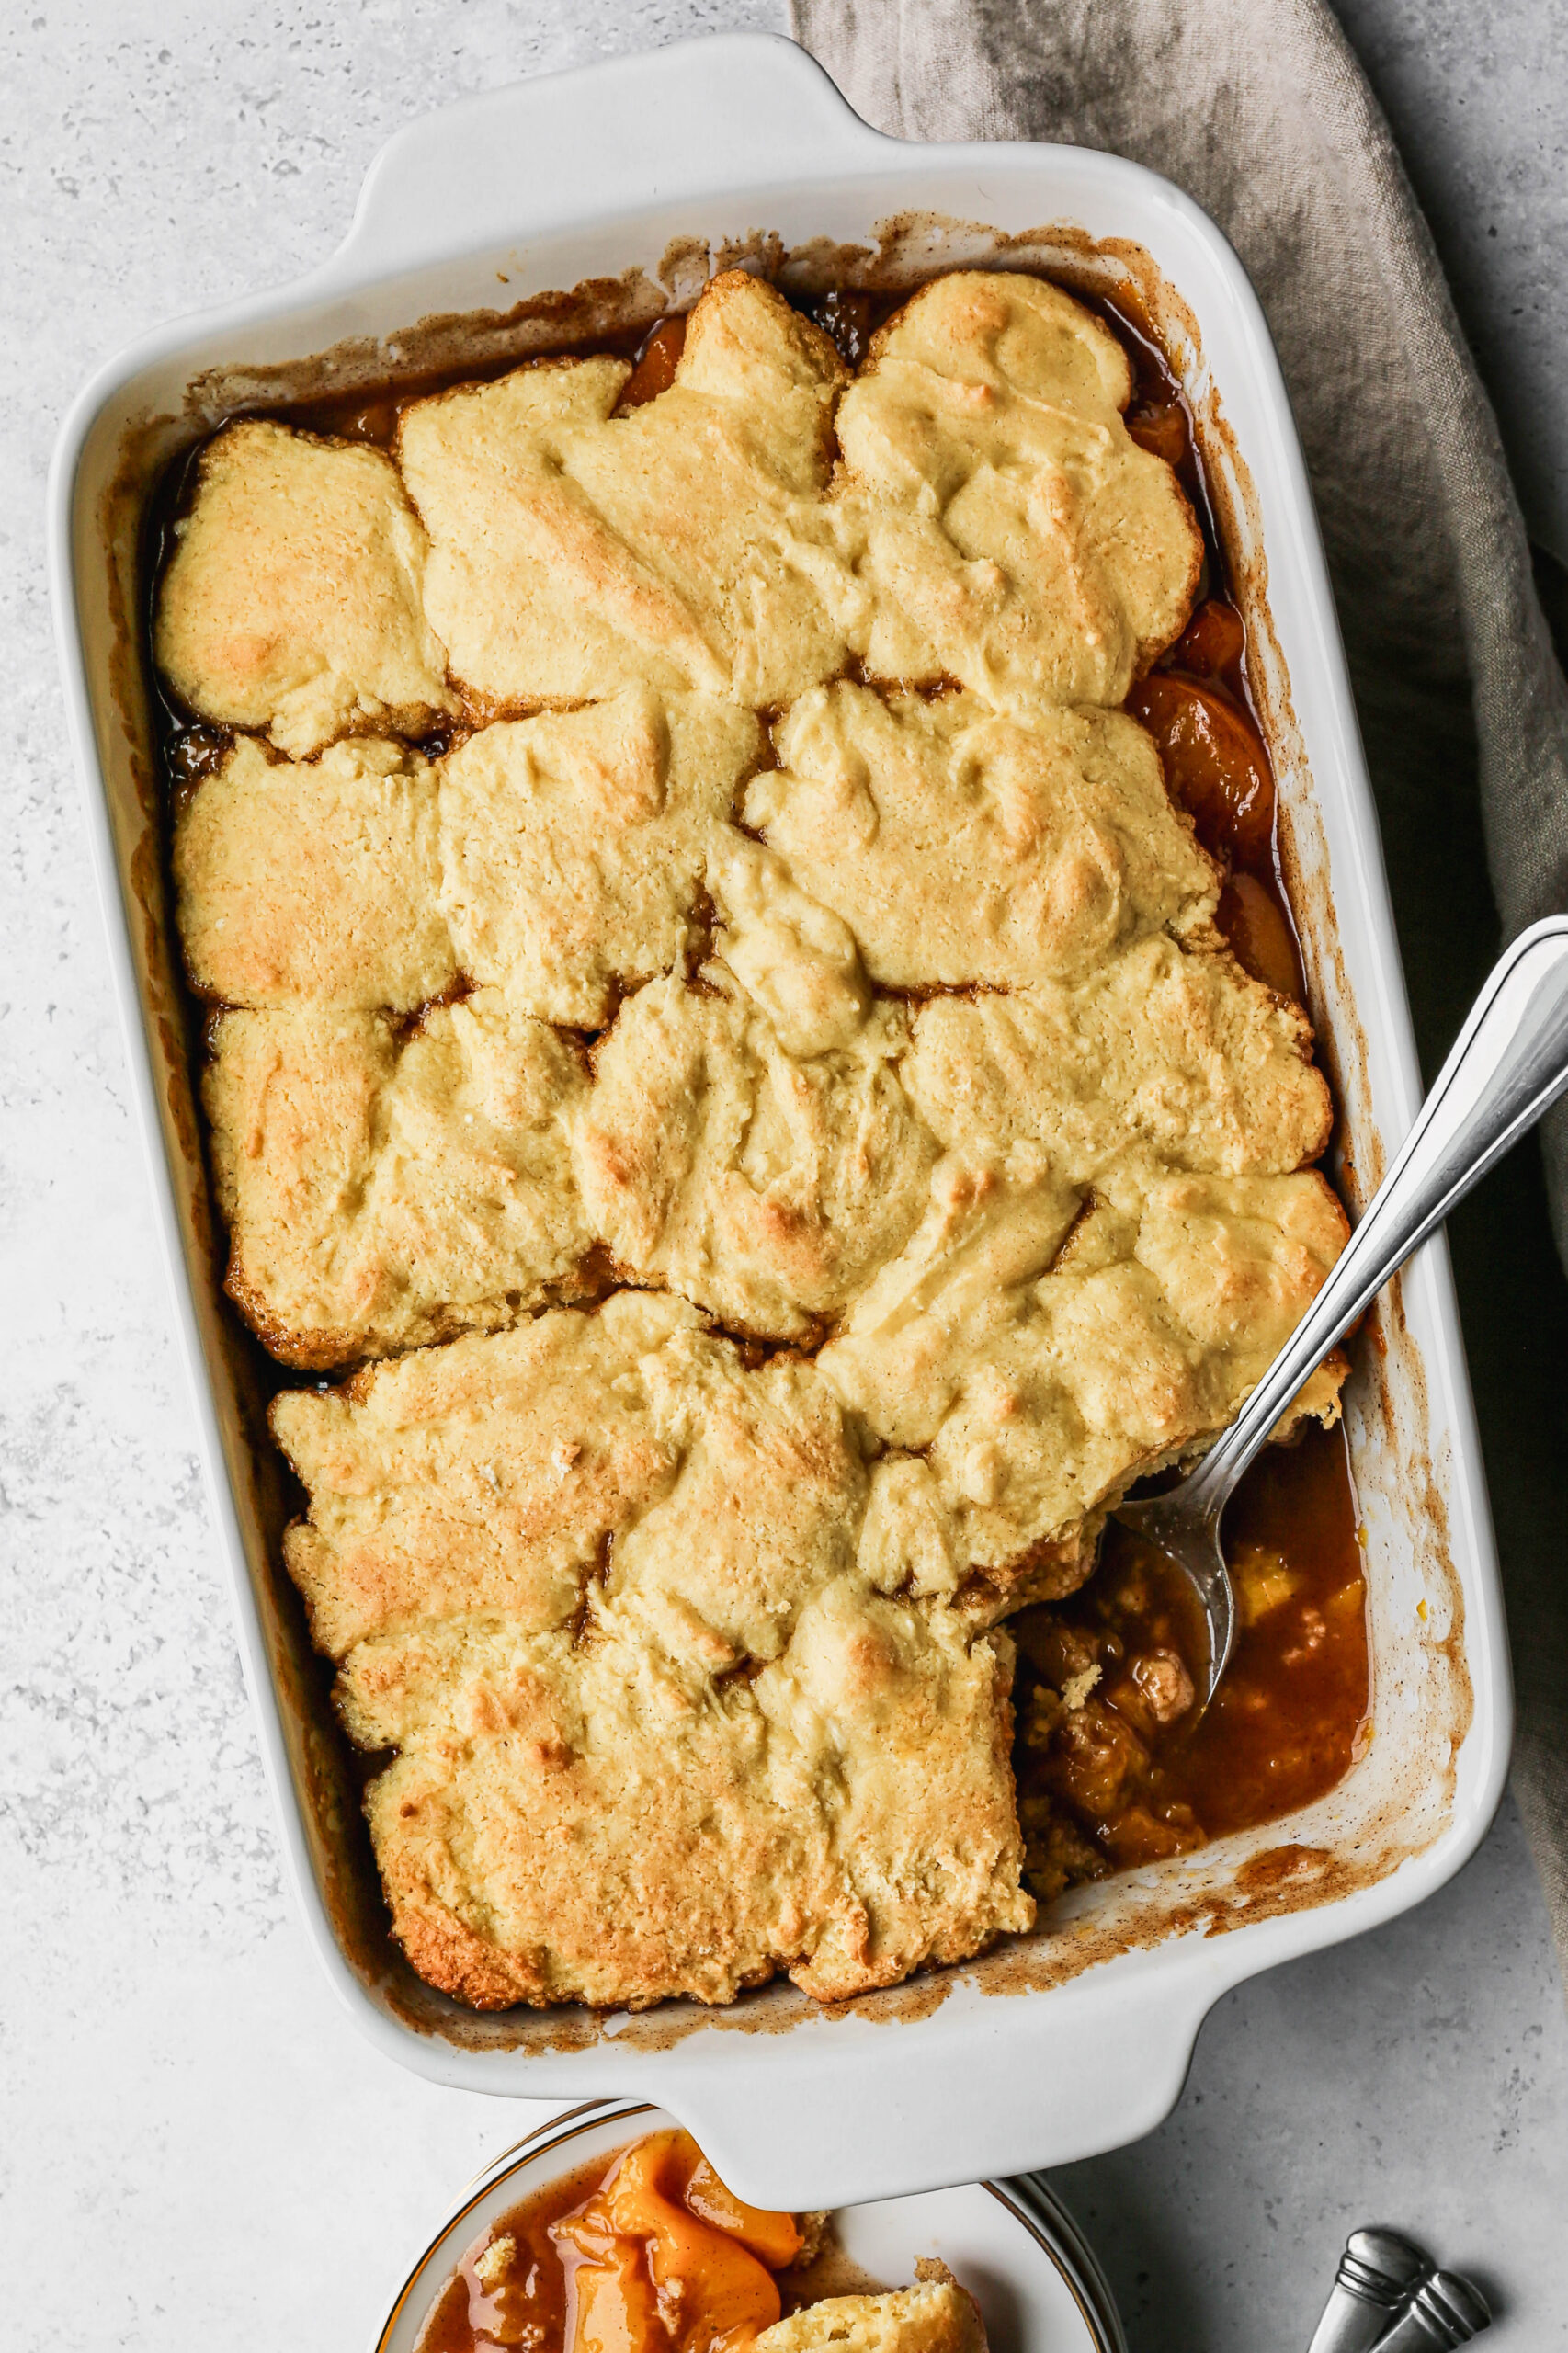
    This Gluten Free Canned Peach Cobbler is the easiest homemade dessert you can make any time of year, not just when fresh peaches are in season. Two cans of peaches are simmered with butter, brown sugar, cinnamon, and warm spices until thick and bubbly, then topped with a fluffy gluten free buttermilk biscuit topping and baked until golden.

    It is the kind of cozy, comforting dessert that feels like it took all day but comes together in just 50 minutes from start to finish.

    a white baking dish of gluten free canned peach cobbler next to a white plate of cobbler.

    The best part about using canned peaches for this gluten free cobbler is that you get consistent results every single time. No worrying about whether the peaches are ripe enough or in season, and no peeling required.

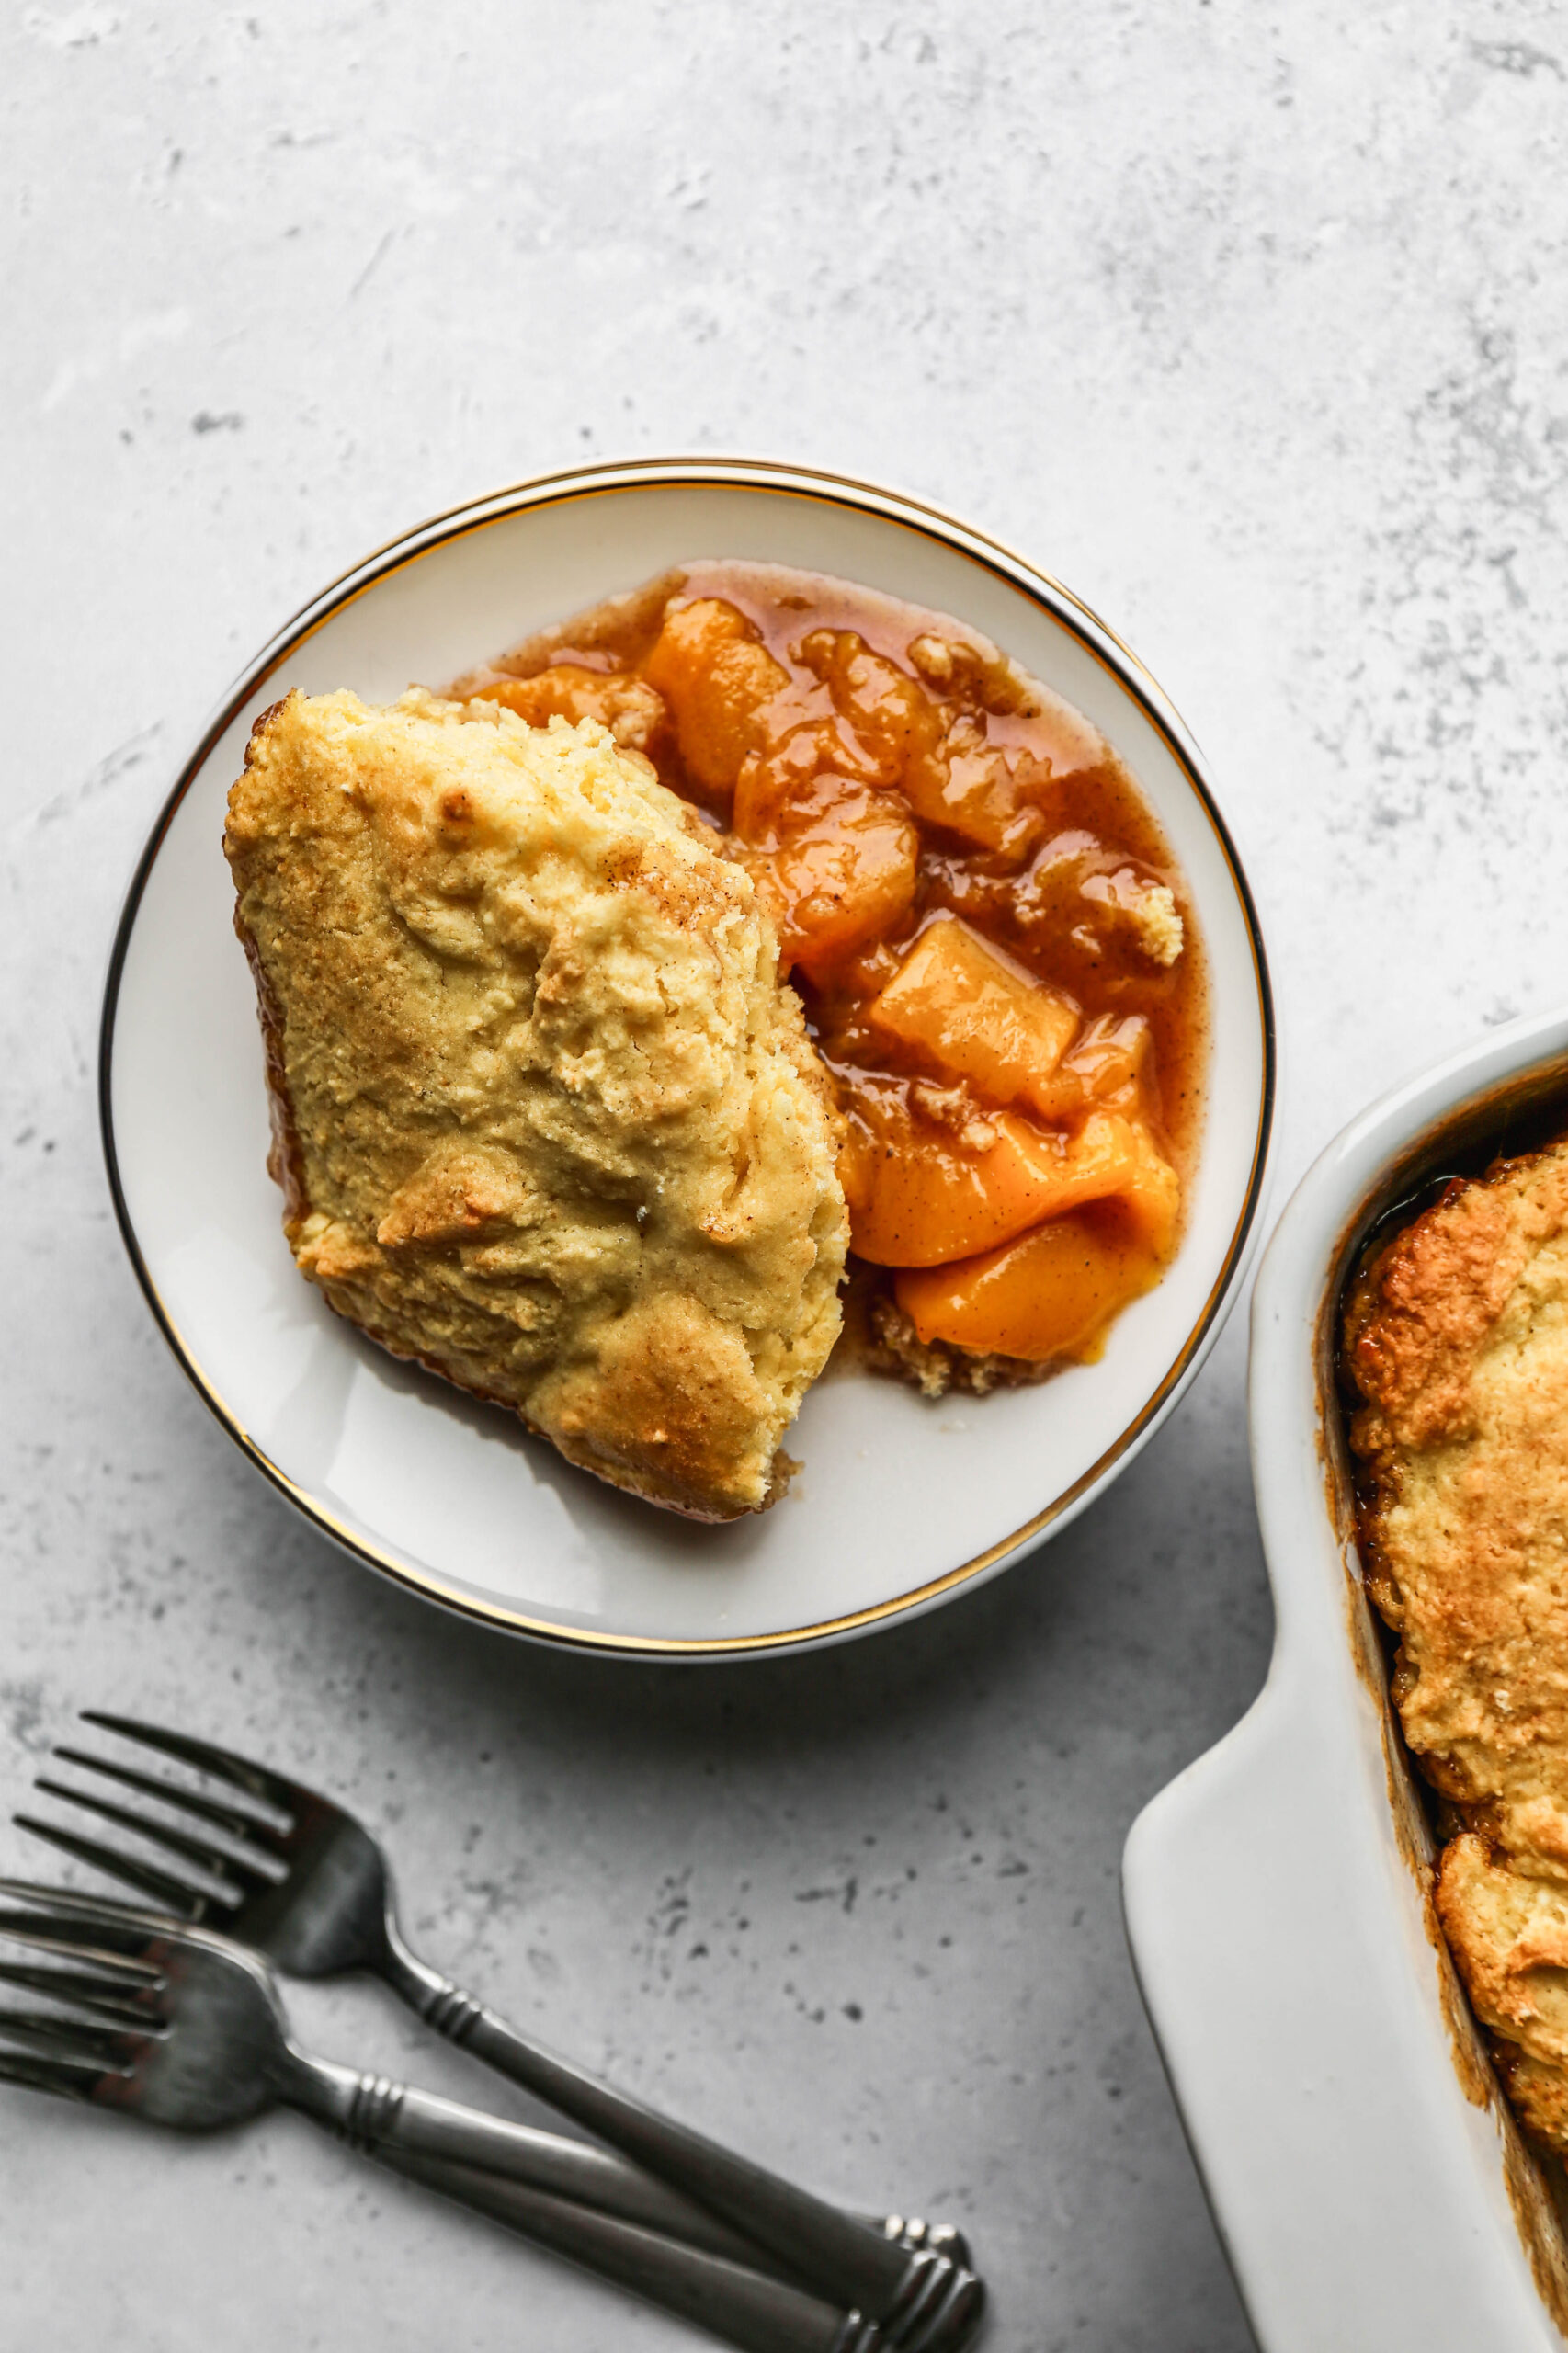
    The buttermilk biscuit topping bakes up light and tender on the inside with a slightly crisp top, which is the perfect contrast to the sweet and saucy peach filling underneath.

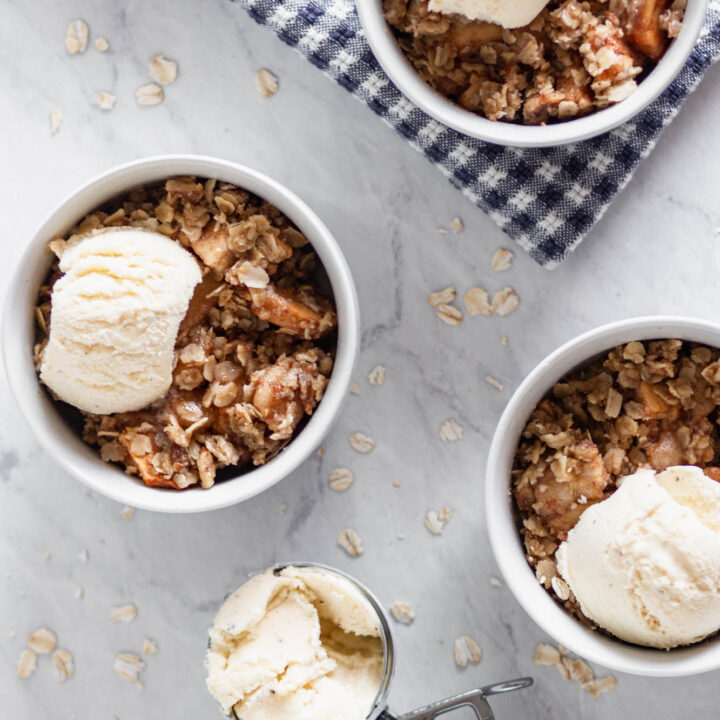
    Serve it warm straight from the oven with a scoop of vanilla ice cream and you have one of the best easy gluten free desserts you will ever make.

    If you are looking for more peach recipes try my Air Fryer Grilled Peaches or my Gluten Free Peach Crisp.

    You can find all of my dessert recipes here: Gluten Free Dessert Recipes

    a white plate of gluten free canned peach cobbler next to a white baking dish of cobbler.
    [feast_advanced_jump_to]

    Ingredients

    • Canned Peaches
    • Unsalted Butter
    • Granulated Sugar
    • Brown Sugar
    • Vanilla Extract
    • Ground Cinnamon
    • Ground Allspice
    • Sea Salt
    • Arrowroot Powder
    • Gluten Free Flour
    • Baking Powder
    • Buttermilk
    • Eggs

    Instructions

    Preheat your oven to 350 degrees.

    In a sauce pan over medium heat add the drained peaches, butter, granulated sugar, brown sugar, vanilla, cinnamon, allspice and salt. Heat to a simmer and simmer for 1-2 minutes.

    In a small bowl mix together the arrowroot powder and peach juice until combined. Pour into the peach mixture and stir to combine. Simmer for 1 minute and then remove from heat.

    In the bowl of your stand mixer combine the gluten free flour, baking powder, salt, granulated sugar, buttermilk, eggs and vanilla. Beat until combined into a smooth batter, about 1-2 minutes.

    Pour the peach mixture into a 9x13 baking dish or 3 quart baking dish. Top with large tablespoons of the buttermilk biscuit mixture.

    Bake at 350 degrees for 35 minutes. The biscuits will be golden and the peach mixture will be bubbling when done.

    Supplies

    More Recipes You Might Enjoy

    • Gluten Free Strawberry Cobbler
    • Gluten Free Blackberry Cobbler
    • Gluten Free Cranberry Apple Crisp
    • Gluten Free Apple Crisp

    I get a lot of my ingredients from Thrive Market. Thrive Market has been a game changer for me eating gluten free. They have so many options I can't get at my rural grocery stores! Use this link to get 40% off your first order!

    Print
    clock clock iconcutlery cutlery iconflag flag iconfolder folder iconinstagram instagram iconpinterest pinterest iconfacebook facebook iconprint print iconsquares squares iconheart heart iconheart solid heart solid icon

    Gluten Free Canned Peach Cobbler


    5 Stars 4 Stars 3 Stars 2 Stars 1 Star

    No reviews

    • Author: Elaine VanVleck
    • Total Time: 50 minutes
    • Yield: 8 servings 1x
    • Diet: Gluten Free
    Print Recipe
    Pin Recipe

    Description

    A sweet and bubbly peach filling made with canned peaches, warm spices, and butter, topped with a fluffy gluten free buttermilk biscuit topping and baked until golden. This easy gluten free peach cobbler is the perfect dessert any time of year.


    Ingredients

    Scale

    Peach Filling:

    • 2 - 29 ounce cans Peaches, drained reserving 4 tablespoons
    • ½ cup Unsalted Butter
    • ¼ cup Granulated Sugar
    • ½ cup Brown Sugar
    • 1 tsp Vanilla Extract
    • 2 tsp Ground Cinnamon
    • ½ tsp Ground Allspice
    • ½ tsp Sea Salt
    • 2 Tbsp Arrowroot Powder or Corn Starch, mixed with reserved juice

    Buttermilk Topping:

    • 2 ½ cups Gluten Free Flour
    • 3 tsp Baking Powder
    • 1 tsp Sea Salt
    • 1 cup Granulated Sugar
    • 1 cup Buttermilk
    • 2 large Eggs
    • 1 tsp Vanilla Extract

    Instructions

    Preheat your oven to 350 degrees.

    In a sauce pan over medium heat add the drained peaches, butter, granulated sugar, brown sugar, vanilla, cinnamon, allspice and salt. Heat to a simmer and simmer for 1-2 minutes.

    In a small bowl mix together the arrowroot powder and peach juice until combined. Pour into the peach mixture and stir to combine. Simmer for 1 minute and then remove from heat.

    In the bowl of your stand mixer combine the gluten free flour, baking powder, salt, granulated sugar, buttermilk, eggs and vanilla. Beat until combined into a smooth batter, about 1-2 minutes.

    Pour the peach mixture into a 9x13 baking dish or 3 quart baking dish. Top with large tablespoons of the buttermilk biscuit mixture.

    Bake at 350 degrees for 35 minutes. The biscuits will be golden and the peach mixture will be bubbling when done.

    If you made this recipe please leave a star rating and comment below. It helps other readers find this recipe and means so much to me.

    • Prep Time: 15 minutes
    • Cook Time: 35 minutes
    • Category: Dessert, Fruit
    • Method: Baking
    • Cuisine: American

    Did you make this recipe?

    Tag @smallfarmbiglife on Instagram and hashtag it #smallfarmbiglife

    If you make this Gluten Free Canned Peach Cobbler, I would love to hear what you think! Drop a comment below and let me know how it turned out, or tag me on Instagram so I can see your cobbler fresh out of the oven. This is one of those desserts you will want to make all year long, so save it to your favorite Pinterest board so you always have it on hand when the craving hits!

    Storage

    Store leftover peach cobbler covered tightly or in an airtight container in the refrigerator for up to four days. The biscuit topping will soften as it sits but the flavor is still delicious. Reheat individual servings in the microwave for 30 to 60 seconds or warm the whole dish in the oven at 350 degrees for about 15 minutes.

    This cobbler does not freeze well due to the buttermilk biscuit topping, so it is best enjoyed fresh or within a few days of baking.

    Top Tip

    Make sure you drain your canned peaches well before starting the filling. Too much liquid in the pan will make the filling runny and prevent it from thickening properly. Reserve just the four tablespoons of peach juice needed for the arrowroot slurry and discard the rest. This one step makes all the difference in getting that perfectly thick and saucy peach filling.

    Didn't find the answer you're looking for?

    Ask AI to answer based on this recipe:

    ChatGPT
    Google AI
    Perplexity
    Grok
    Claude

    Frequently Asked Questions

    What can I used to thicken my peach cobbler?

    For this recipe I used arrowroot powder mixed with peach juice from the can to mix with the cobbler to thicken it. You can also use corn starch or tapioca flour for thickening a cobbler.

    It is important to mix your thickening ingredient with water or peach juice in a small bowl before adding it to your cobbler. This will prevent the starch from lumping in your dessert and will leave a smooth texture.

    Do you drain canned peaches for peach cobbler?

    Yes! For this recipe is important that you drain the canned peaches. You will reserve two tablespoons of liquid to mix with the arrowroot powder, but otherwise drain the juice from the peach cans.

    For this recipe if you don't drain the peaches your cobbler will be really runny and there will be an abundance of liquid. I tried this recipe without draining the peaches and I advise draining them.

    Gluten Free No Bake Lemon Icebox Pie

    This easy recipe for gluten free no bake icebox pie is the perfect summer dessert! It's an old fashioned recipe with condensed milk, cream cheese and a gingersnap cookie crust. This no bake lemonade icebox pie is creamy and a classic recipe for hot days.

    a white pie plate of gluten free no bake lemon icebox pie next to lemon slices.

    This Gluten Free No Bake Lemon Icebox Pie is a cool, creamy dessert that delivers bright citrus flavor in every bite.

    Perfect for warm weather, this refreshing dessert is a modern twist on the Old Fashioned No Bake Lemon Icebox Pie, making it ideal for summer gatherings, picnics, or anytime you need a quick, no fuss treat.

    Its smooth, lemony filling and chilled texture create a satisfying contrast that's both light and indulgent. It's everything you want in a classic Lemon Dessert Recipe!

    If you are looking for more cold treats to serve on hot days try my Gluten Free Strawberry Icebox Bars, my Gluten Free No Bake S'mores Pie, my Gluten Free No Bake Key Lime Pie, or my Homemade Strawberry Banana Popsicles.

    You can find all of my dessert recipes here: Gluten Free Dessert Recipes

    a white pie plate of gluten free no bake lemon icebox pie next to a slice on a white plate.
    [feast_advanced_jump_to]

    Ingredients

    • Gluten Free Gingersnap Cookies Recipe or Gluten Free Gingersnap Cookies
    • Unsalted Butter
    • Sea Salt
    • Cream Cheese
    • Sweetened Condensed Milk
    • Lemon Juice
    • Lemon Zest
    • Vanilla Extract
    • Unflavored Gelatin
    • Water
    • Heavy Whipping Cream
    • Powdered Sugar

    Instructions

    In a food processor, process the gingersnap cookies until they are crumbled. Add the melted butter and salt. Pulse to combine the ingredients into a paste.

    Pour the cookie mixture into a 9-inch pie plate and press evenly on the bottoms and sides. Place in the freezer while you make the filling.

    In your stand mixer beat the cream cheese 1-2 minutes until creamy. Add the sweetened condensed milk and beat 2 minutes more to combine. Add the lemon juice, lemon zest and vanilla. Beat just until incorporated into the cream cheese mixture.

    Stir together the gelatin packet and water in a small bowl. Let stand 1-2 minutes to dissolve fully. Add to the cream cheese mixture and beat to combine.

    Pour the cream cheese mixture into the pie crust. Freeze for at least 2 hours.

    In the bowl of your stand mixer using the whisk attachment whisk at medium high speed the heavy whipping cream, powdered sugar and vanilla until stiff peaks form.

    Top the icebox pie with the whipped cream before serving.

    Supplies

    Frequently Asked Questions

    Can you freeze no bake lemon icebox pie?

    Yes! This pie is frozen after it is put together. It is perfect for making a day or two in advance and having ready to serve. Simply take the pie out of the freezer 15-20 minutes before you want to serve it.

    How many lemons do I need for ⅓ cup lemon juice?

    You will need 3 medium lemons to get ⅓ cup of lemon juice. If lemons aren't in season or hard to get you can also use bottled lemon juice. Before you use the lemons for juice be sure to zest the outside for this recipe and then you can freeze the leftovers for a future recipe.

    More Recipes You Might Enjoy

    • Gluten Free Lemon Curd
    • Gluten Free Iced Lemon Cookies
    • Gluten Free Lemon Bundt Cake with Lemon Glaze
    • Gluten Free Lemon Shortbread Bars

    I get a lot of my ingredients from Thrive Market. Thrive Market has been a game changer for me eating gluten free. They have so many options I can't get at my rural grocery stores! Use this link to get 40% off your first order!

    Print
    clock clock iconcutlery cutlery iconflag flag iconfolder folder iconinstagram instagram iconpinterest pinterest iconfacebook facebook iconprint print iconsquares squares iconheart heart iconheart solid heart solid icon

    Gluten Free No Bake Lemon Icebox Pie


    5 Stars 4 Stars 3 Stars 2 Stars 1 Star

    No reviews

    • Author: Elaine VanVleck
    • Total Time: 20 minutes
    • Yield: 8 servings 1x
    • Diet: Gluten Free
    Print Recipe
    Pin Recipe

    Description

    This easy recipe for gluten free no bake icebox pie is the perfect summer dessert! It's an old fashioned recipe with condensed milk, cream cheese and a gingersnap cookie crust. This no bake lemonade icebox pie is creamy and a classic recipe for hot days.


    Ingredients

    Units Scale

    Crust:

    • 1 ½ cups Gluten Free Ginger Cookies Recipe or Gluten Free Gingersnap Cookies
    • ¼ cup Unsalted Butter, melted
    • ½ tsp Sea Salt

    Filling:

    • 2 - 8 ounce packages Cream Cheese, at room temperature
    • 14 ounce can Sweetened Condensed Milk
    • ⅓ cup Lemon Juice
    • 2 Tbsp Lemon Zest
    • 1 tsp Vanilla Extract
    • 1 - .75 ounce pouch Unflavored Gelatin
    • ¼ cup Water

    Whipped Cream Topping:

    • 1 ½ cups Heavy Whipping Cream
    • 2 Tbsp Powdered Sugar, sifted
    • 1 tsp Vanilla Extract

    Instructions

    In a food processor, process the gingersnap cookies until they are crumbled. Add the melted butter and salt. Pulse to combine the ingredients into a paste.

    Pour the cookie mixture into a 9-inch pie plate and press evenly on the bottoms and sides. Place in the freezer while you make the filling.

    In your stand mixer beat the cream cheese 1-2 minutes until creamy. Add the sweetened condensed milk and beat 2 minutes more to combine. Add the lemon juice, lemon zest and vanilla. Beat just until incorporated into the cream cheese mixture.

    Stir together the gelatin packet and water in a small bowl. Let stand 1-2 minutes to dissolve fully. Add to the cream cheese mixture and beat to combine.

    Pour the cream cheese mixture into the pie crust. Freeze for at least 2 hours.

    In the bowl of your stand mixer using the whisk attachment whisk at medium high speed the heavy whipping cream, powdered sugar and vanilla until stiff peaks form.

    Top the icebox pie with the whipped cream before serving.

    Notes

    You can make this lemon icebox pie up to 2 days in advance. Take the pie out of the freezer 15-20 minutes before serving so you can cut it.

    You can replace the gingersnap cookies with gluten free graham crackers. Add ½ teaspoon of ground cinnamon to the crumbled mixture for a bit more flavor.

    • Prep Time: 20 minutes
    • Category: Pie, Ice Cream
    • Method: Freezer
    • Cuisine: Gluten Free

    Did you make this recipe?

    Tag @smallfarmbiglife on Instagram and hashtag it #smallfarmbiglife

    Long Island Iced Tea Mocktails

    If you love the bold tangy flavor of a Long Island Iced Tea but want a version you can serve to everyone at the table, this mocktail recipe is exactly what you need. Black tea bags, apple cider vinegar, fresh lemon juice, sugar, baking soda, and ginger beer come together in just 5 minutes for a pitcher of the most refreshing and flavorful non alcoholic drink you will ever make.

    It has all the complexity and zing of the classic cocktail without any of the alcohol, making it a perfect summer drink for BBQs, backyard parties, and any gathering where you want something fun and festive that everyone can enjoy.

    two glasses of long island iced tea mocktails with lemon slices on top.

    What makes this Long Island Iced Tea mocktail so clever is the combination of apple cider vinegar and ginger beer. The apple cider vinegar adds the tangy bite that mimics the multi-spirit base of the original cocktail, and the ginger beer brings a light fizzy kick that makes every sip feel refreshing and satisfying.

    A small pinch of baking soda smooths out the bitterness of the black tea and gives the drink that beautiful amber color you expect from a classic Long Island Iced Tea.

    The whole pitcher comes together in just 10 minutes and serves four, making it one of the easiest and most impressive non alcoholic summer drinks you can make for a crowd.

    If you are looking for more non alcoholic mocktail recipes to enjoy you might also like my Easy Frozen Watermelon Margarita Mocktail, my Pina Colada Mocktail, my Frozen Cranberry Margarita Mocktail, my Strawberry Daiquiri Mocktails or my Classic Margarita Mocktail.

    You can find all of my drink recipes here: Gluten Free Drink Recipes

    a glass of long island iced tea mocktails with a lemon slice next to it.
    [feast_advanced_jump_to]

    Ingredients

    • Iced Tea Bags
    • Water
    • Apple Cider Vinegar
    • Ginger Beer
    • Lemon Juice
    • Granulated Sugar
    • Baking Soda
    • Ice
    • Lemon Slices

    Instructions

    Boil water and pour over tea bags in a pitcher. Let steep for 5 minutes.

    Carefully remove the tea bags. Add the apple cider vinegar, lemon juice, sugar and baking soda. Stir to combine. Let the mixture cool slightly.

    Pour the ginger beer into the iced tea mixture.

    Fill glasses with ice and pour the tea over it. Top the drink with a lemon slice.

    Serve immediately.

    Supplies

    More Recipes You Might Enjoy

    • Lemon Lime Homemade Sports Drink
    • Iced Chai Tea Latte Concentrate
    • Classic Margarita Mocktail
    • Strawberry Daiquiri Mocktails

    I get a lot of my ingredients from Thrive Market. Thrive Market has been a game changer for me eating gluten free. They have so many options I can't get at my rural grocery stores! Use this link to get 40% off your first order!

    Print
    clock clock iconcutlery cutlery iconflag flag iconfolder folder iconinstagram instagram iconpinterest pinterest iconfacebook facebook iconprint print iconsquares squares iconheart heart iconheart solid heart solid icon

    Long Island Iced Tea Mocktails


    5 Stars 4 Stars 3 Stars 2 Stars 1 Star

    No reviews

    • Author: Elaine VanVleck
    • Total Time: 10 minutes
    • Yield: 4 servings 1x
    • Diet: Gluten Free
    Print Recipe
    Pin Recipe

    Description

    This Long Island Iced Tea mocktail makes a whole pitcher of refreshing non alcoholic drinks in just 5 minutes! Black tea bags, apple cider vinegar, fresh lemon juice, sugar, baking soda, and ginger beer come together for a tangy and lightly sweet mocktail that delivers all the classic flavor of a Long Island Iced Tea without any alcohol. Naturally gluten free and perfect for summer BBQs, parties, and warm weather entertaining!


    Ingredients

    Units Scale
    • 2 Family Size Iced Tea Bags
    • 4 cups Boiling Water
    • ¼ cup Apple Cider Vinegar
    • 3 Tbsp Lemon Juice
    • 2 Tbsp Granulated Sugar
    • ¼ tsp Baking Soda
    • 1 bottle or can of Ginger Beer, 8-12 ounces
      Ice, to fill your glasses
      Lemon Slices, to serve with drinks

    Instructions

    Boil water and pour over tea bags in a pitcher. Let steep for 5 minutes.

    Carefully remove the tea bags. Add the apple cider vinegar, lemon juice, sugar and baking soda. Stir to combine. Let the mixture cool slightly.

    Pour the ginger beer into the iced tea mixture.

    Fill glasses with ice and pour the tea over it. Top the drink with a lemon slice.

    Serve immediately.

    • Prep Time: 5 minutes
    • Cook Time: 5 minutes
    • Category: Drinks
    • Method: Mixing
    • Cuisine: American

    Did you make this recipe?

    Tag @smallfarmbiglife on Instagram and hashtag it #smallfarmbiglife

    If you make these Long Island Iced Tea Mocktails I would love to hear what you think! Leave a star rating and a comment below and let me know what occasion you served them for.

    Don't forget to save this recipe to your Pinterest boards so you can find it again all summer long!

    Storage

    This Long Island Iced Tea mocktail is best served fresh immediately after mixing for the best flavor and fizz. If you have leftover mocktail store it in a sealed pitcher or jar in the refrigerator for up to 24 hours. Keep in mind that the ginger beer will lose its carbonation as it sits so the drink will be less fizzy the next day.

    To get the best results when making this ahead of time, brew the tea mixture and store it in the refrigerator until you are ready to serve, then add the ginger beer right before pouring over ice. This way the mocktail stays fresh and bubbly for every glass.

    Top Tip

    Let the brewed tea cool for at least 5 to 10 minutes before adding the ginger beer. If the tea is still very hot when you pour in the ginger beer it will cause it to go flat almost immediately and you will lose all of that light fizzy quality that makes this mocktail so refreshing. The ginger beer is best added when the tea mixture is warm but not steaming, and then poured immediately over ice so the whole drink stays cold and bubbly from the very first sip.

    Didn't find the answer you're looking for?

    Ask AI to answer based on this recipe:

    ChatGPT
    Google AI
    Perplexity
    Grok
    Claude

    Frequently Asked Questions

    Can I make this Long Island Iced Tea mocktail ahead of time?

    Yes, with one important tip. Brew the tea and mix in the apple cider vinegar, lemon juice, sugar, and baking soda ahead of time and store the mixture in a sealed pitcher in the refrigerator for up to 24 hours. Add the ginger beer right before serving so the mocktail stays fizzy and fresh. If you add the ginger beer too early it will go flat and lose the light bubbly quality that makes this drink so refreshing.

    Can I use decaf tea bags for this recipe?

    Absolutely! Regular or decaf black tea bags both work perfectly in this recipe. The tea is what gives this mocktail its classic amber color and slightly bitter base that balances the sweetness and tang of the other ingredients. If you are serving this mocktail in the evening or to anyone who is sensitive to caffeine, decaf black tea bags are a great option and the flavor will be nearly identical

    What does apple cider vinegar do in this mocktail?

    The apple cider vinegar is the secret ingredient that gives this Long Island Iced Tea mocktail its signature tangy complexity. In the original Long Island Iced Tea that tangy bite comes from the combination of multiple spirits. In this non alcoholic version the apple cider vinegar replicates that bold tangy flavor without any alcohol. It sounds unusual but you would never guess it was there. It simply makes the drink taste more complex and layered.

    Why do you add baking soda to iced tea?

    Adding a small amount of baking soda to the brewed tea neutralizes the tannins that cause bitterness and cloudiness. The result is a smoother, less bitter tea with a beautiful clear amber color that looks just like a classic Long Island Iced Tea. You only need a tiny amount so the baking soda does not affect the flavor of the drink at all.

    Can I use a different type of tea for this recipe?

    Black tea is strongly recommended for this recipe because it gives the mocktail its classic deep amber color and bold flavor that holds up against the apple cider vinegar and ginger beer. Green tea or herbal teas would produce a very different color and flavor profile and would not give you the same Long Island Iced Tea look and taste. If you want to experiment, a strong black and green tea blend could work but classic black tea is always the best choice for this recipe.

    Can I make this mocktail without ginger beer?

    Ginger beer is what gives this mocktail its fizzy kick and a subtle spicy warmth that makes it taste more complex and interesting. If you cannot find ginger beer you could substitute sparkling water or club soda for the carbonation, but keep in mind that the flavor will be noticeably milder without the ginger. Ginger ale is a closer substitute than plain sparkling water if ginger beer is not available and will give you a similar but slightly sweeter result.

    Air Fryer Grilled Vegetable Orzo Salad

    This easy cold air fryer grilled vegetable orzo salad is the perfect summer side dish! It's a healthy pasta salad loaded with veggies and a simple Italian dressing. I like to make this salad a day ahead to serve at barbecues and with meals.

    a bowl of air fryer grilled vegetable orzo salad next to a bottle of olive oil and a small bowl of coarse sea salt.

    If you are looking for more pasta salads try my Gluten Free Pesto Pasta Salad, my Gluten Free BLT Pasta Salad, my Easy Gluten Free Macaroni Salad or my Gluten Free Green Goddess Pasta Salad.

    You can find all my salad recipes here: Gluten Free Salad Recipes

    a bowl of air fryer grilled vegetable orzo salad next to a bottle of olive oil.
    [feast_advanced_jump_to]

    Ingredients

    • Gluten Free Orzo Pasta
    • Grape Tomatoes
    • Minced Garlic
    • Red Onion
    • Red Bell Pepper
    • Yellow Bell Pepper
    • Zucchini
    • Olive Oil
    • Sea Salt
    • Coarse Ground Black Pepper
    • Dried Basil
    • Italian Seasoning
    • Apple Cider Vinegar

    Instructions

    In a large pot cook the gluten free orzo pasta per the package instructions. Drain and rinse with cold water.

    In a large mixing bowl add the tomatoes, garlic, onion, bell peppers, zucchini, olive oil, salt, pepper, basil and Italian seasoning. Stir to combine.

    Pour the vegetable mixture into the basket of your air fryer and cook at 360 degrees for 5 minutes. Carefully drain the excess liquid from the air fryer basket.

    Pour the cooked orzo, vegetable mixture, apple cider vinegar and olive oil into a serving bowl. Stir to combine.

    Refrigerate for at least one hour before serving.

    Supplies

    Frequently Asked Questions

    How do you make orzo salad?

    For this gluten free grilled vegetable orzo salad I used Jovial Grain Free Cassava Orzo Pasta. I cooked the pasta per the pasta instructions being sure not to overcook it. Then, I cut up the veggies and coated them with the olive oil mixture.

    I places the chopped veggies into my air fryer basket and cooked at 360 degrees for 5 minutes. Next, I combined the veggies, pasta, apple cider vinegar and olive oil in a serving bowl. Refrigerate for at least one hour and serve cold.

    Should orzo be rinsed after cooking?

    Yes, after you have cooked the gluten free orzo per the package instructions be sure to rinse the pasta in cold water. Removing the extra starch will help the pasta not to clump together. If the pasta starts to clump before you get it mixed into the salad rinse it with cold water again and let drain.

    More Recipes You Might Enjoy

    Oven Baked Steak and Potato Kabobs
    Air Fryer Grilled Peaches
    Seven Layer Salad
    Oven Baked Marinated Steak Kabobs
    Classic Margarita Mocktail

    I get a lot of my ingredients from Thrive Market. Thrive Market has been a game changer for me eating gluten free. They have so many options I can't get at my rural grocery stores! Use this link to get 40% off your first order!

    Print
    clock clock iconcutlery cutlery iconflag flag iconfolder folder iconinstagram instagram iconpinterest pinterest iconfacebook facebook iconprint print iconsquares squares iconheart heart iconheart solid heart solid icon

    Air Fryer Grilled Vegetable Orzo Salad


    5 Stars 4 Stars 3 Stars 2 Stars 1 Star

    No reviews

    • Author: Elaine VanVleck
    • Total Time: 25 minutes
    • Yield: 6 servings 1x
    • Diet: Gluten Free
    Print Recipe
    Pin Recipe

    Description

    This easy cold air fryer grilled vegetable orzo salad is the perfect summer side dish! It's a healthy pasta salad loaded with veggies and a simple Italian dressing. I like to make this salad a day ahead to serve at barbecues and with meals.


    Ingredients

    Scale
    • 8 ounces Jovial Gluten Free Orzo Pasta
    • 10 ounces Grape Tomatoes, cut in half
    • 1 Tbsp Minced Garlic
    • 1 small Red Onion, chopped
    • 1 Red Bell Pepper, seeded and chopped
    • 1 Yellow Bell Pepper, seeded and chopped
    • 2 cups Zucchini, seeded and chopped
    • 1 Tbsp Olive Oil
    • 1 tsp Sea Salt
    • ¼ tsp Coarse Ground Black Pepper
    • 1 tsp Dried Basil
    • 1 tsp Italian Seasoning
    • 1 Tbsp Apple Cider Vinegar
    • 3 Tbsp Olive Oil

    Instructions

    In a large pot cook the gluten free orzo pasta per the package instructions. Drain and rinse with cold water.

    In a large mixing bowl add the tomatoes, garlic, onion, bell peppers, zucchini, olive oil, salt, pepper, basil and Italian seasoning. Stir to combine.

    Pour the vegetable mixture into the basket of your air fryer and cook at 360 degrees for 5 minutes. Carefully drain the excess liquid from the air fryer basket.

    Pour the cooked orzo, vegetable mixture, apple cider vinegar and olive oil into a serving bowl. Stir to combine.

    Refrigerate for at least one hour before serving.

    • Prep Time: 20 minutes
    • Cook Time: 5 minutes
    • Category: Side Dish, Salads
    • Method: Stove Top
    • Cuisine: Gluten Free

    Did you make this recipe?

    Tag @smallfarmbiglife on Instagram and hashtag it #smallfarmbiglife

    Oven Baked Steak and Potato Kabobs

    This easy recipe for oven baked steak and potato kabobs makes a quick meal! The skewers are stacked with beef steak, onions and baby red potatoes. Each kabob is brushed with a rosemary oil mixture that gives them lots of flavor.

    a cream and gold platter of oven baked steak and potato kabobs next to a small bowl of flaky sea salt.

    Sometimes (especially during the winter months) I don't want to start our grill. This recipe made in the oven is perfect for those times. It's an easy meal or great for serving at parties for a hearty snack. I love that these can be baking without having to be watched while I enjoy time with family and friends.

    If you are looking for other easy recipes you might also enjoy my Slow Cooker Steak and Mushrooms, my Oven Baked Marinated Steak Kabobs, my Air Fryer Garlic Steak Bites or my Gluten Free Salisbury Steak with Mushroom Gravy.

    You can find all of my meal recipes here: Gluten Free Meal Recipes

    a wooden skewer of oven baked steak and potato kabobs.
    [feast_advanced_jump_to]

    Ingredients

    • Baby Dutch Potatoes
    • Sirloin Steak
    • Red Onion
    • Sweet Onion
    • Montreal Steak Seasoning
    • Olive Oil
    • Minced Garlic
    • Sea Salt
    • Coarse Ground Black Pepper
    • Dried Crushed Rosemary

    Instructions

    Soak the wooden skewers in water for 30 minutes.

    In a large pot boil the potatoes for 3-5 minutes until they're tender. Drain and set them aside to cool.

    Cut the steak into one inch cubes and season with the Montreal steal seasoning. Cut the onions into one inch cubes and set aside.

    In a small bowl whisk together the olive oil, minced garlic, salt, pepper and rosemary. 

    Thread the potatoes, steak and onions onto the skewers. This should make 8 full skewers.

    Place the kabobs on a baking sheet. Brush or drizzle the olive oil mixture over them.

    Bake at 350 degrees for 30 minutes. Turn the kabobs every 10 minutes so they cook evenly.

    Supplies

    Storage

    After the kabobs have completely cooled I liked to take everything off the skewers and store it all together in an air tight container in the refrigerator for up to 5 days.

    More Recipes You Might Enjoy

    • Oven Baked Marinated Steak Kabobs
    • Slow Cooker Steak and Mushrooms
    • Air Fryer Garlic Steak Bites
    • Gluten Free Salisbury Steak with Mushroom Gravy

    I get a lot of my ingredients from Thrive Market. Thrive Market has been a game changer for me eating gluten free. They have so many options I can't get at my rural grocery stores! Use this link to get 40% off your first order!

    Print
    clock clock iconcutlery cutlery iconflag flag iconfolder folder iconinstagram instagram iconpinterest pinterest iconfacebook facebook iconprint print iconsquares squares iconheart heart iconheart solid heart solid icon

    Oven Baked Steak and Potato Kabobs


    5 Stars 4 Stars 3 Stars 2 Stars 1 Star

    No reviews

    • Author: Elaine VanVleck
    • Total Time: 1 hour
    • Yield: 8 skewers 1x
    • Diet: Gluten Free
    Print Recipe
    Pin Recipe

    Description

    This easy recipe for oven baked steak and potato kabobs makes a quick meal! The skewers are stacked with beef steak, onions and baby red potatoes. Each kabob is brushed with a rosemary oil mixture that gives them lots of flavor.


    Ingredients

    Scale
    • 1 pound Baby Dutch Potatoes, cooked
    • 1 ½ pounds Sirloin Steak, cut into 1-inch cubes
    • 1 large Red Onion, cut into 1-inch cubes
    • 1 large Sweet Onion, cut into 1-inch cubes
    • 1 Tbsp Montreal Steak Seasoning
    • 2 Tbsp Olive Oil
    • 1 Tbsp Minced Garlic
    • 1 tsp Sea Salt
    • ½ tsp Coarse Ground Black Pepper
    • 1 tsp Dried Crushed Rosemary

    Instructions

    Soak the wooden skewers in water for 30 minutes.

    In a large pot boil the potatoes for 3-5 minutes until they're tender. Drain and set them aside to cool.

    Cut the steak into one inch cubes and season with the Montreal steal seasoning. Cut the onions into one inch cubes and set aside.

    In a small bowl whisk together the olive oil, minced garlic, salt, pepper and rosemary. 

    Thread the potatoes, steak and onions onto the skewers. This should make 8 full skewers.

    Place the kabobs on a baking sheet. Brush or drizzle the olive oil mixture over them.

    Bake at 350 degrees for 30 minutes. Turn the kabobs every 10 minutes so they cook evenly.

    • Prep Time: 30 minutes
    • Cook Time: 30 minutes
    • Category: Meals, Appetizers
    • Method: Baking
    • Cuisine: Gluten Free

    Did you make this recipe?

    Tag @smallfarmbiglife on Instagram and hashtag it #smallfarmbiglife

    Top Tip

    Taking the kabobs off the skewers makes the easier to reheat. To reheat place a serving on your plate, cover with a damp paper towel and then heat in the microwave in 30 second intervals until hot. Enjoy!

    Didn't find the answer you're looking for?

    Ask AI to answer based on this recipe:

    ChatGPT
    Google AI
    Perplexity
    Grok
    Claude

    Frequently Asked Questions

    Can steak kabobs be cooked in the oven?

    Yes! Baking kabobs in the oven is one of my favorite ways to prepare them. It's simple and quick to have a meal or appetizers without turning on your grill. I bake the skewers at 350 degrees for 30 minutes turning them every 10 minutes.

    How do I cook kabobs in the oven?

    You will need to soak wooden skewers for 30 minutes in water. Boil the potatoes in a pot of water for 3-5 minutes until a fork goes through them. Drain them and let them cool.

    While the skewers are soaking cut the steak and veggies into cubes. Season the steak with Montreal steak seasoning and let stand. In a small bowl make the oil mixture to brush or drizzle over the kabobs before they go into the oven. Thread the steak, potatoes and onion onto the skewers placing them on all on a baking sheet.

    Brush the oil mixture onto the kabobs. Bake at 350 degrees for 30 minutes. Turn the kabobs every 10 minutes so they cook evenly. Serve warm as a meal or appetizers.

    • « Previous Page
    • 1
    • …
    • 41
    • 42
    • 43
    • 44
    • 45
    • …
    • 98
    • Next Page »

    Welcome! I'm Elaine

    I'm so glad you are here! I share easy gluten free recipes from my small farm in Washington.

    Be sure to sign up for my newsletter to stay up to date on all of my new recipes.

    More about me...
    • Instagram
    • Pinterest
    • Facebook
    • Twitter
    • Mail

    Load up on new recipes, exclusive goodies, + more!
    Sign up below to stay up-to-date on news, events, and special deals.
    Thank you for subscribing!

    Easy Meals Recipes

    • Gluten Free Instant Pot Chili Mac and Cheese
    • Gluten Free Taco Casserole
    • Gluten Free Cowboy Baked Beans
    • Gluten Free Walking Taco Casserole
    • Gluten Free Creamy Beef and Mushroom Pasta
    • Gluten Free Instant Pot Chicken & Dumplings
    • Instant Pot Mexican Style Beef and Rice
    • Gluten Free Chicken Parmesan Pasta Casserole
    • Gluten Free One Pot Hamburger Helper Copycat
    • Gluten Free Salisbury Steak with Mushroom Gravy
    • Gluten Free Air Fryer Fajitas
    • Gluten Free Sloppy Joe Casserole

    Footer

    back to top

    About

    • Privacy Policy
    • Shop my Amazon Page
    • Follow me on LTK

    Newsletter

    • Sign Up! for emails and updates

    Contact

    • Contact
    • Media Kit
    • About Me

    As an Amazon Associate I earn from qualifying purchases.

    I may get commissions for purchases made through links on this site.

    Copyright © 2026 Brunch Pro on the Brunch Pro Theme