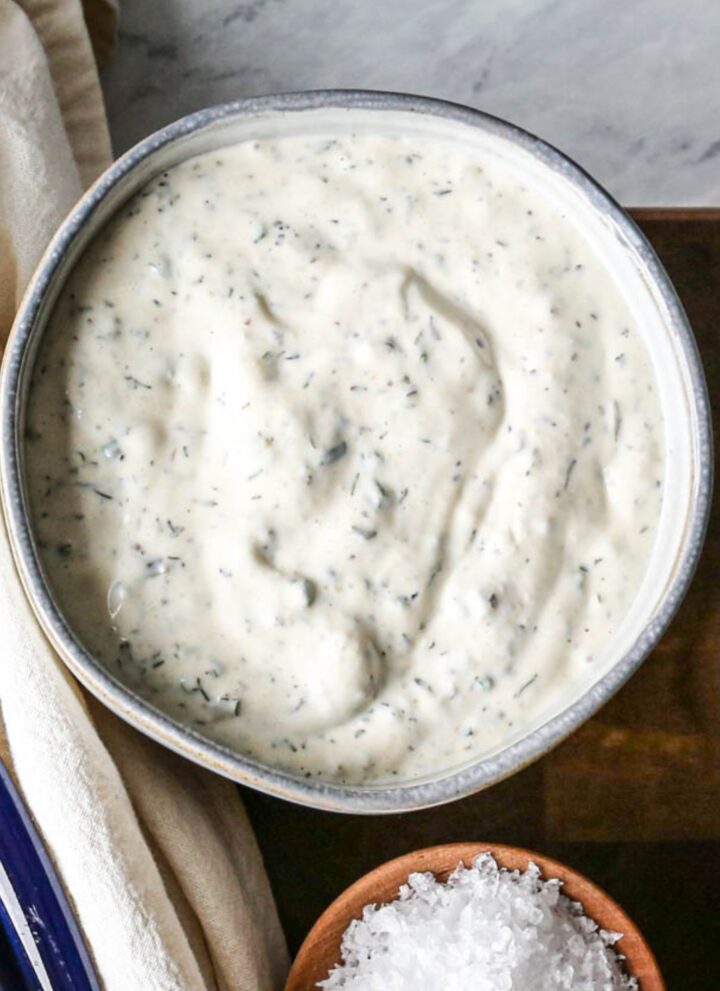
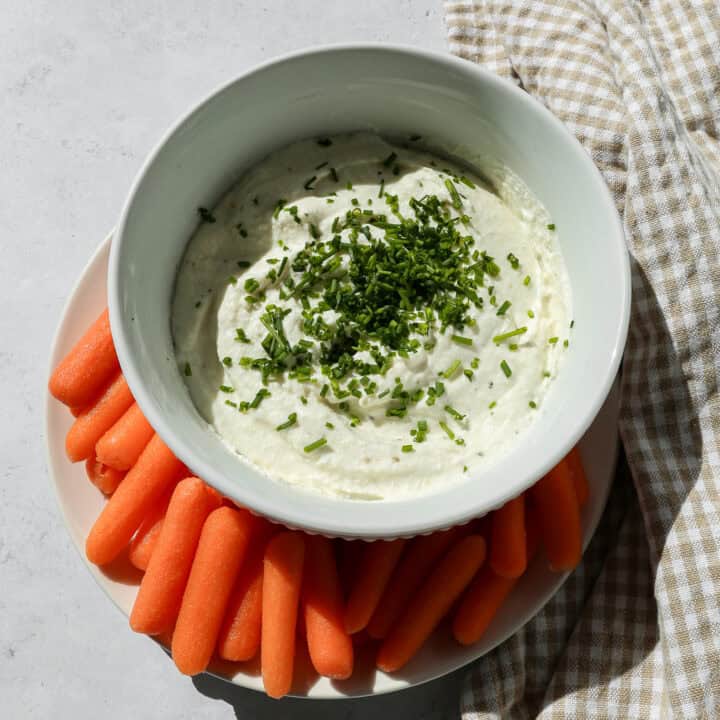
• Skip to primary navigation
  • Skip to main content
  • Skip to primary sidebar
  • Skip to footer
Small Farm Big Life logo
  • Recipe Index
  • Subscribe
  • Resources
  • Home Decor
  • Nav Social Menu

    • Email
    • Facebook
    • Instagram
    • Pinterest
menu icon
go to homepage
subscribe
search icon
Homepage link
  • Home
  • Recipe Index
  • Subscribe
  • My Story
  • Resources
  • Free Guides
  • Home Decor
    • Email
    • Facebook
    • Instagram
    • Pinterest
  • ×

    Gluten Free Lemon Shortbread Bars

    a baking dish of gluten free lemon shortbread bars

    These easy gluten free lemon shortbread bars use tart lemon curd and a buttery shortbread crust. They are a simple take on classic lemon bars. These homemade bars use common ingredients and make a rich treat!

    The crust is a crumbly layer of shortbread that uses five ingredients you likely have on hand. The top layer is my gluten free lemon curd recipe. I bake the shortbread crust and then after it has cooled spread the lemon curd over top and refrigerate.

    I like to make a double batch of the lemon curd and then use part of it for a cake or pancake topping and then save the remaining for this gluten free lemon shortbread recipe. I store the lemon curd in the refrigerator for a week until I need it for this recipe.

    a 9x13 baking dish of gluten free lemon shortbread bars

    Do I need to refrigerate lemon bars?

    Yes. If you don't refrigerate these bars the lemon won't hold together as nicely. I also like the texture and flavor a lot more when the bars are cold.

    What should lemon bars look like when done?

    For these bars you will just bake the shortbread crust. It will have a light brown color. Be sure not to take it out of the oven while it's still very pale. This will cause it to become mushy and it won't have the texture of shortbread. You want a nice light golden brown color.

    Do lemon bars rise?

    No. The gluten free shortbread crust might become a bit puffy but it won't rise. When you take it out of the oven if it has become puffy at all it will flatten as it cools.

    If you like this recipe you might also enjoy:

    Gluten Free Lemon Bars
    Gluten Free Lemon Bundt Cake with Lemon Glaze
    Lemon Lime Homemade Gatorade
    Healthy Lemon Ginger Tea
    Easy Pea Salad

    I get my ingredients from Thrive Market. Thrive Market has been a game changer for me eating gluten free. They have so many options I can't get at my rural grocery stores! Use this link to get 25% off your first order!

    Print
    clock clock iconcutlery cutlery iconflag flag iconfolder folder iconinstagram instagram iconpinterest pinterest iconfacebook facebook iconprint print iconsquares squares iconheart heart iconheart solid heart solid icon

    Gluten Free Lemon Shortbread Bars


    5 Stars 4 Stars 3 Stars 2 Stars 1 Star

    No reviews

    • Author: Elaine VanVleck
    • Total Time: 30 minutes
    • Yield: 12 bars 1x
    • Diet: Gluten Free
    Print Recipe
    Pin Recipe

    Description

    These easy gluten free lemon shortbread bars use tart lemon curd and a buttery shortbread crust. They are a simple take on classic lemon bars. These homemade bars use common ingredients and make a rich treat! 


    Ingredients

    Units Scale

    1 cup Unsalted Butter, at room temperature
    ⅓ cup Confectioners' Sugar
    2 cups Gluten Free Flour
    ½ tsp. Baking Powder
    ¼ tsp. Sea Salt


    Instructions

    Preheat your oven to 350 degrees.

    Grease a 9x13 baking dish with butter or coconut oil. Set aside.

    In the bowl of your stand mixer cream together the butter and confectioners' sugar. Add the flour, baking powder and salt. Mix just until the ingredients are combined. Don't over mix your ingredients!

    Pour the dough into your 9x13 baking dish and press into an even layer on the bottom of the pan. Use a fork to pierce the dough lightly all over. You don't need to pierce all the way through.

    Bake at 350 degrees for 20 to 25 minutes until the shortbread is golden brown.

    Let the crust cool completely before you top it with the Gluten Free Lemon Curd.

    Notes

    You could sprinkle confectioners' sugar over the bars, but I think the crust is sweet enough and I like to keep the lemon curd tart.

    • Prep Time: 10 minutes
    • Cook Time: 20 minutes
    • Category: Dessert
    • Method: Baking
    • Cuisine: Gluten Free

    Did you make this recipe?

    Tag @smallfarmbiglife on Instagram and hashtag it #smallfarmbiglife

    Lemon Lime Homemade Sports Drink

    This DIY recipe for lemon lime homemade sports drink is a healthy way to replenish electrolytes. This drink is made with natural ingredients and no added sugar. In this recipe I tell you how to make a sugar free sports drink with coconut water.

    a ball canning jar with lemon lime homemade sports drink with ice cubes and lemon and lime slices

    I haven't found a sports drink in the store that doesn't have dyes or ingredients I don't consume. So, I decided to make my own. It's really easy! In this version I use lemon lime, but you could use any juice you have at home.

    It's so key for our bodies to drink more than just water. We need to replace the electrolytes we use up sweating during exercise or while we are sick. I blend this drink up in my blender and serve it over ice. If I have some leftover I store it in the refrigerator in a sealed jar.

    If you are looking for more refreshing drink recipes try my Iced Chai Tea Latte Concentrate, my Homemade Blueberry Lemonade made with Frozen Blueberries, my Pina Colada Mocktail or my Homemade Raspberry Lemonade.

    You can find all of my drink recipes here: Gluten Free Drink Recipes

    Two glasses of lemon lime homemade sports drink with ice and lemon wedges on top sitting next to a small bowl of pink salt

    This Lemon Lime Homemade Sports Drink is a refreshing and healthy alternative to store-bought options, offering natural hydration and replenishment through real, whole ingredients.

    Perfect for hot summer days or post-workout recovery, this DIY sports drink combines the crisp tang of citrus with natural electrolytes to help you stay energized and hydrated.

    Whether you're looking for a homemade Gatorade substitute or a simple refreshing drink to beat the heat, this recipe delivers both taste and function.

    [feast_advanced_jump_to]

    Ingredients

    • Water
    • Coconut Water
    • Orange Juice
    • Lemon Juice
    • Lime Juice
    • Honey
    • Pink Himalayan Salt

    Instructions

    In your blender add the waters, juices, honey and salt. Pulse until all the ingredients are combined.

    Serve over ice.

    Supplies

    Storage

    Store in an air tight jar in the refrigerator for up to two weeks.

    Frequently Asked Questions

    How do I make my own gatorade?

    It's so easy and you can control the ingredients! I like to start with a coconut water and regular water base. Then add in juices. In this recipe I use orange, lemon and lime juices. You could change that up to use what you have on hand. Then I use honey to sweeten slightly and some sea salt.

    If you have been used to drinking regular gatorade this recipe may not have enough honey for you. You may want to start with a little more honey and then lessen that a little each time you make this recipe until your taste buds get used to drinking something a little less sweet.

    How long will homemade sports drink last?

    If you have leftover lemon lime homemade sports drink you will want to store it in your refrigerator. It will last in your refrigerator for up to two weeks. This recipe doesn't make a large batch, so you shouldn't have any trouble using it up in that time frame.

    More Recipes You Might Enjoy

    • Homemade Blueberry Lemonade made with Frozen Blueberries
    • Long Island Iced Tea Mocktails
    • Strawberry Daiquiri Mocktails
    • Cantaloupe Agua Fresca

    I get a lot of my ingredients from Thrive Market. Thrive Market has been a game changer for me eating gluten free. They have so many options I can't get at my rural grocery stores! Use this link to get 40% off your first order!

    Print
    clock clock iconcutlery cutlery iconflag flag iconfolder folder iconinstagram instagram iconpinterest pinterest iconfacebook facebook iconprint print iconsquares squares iconheart heart iconheart solid heart solid icon

    Lemon Lime Homemade Sports Drink


    5 Stars 4 Stars 3 Stars 2 Stars 1 Star

    No reviews

    • Author: Elaine VanVleck
    • Total Time: 10 minutes
    • Yield: 5 cups 1x
    Print Recipe
    Pin Recipe

    Description

    This DIY recipe for lemon lime homemade sports drink is a healthy way to replenish electrolytes. This drink is made with natural ingredients and no added sugar. In this recipe I tell you how to make a sugar free sports drink with coconut water.


    Ingredients

    Scale
    • 3 cups Water
    • 1 cup Coconut Water
    • ½ cup Orange Juice
    • ¼ cup Lemon Juice
    • ¼ cup Lime Juice
    • 3 Tbsp. Honey
    • ½ tsp. Pink Himalayan Salt

    Instructions

    In your blender add the waters, juices, honey and salt. Pulse until all the ingredients are combined.

    Serve over ice.

    If you have any leftover store it in the refrigerator in a sealed container.

    Notes

    You can also add this recipe to a pitcher and stir. I think the honey and salt mix in better in the blender though.

    • Prep Time: 10 minutes
    • Category: Drink
    • Method: Blended
    • Cuisine: Gluten Free

    Did you make this recipe?

    Tag @smallfarmbiglife on Instagram and hashtag it #smallfarmbiglife

    Top Tip

    Shake the bottle to stir before serving to make sure all of the ingredients are mixed together.

    Easy Pea Salad

    This recipe for easy pea salad is made with bacon and green peas. This cold and creamy old fashioned salad is perfect for Spring! My classic recipe is made with sour cream and vinegar dressing.

    a bowl of easy pea salad with shredded cheddar cheese sprinkled on top next to a little wooden bowl of pepper and a little ceramic bowl of salt

    Easy Pea Salad is a classic, creamy salad that's perfect for any occasion, from casual dinners to holiday gatherings. This simple pea salad combines green peas with bacon, cheese, and a tangy dressing for a satisfying, cold vegetable salad that everyone will love.

    It's a versatile, easy vegetable salad that can be customized to your tastes, whether you prefer a classic southern pea salad or want to add extra veggies.

    The creamy peas and savory bacon make this pea salad a hit as a refreshing, gluten-free side dish that complements any meal.

    If you are looking for more easy salads you might also enjoy my Seven Layer Salad, my Thai Style Cabbage Salad, my Sugar Free Broccoli Salad or my Gluten Free Green Goddess Pasta Salad.

    You can find all of my salad recipes here: Gluten Free Salad Recipes

    a bowl of easy pea salad with shredded cheddar cheese sprinkled on top next to a little wooden bowl of pepper and a little ceramic bowl of salt
    [feast_advanced_jump_to]

    Ingredients

    • Frozen Peas
    • Bacon
    • White Onion
    • Cheddar Cheese
    • Mayonnaise
    • Sour Cream
    • Sea Salt
    • Coarse Ground Black Pepper
    • White Vinegar

    Instructions

    Pour your frozen peas into a bowl and place in the refrigerator the night before to thaw. If you don't have time for that you can thaw them in the microwave using the defrost setting.

    Cook the bacon. I like to place my bacon on a baking sheet and bake at 400 degrees for 30-35 minutes until it is crispy. Once the bacon is cooled crumble it into pieces.

    Once the peas are thawed and the bacon is cooled mix the ingredients together in a bowl.

    Mix together the peas, bacon, onion, cheese, mayonnaise, sour cream, salt, pepper and vinegar until all the ingredients are blended completely.

    Store the salad in and air tight container in the refrigerator until you are ready to serve it.

    Supplies

    Frequently Asked Questions

    What kind of peas are used in this salad?

    I use frozen green peas in this salad. I purchase a 32 ounce bag and let them thaw before putting together the salad. If you try to put the salad together while the peas are still frozen it is much harder to stir in the dressing and mix the ingredients together.

    Save yourself the headache of a clumped salad and thaw your peas first!

    Do I need to cook the frozen peas for this salad?

    No. You thaw the peas and put them directly into the salad. There is no need to cook them for this salad.

    How long does pea salad last in the refrigerator?

    This easy pea salad can be made a day ahead and will last in your refrigerator for up to three days. We don't usually have salad left for that long though. It is delicious and gets eaten pretty quickly around here.

    Does the bacon in this pea salad need to be gluten free and nitrite free?

    Yes to both if you can find it! All of the ingredients in this easy pea salad are naturally gluten free, but you do want to make sure the bacon you purchase is certified gluten free since some bacon is processed in facilities that also handle gluten containing products.

    I also personally prefer bacon that is nitrite and nitrate free. I have found that nitrites and nitrates cause an inflammatory reaction for me that is very similar to a gluten reaction, so it is something worth paying attention to when you are shopping. Look for bacon that is labeled both gluten free and uncured without added nitrites or nitrates for the best result in this recipe.

    More Recipes You Might Enjoy

    • Seven Layer Salad
    • Cranberry Fluff Salad
    • Sugar Free Broccoli Salad
    • Gluten Free Coleslaw

    I get a lot of my ingredients from Thrive Market. Thrive Market has been a game changer for me eating gluten free. They have so many options I can't get at my rural grocery stores! Use this link to get 40% off your first order!

    Print
    clock clock iconcutlery cutlery iconflag flag iconfolder folder iconinstagram instagram iconpinterest pinterest iconfacebook facebook iconprint print iconsquares squares iconheart heart iconheart solid heart solid icon

    Easy Pea Salad


    5 Stars 4 Stars 3 Stars 2 Stars 1 Star

    No reviews

    • Author: Elaine VanVleck
    • Total Time: 45 minutes
    • Yield: 9 servings 1x
    • Diet: Gluten Free
    Print Recipe
    Pin Recipe

    Description

    This easy pea salad is a cold and creamy classic that is perfect for spring potlucks, Easter, cookouts, and holiday gatherings. Sweet green peas are tossed with crispy bacon, shredded cheddar cheese, white onion, and a simple tangy dressing made with mayonnaise, sour cream, and white vinegar for a gluten free side dish everyone will love. Best of all it can be made a day ahead making it the ultimate stress-free make ahead salad for any occasion!


    Ingredients

    Scale
    • 1 - 32 ounce bag Frozen Peas, thawed
    • 1 pound Bacon, cooked and crumbled
    • 1 small White Onion, finely chopped
    • 1 cup Cheddar Cheese, shredded
    • ½ cup Mayonnaise
    • ½ cup Sour Cream
    • ½ tsp. Sea Salt
    • ½ tsp. Coarse Ground Black Pepper
    • 2 tsp. White Vinegar

    Instructions

    Pour your frozen peas into a bowl and place in the refrigerator the night before to thaw. If you don't have time for that you can thaw them in the microwave using the defrost setting.

    Cook the bacon. I like to place my bacon on a baking sheet and bake at 400 degrees for 30-35 minutes until it is crispy. Once the bacon is cooled crumble it into pieces.

    Once the peas are thawed and the bacon is cooled mix the ingredients together in a bowl.

    Mix together the peas, bacon, onion, cheese, mayonnaise, sour cream, salt, pepper and vinegar until all the ingredients are blended completely.

    Store the salad in and air tight container in the refrigerator until you are ready to serve it.

    Notes

    I like to make this salad the day before so it's cold and ready to serve in the refrigerator.

    • Prep Time: 15 minutes
    • Cook Time: 30 minutes
    • Category: Salad
    • Method: Mixed
    • Cuisine: American

    Did you make this recipe?

    Tag @smallfarmbiglife on Instagram and hashtag it #smallfarmbiglife

    Storage

    Store leftover pea salad in an airtight container in the refrigerator for up to three days. Keep in mind that the longer the salad sits the more the dressing will absorb into the peas and other ingredients, so the salad may be a little thicker on day two or three. If you want to freshen it up you can stir in a small spoonful of sour cream or mayonnaise before serving. Do not freeze this salad as the creamy dressing does not hold up well to freezing and the peas will become mushy when thawed.

    Top Tip

    This recipe is a staple for spring in our house. It is perfect for a gathering and Easter. I like to make this salad the day before I need it so it's ready to go. I love having one less step to do the day of an event!

    Gluten Free Apple Carrot Muffins

    These Gluten Free Apple Carrot Muffins are an easy, cozy bake that's perfect for busy mornings and snack time. Inspired by classic morning glory muffins, this apple carrot muffins recipe combines apple and carrot for a soft, comforting texture that's naturally kid approved.

    They're quick and easy to make, making them ideal as a grab and go breakfast or afternoon snack.

    a cream plate with three gluten free apple carrot muffins with glaze drizzled over them

    Lightly sweet and satisfying, these homemade apple carrot muffins feel wholesome without sacrificing flavor. They work beautifully as breakfast muffins, lunchbox treats, or a simple vegetable breakfast muffin option.

    If you're looking for healthy gluten free apple carrot muffins that are easy to bake and loved by the whole family, this recipe fits the bill perfectly.

    If you're looking for more muffin recipes try my Gluten Free Banana Bread Muffins, my Gluten Free Zucchini Muffins, my Gluten Free Blueberry Oat Muffins or my Gluten Free Banana Oat Muffins.

    You can find all my breakfast recipes here: Gluten Free Breakfast Recipes

    a metal cooling rack of gluten free apple carrot muffins with glaze drizzled over top of them
    [feast_advanced_jump_to]

    Ingredients

    • Brown Sugar
    • Eggs
    • Unsalted Butter
    • Buttermilk
    • Vanilla Extract
    • Apples
    • Carrots
    • Dried Shredded Coconut
    • Gluten Free Flour
    • Ground Cinnamon
    • Baking Powder
    • Baking Soda
    • Sea Salt

    Instructions

    Preheat your oven to 350 degrees.

    Line a 12 muffin pan with liners and set aside.

    In the bowl of your stand mixer combined the brown sugar and egg until blended. Then slowly pour in the melted butter while blending. Next pour in the buttermilk and vanilla. Blend to combine.

    Add the finely chopped apple, shredded carrots and shredded coconut. Blend until just combined.

    Add the gluten free flour, cinnamon, baking powder, baking soda and salt. Blend until just combined. Do not over blend! You want your batter to be light and fluffy.

    Divide the batter between the cups of 12 muffin pan.

    Bake at 350 degrees for 20 minutes or until the muffins are golden brown.

    Supplies

    More Recipes You Might Enjoy

    • Gluten Free Banana Bread Muffins
    • Gluten Free Chocolate Zucchini Muffins
    • Gluten Free Blueberry Oat Muffins
    • Gluten Free Chocolate Chip Banana Muffins

    I get a lot of my ingredients from Thrive Market. Thrive Market has been a game changer for me eating gluten free. They have so many options I can't get at my rural grocery stores! Use this link to get 40% off your first order!

    Print
    clock clock iconcutlery cutlery iconflag flag iconfolder folder iconinstagram instagram iconpinterest pinterest iconfacebook facebook iconprint print iconsquares squares iconheart heart iconheart solid heart solid icon

    Gluten Free Apple Carrot Muffins


    5 Stars 4 Stars 3 Stars 2 Stars 1 Star

    No reviews

    • Author: Elaine VanVleck
    • Total Time: 40 minutes
    • Yield: 12 muffins 1x
    Print Recipe
    Pin Recipe

    Description

    These easy and healthy gluten free apple carrot muffins are moist and make a great breakfast. This recipe is the best for quick and simple muffins. They are very similar to morning glory muffins.


    Ingredients

    Scale
    • 1 cup Brown Sugar
    • 2 large Eggs
    • ½ cup Unsalted Butter, melted
    • ¾ cup Buttermilk
    • 2 tsp. Vanilla Extract
    • 1 cup Apple, peeled, cored and finely chopped
    • ⅔ cup Carrot, shredded
    • ⅓ cup Dried Shredded Coconut
    • 2 cups Gluten Free Flour
    • 1 ½ tsp. Ground Cinnamon
    • 3 tsp. Baking Powder
    • 1 ½ tsp. Baking Soda
    • 1 tsp. Sea Salt

    Instructions

    Preheat your oven to 350 degrees.

    Line a 12 muffin pan with liners and set aside.

    In the bowl of your stand mixer combined the brown sugar and egg until blended. Then slowly pour in the melted butter while blending. Next pour in the buttermilk and vanilla. Blend to combine.

    Add the finely chopped apple, shredded carrots and shredded coconut. Blend until just combined.

    Add the gluten free flour, cinnamon, baking powder, baking soda and salt. Blend until just combined. Do not over blend! You want your batter to be light and fluffy.

    Divide the batter between the cups of 12 muffin pan.

    Bake at 350 degrees for 20 minutes or until the muffins are golden brown.

    Notes

    If you want to drizzle frosting over the muffins mix 1 cup of powdered sugar with 1 tablespoon milk. Stir together until smooth and drizzle over each muffin.

    • Prep Time: 20 minutes
    • Cook Time: 20 minutes
    • Category: Breakfast
    • Method: Baking
    • Cuisine: Gluten Free

    Did you make this recipe?

    Tag @smallfarmbiglife on Instagram and hashtag it #smallfarmbiglife

    Frequently Asked Questions

    How do you get gluten free muffins to rise?

    Your gluten free flour plays big role in whether or not your muffins rise. Since there isn't gluten it helps if there is xanthan gum to make up in texture for being gluten free.

    You should also be using baking powder. A muffin recipe without baking powder is not going to rise very well. Some people may not mind, but I like a fluffy muffin with lots of the delicious top to drizzle frosting over.

    How do I store gluten free muffins?

    Since these homemade muffins don't have preservatives in them they won't last out on the counter very long. You can leave them in a sealed container for a couple of days on the counter, but then I highly suggest moving them to the fridge so they don't ruin.

    How do you make gluten free muffins moist?

    Your gluten free muffins being moist comes down to your wet ingredients. You need to have enough oils or eggs so they aren't dry. In this recipe I also added buttermilk so these muffins are super moist and fluffy.

    If you are making gluten free muffins that aren't moist trying adding a bit more butter, buttermilk, or applesauce. There is a fine line though! If you add too much you will lose the fluffiness of the muffins.

    Gluten Free Taco Casserole

    This easy recipe for gluten free taco casserole is layered with tortillas and ground beef. After assembling your layers you bake this healthy casserole. It is a cheesy dinner and a great use for hamburger!

    a glass 9x13 baking dish of gluten free taco casserole next to a bowl of sour cream and a bowl of salsa

    Gluten-free taco casserole is a delicious and easy-to-make dish that is perfect for a family dinner or potluck. This casserole combines layers of seasoned ground beef, gluten-free tortillas, and melted cheese, creating a hearty and flavorful meal.

    The recipe is a great option for those who need to avoid gluten but still crave the familiar tastes of a taco. It's baked to perfection, resulting in a crispy, cheesy top layer while keeping the inside moist and flavorful.

    This casserole is great to make and assemble ahead of time and then put in the oven to melt the cheese. You could also assemble and freeze this recipe for later. We like to eat this casserole with shredded lettuce, avocado slices, some lemon juice and salsa.

    If you are looking for more Mexican style recipes try my Healthy Mexican Street Corn Salad, Instant Pot Mexican Style Beef & Rice, Gluten Free Enchilada Skillet or my Easy Ground Beef Nacho Casserole.

    You can find all of my meal recipes here: Gluten Free Meals Recipes

    two white plates with servings of gluten free taco casserole
    [feast_advanced_jump_to]

    Ingredients

    • Ground Beef
    • Yellow Onion
    • Black Olives
    • Fire Roasted Tomatoes
    • Tomato Sauce
    • Chili Powder
    • Ground Cumin
    • Smoked Paprika
    • Sea Salt
    • Onion Powder
    • Garlic Powder
    • Dried Oregano
    • Ground Black Pepper
    • Gluten Free Corn Tortillas
    • Cheddar Cheese

    Instructions

    Preheat your oven to 400 degrees.

    In a frying pan cook the ground beef until there is just a little pink left. Add the chopped onions and cook until they are beginning to become translucent. Add the olives, roasted tomatoes, tomato sauce, chili powder, ground cumin, smoked paprika, salt, garlic powder, onion powder, oregano and black pepper. Cook until warmed through and simmering slightly.

    In a 9x13 baking dish spoon a layer of the beef mixture to cover the bottom of the pan. Add a layer of 6 corn tortillas. Then add another layer of the beef mixture. Top this layer with half the cheese and then add the remaining 6 corn tortillas. Finally top the casserole with the last of the beef mixture and the rest of the cheese.

    Bake at 400 degrees for 10 minutes. The cheese should be melted, but the casserole may not be bubbling.

    Serve hot with shredded lettuce, avocado slices, sour cream, lemon wedges or salsa.

    Supplies

    Frequently Asked Questions

    How long do I bake this gluten free taco casserole?

    This gluten free taco casserole bakes at 400 degrees for 10 minutes. You precook the ground beef and onions. Then you layer the beef mixture, corn tortillas and cheddar cheese into a 9x13 baking dish. You are baking the taco casserole just to melt the cheese.

    Is this taco bake good for meal prep?

    Yes! It is really simple to make the ground beef taco meat ahead of time and then store in an air tight container in the fridge. You can also use pre-shredded cheese so all you need to do for dinner is layer the ingredients into your baking dish and bake.

    Can you freeze this gluten free taco casserole?

    Yes! This gluten free taco casserole makes a fantastic freezer meal. I assemble the casserole per the instructions like I'm going to bake it. Then I seal it in a freezer container and freeze it for up to a month. This is a perfect freezer meal to have on hand to bake in 10 minutes and have dinner.

    Can I use a different meat in this casserole?

    Yes! You can prepare this dish with shredded chicken if you would prefer. You can either cook your chicken or purchase a cooked chicken. Then, shred the chicken meat and mix it with the same spices and ingredients as the ground beef in the recipe below. This is a great way to use leftover chicken.

    Can I make this gluten free taco casserole for a large group?

    Absolutely! This recipe scales up really well for a crowd. To serve 12 people simply double the recipe and use two 9x13 baking dishes. To serve 18 people triple the recipe across three baking dishes. The baking time stays the same at 400 degrees for 10 minutes regardless of how many pans you are making. You are just baking until the cheese is melted.

    The ground beef mixture can be made ahead of time and stored in the refrigerator, which makes assembling multiple pans much easier when you are cooking for a large group. You can also assemble the pans completely the night before and refrigerate them unbaked, then pop them in the oven right before serving.

    More Recipes You Might Enjoy

    • Gluten Free Walking Taco Casserole
    • Gluten Free Taco Pasta Bake
    • Easy Ground Beef Nacho Casserole
    • 20+ Gluten Free Comfort Dishes to Make When the Weather is Cold

    I get a lot of my ingredients from Thrive Market. Thrive Market has been a game changer for me eating gluten free. They have so many options I can't get at my rural grocery stores! Use this link to get 40% off your first order!

    Print
    clock clock iconcutlery cutlery iconflag flag iconfolder folder iconinstagram instagram iconpinterest pinterest iconfacebook facebook iconprint print iconsquares squares iconheart heart iconheart solid heart solid icon

    Gluten Free Taco Casserole


    5 Stars 4 Stars 3 Stars 2 Stars 1 Star

    5 from 5 reviews

    • Author: Elaine VanVleck
    • Total Time: 30 minutes
    • Yield: 6 servings 1x
    • Diet: Gluten Free
    Print Recipe
    Pin Recipe

    Description

    This gluten free taco casserole is an easy and hearty weeknight dinner the whole family will love. Seasoned ground beef, fire roasted tomatoes, black olives, and a homemade taco spice blend are layered with corn tortillas and melted cheddar cheese and baked until perfectly golden and bubbling. It comes together in just 30 minutes, freezes beautifully, and is the ultimate gluten free Mexican-inspired comfort food for busy nights!


    Ingredients

    Scale
    • 1 ½ pounds Ground Beef
    • 1 small Yellow Onion, chopped
    • 1 - 6 ounce can Black Olives, chopped
    • 1 - 15 ounce can Fire Roasted Tomatoes
    • 1 - 15 ounce can Tomato Sauce
    • 2 tsp. Chili Powder
    • 1 ½ tsp. Ground Cumin
    • 1 tsp. Smoked Paprika
    • 1 tsp. Sea Salt
    • ½ tsp. Onion Powder
    • ½ tsp. Garlic Powder
    • ½ tsp. Dried Oregano
    • ½ tsp. Ground Black Pepper
    • 12 - 6 inch Corn Tortillas
    • 2 cups Cheddar Cheese, shredded

    Instructions

    Preheat your oven to 400 degrees.

    In a frying pan cook the ground beef until there is just a little pink left. Add the chopped onions and cook until they are beginning to become translucent. Add the olives, roasted tomatoes, tomato sauce, chili powder, ground cumin, smoked paprika, salt, garlic powder, onion powder, oregano and black pepper. Cook until warmed through and simmering slightly.

    In a 9x13 baking dish spoon a layer of the beef mixture to cover the bottom of the pan. Add a layer of 6 corn tortillas. Then add another layer of the beef mixture. Top this layer with half the cheese and then add the remaining 6 corn tortillas. Finally top the casserole with the last of the beef mixture and the rest of the cheese.

    Bake at 400 degrees for 10 minutes. The cheese should be melted, but the casserole may not be bubbling.

    Serve hot with shredded lettuce, avocado slices, sour cream, lemon wedges or salsa.

    Notes

    This casserole freezes well for up to a month in a freezer container.

    • Prep Time: 20 minutes
    • Cook Time: 10 minutes
    • Category: Dinner
    • Method: Baking
    • Cuisine: American

    Did you make this recipe?

    Tag @smallfarmbiglife on Instagram and hashtag it #smallfarmbiglife

    Top Tip

    I love to use the corn tortillas from Trader Joe's. I think they have the best flavor. Whatever tortilla you use you want to make sure it's certified gluten free. Yes, corn tortillas should be gluten free, but that doesn't mean they aren't processed in a plant along with products with gluten in them.

    If you made this gluten free taco casserole I would love to hear what you thought! Please leave a star rating and a comment below. It really helps other readers find this recipe.

    • « Go to Previous Page
    • Page 1
    • Interim pages omitted …
    • Page 87
    • Page 88
    • Page 89
    • Page 90
    • Page 91
    • Interim pages omitted …
    • Page 96
    • Go to Next Page »

    Primary Sidebar

    Welcome! I'm Elaine

    I'm so glad you are here! I share easy gluten free recipes from my small farm in Washington.

    Be sure to sign up for my newsletter to stay up to date on all of my new recipes.

    More about me...
    • Instagram
    • Pinterest
    • Facebook
    • Twitter
    • Mail

    Load up on new recipes, exclusive goodies, + more!
    Sign up below to stay up-to-date on news, events, and special deals.
    Thank you for subscribing!

    Easy Meals Recipes

    • Gluten Free Instant Pot Chili Mac and Cheese
    • Gluten Free Taco Casserole
    • Gluten Free Cowboy Baked Beans
    • Gluten Free Walking Taco Casserole
    • Gluten Free Creamy Beef and Mushroom Pasta
    • Gluten Free Instant Pot Chicken & Dumplings
    • Instant Pot Mexican Style Beef and Rice
    • Gluten Free Chicken Parmesan Pasta Casserole
    • Gluten Free One Pot Hamburger Helper Copycat
    • Gluten Free Salisbury Steak with Mushroom Gravy
    • Gluten Free Air Fryer Fajitas
    • Gluten Free Sloppy Joe Casserole

    Footer

    Disclaimer:

    “We are a participant in the Amazon Services LLC Associates Program, an affiliate advertising program designed to provide a means for us to earn fees by linking to Amazon.com and affiliated sites.”

    Footer

    back to top

    About

    • Privacy Policy
    • Shop my Amazon Page
    • Follow me on LTK

    Newsletter

    • Sign Up! for emails and updates

    Contact

    • Contact
    • Media Kit
    • About Me

    As an Amazon Associate I earn from qualifying purchases.

    I may get commissions for purchases made through links on this site.

    Copyright © 2026 Brunch Pro on the Brunch Pro Theme