These Air Fryer Chicken Bites are an easy, quick way to make juicy, bite size chicken using boneless chicken breast in the air fryer. This air fryer chicken bites recipe delivers tender chicken with a perfectly cooked outside, making it a go to air fryer chicken recipe for busy weeknights.
If you're looking for a healthy air fryer recipe that comes together fast, these chicken bites are one of the easiest chicken dinners to keep on rotation.

Perfect for lunch, dinner, or snacks, these air fryer chicken breast bites are protein packed and incredibly versatile. Serve them as a quick weeknight dinner, a game day snack, or a healthy option for meal prep.
Once you learn how to cook chicken bites in the air fryer, this air fryer recipe becomes a reliable, quick protein you'll make again and again.
If you are looking for more chicken recipes try my Gluten Free Chicken and Broccoli Pasta Bake, my Gluten Free Chicken Pot Pie Casserole, my Gluten Free Chicken Parmesan Pasta Casserole or my Gluten Free Instant Pot Chicken & Dumplings.
You can find all of my meal recipes here: Gluten Free Meal Recipes

Instructions
Cut your chicken breasts into two thick chunks each and then thinly slice each.
Put the sliced chicken into a mixing bowl and pour the oil over it. Stir to coat the chicken in oil.
In a small bowl mix together the salt, garlic powder, onion powder, paprika, pepper, brown sugar and cornstarch.
Sprinkle the seasoning mixture over the chicken and then stir to coat the chicken.
Place the chicken in your air fryer basket in an even layer.
Air fry at 400 degrees for 12 minutes. At 6 minutes it's very important to break the chicken apart with a fork and shake the basket so you get nice pieces of chicken bites.
Serve plain or with my Sweet and Spicy Sauce.
Supplies


More Recipes You Might Enjoy


I get a lot of my ingredients from Thrive Market. Thrive Market has been a game changer for me eating gluten free. They have so many options I can't get at my rural grocery stores! Use this link to get 40% off your first order!
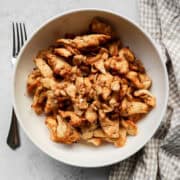
Air Fryer Chicken Bites
- Total Time: 22 minutes
- Yield: 5 servings 1x
- Diet: Gluten Free
Description
These Air Fryer Chicken Bites are an easy, quick way to make juicy, bite size chicken using boneless chicken breast in the air fryer. This air fryer chicken bites recipe delivers tender chicken with a perfectly cooked outside, making it a go to air fryer chicken recipe for busy weeknights.
Ingredients
- 1 - 1.5 lbs Boneless Skinless Chicken Breast, 2-3 breasts
- 1 tbsp Avocado Oil or Olive Oil
- 1 tsp Salt
- 1 tsp Garlic Powder
- 1 tsp Onion Powder
- 1 tsp Smoked Paprika
- ½ tsp Coarse Ground Black Pepper
- 2 tsp Brown Sugar
- 2 tsp Cornstarch
Instructions
Cut your chicken breasts into two thick chunks each and then thinly slice each.
Put the sliced chicken into a mixing bowl and pour the oil over it. Stir to coat the chicken in oil.
In a small bowl mix together the salt, garlic powder, onion powder, paprika, pepper, brown sugar and cornstarch.
Sprinkle the seasoning mixture over the chicken and then stir to coat the chicken.
Place the chicken in your air fryer basket in an even layer.
Air fry at 400 degrees for 12 minutes. At 6 minutes it's very important to break the chicken apart with a fork and shake the basket so you get nice pieces of chicken bites.
Serve plain or with my Sweet and Spicy Sauce.
- Prep Time: 10 minutes
- Cook Time: 12 minutes
- Category: Meals, Meats
- Method: Air Fryer
- Cuisine: Gluten Free
Top Tip
It is very important that you break the chicken bites apart at 6 minutes in the cooking process. If you don't do that you will have a stuck together lump of chicken and the bites won't brown properly.
Didn't find the answer you're looking for?
Ask AI to answer based on this recipe:
Frequently Asked Questions
Chicken bites cook quickly in the air fryer. I cook them at 400 degrees for 12 minutes. Be sure to flip or shake them halfway through for even cooking and juicy results.
Yes, air fryer chicken bites are a healthy option since they're made with lean protein and cooked with minimal oil. This makes them a quick, protein packed meal or snack that fits well into a balanced, healthy diet.