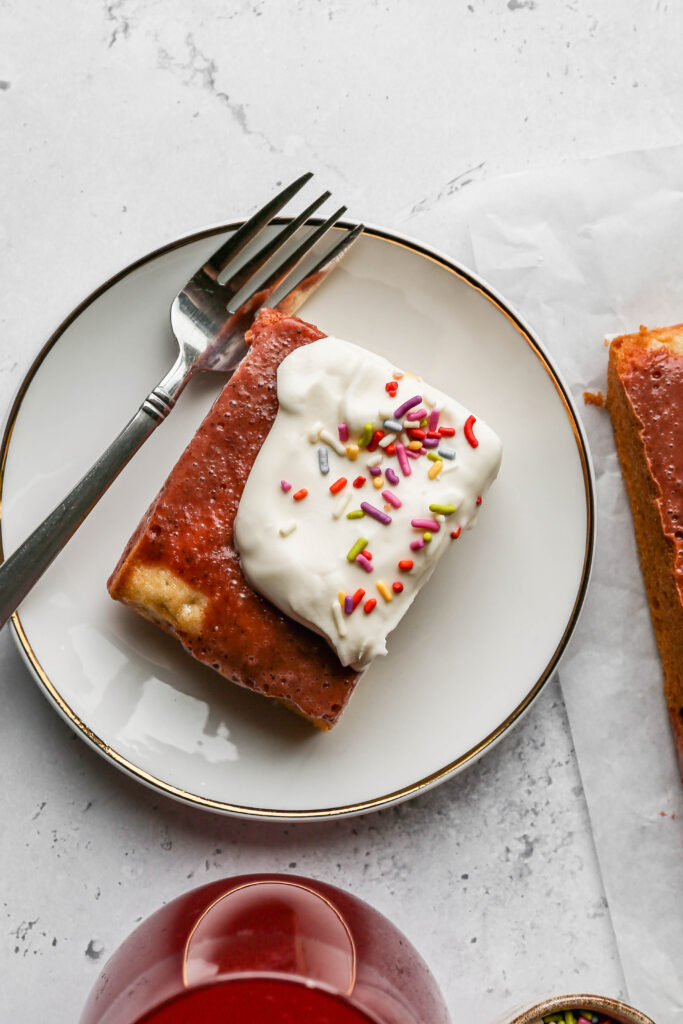
• Skip to primary navigation
  • Skip to main content
  • Skip to primary sidebar
  • Skip to footer
Small Farm Big Life logo
  • Recipe Index
  • Subscribe
  • Resources
  • Home Decor
  • Nav Social Menu

    • Email
    • Facebook
    • Instagram
    • Pinterest
menu icon
go to homepage
subscribe
search icon
Homepage link
  • Home
  • Recipe Index
  • Subscribe
  • My Story
  • Resources
  • Free Guides
  • Home Decor
    • Email
    • Facebook
    • Instagram
    • Pinterest
  • ×

    2022 Thanksgiving Kitchen and Table Ideas

    I love a beautiful table! I've put together some ideas for various styles of Thanksgiving kitchen and table ideas. You can mix and match ideas for a table you and your guests will love. I've also included my must have favorites for making our Thanksgiving meal.

    a Thanksgiving table set with plates, wine glasses, pumpkins, pomegranates, flowers and linen napkins.

    Kitchen Supplies

    Having the right tools, pans, etc. for preparing your Thanksgiving meal will make all of the difference. These are a few of my favorite things. I use most of these items all year long!

    Thanksgiving Table Ideas

    It's fun to have a few pieces that look like fall or Thanksgiving and then a few pieces that can be used through Christmas. A great way to do this is paper napkins and the fun pumpkin soup bowls for Thanksgiving and then new glassware to use all season long.

    I get a lot of my ingredients from Thrive Market. Thrive Market has been a game changer for me eating gluten free. They have so many options I can't get at my rural grocery stores! Use this link to get 25% off your first order!

    You might also enjoy:

    Delicious Gluten Free Thanksgiving Recipes

    My Favorite Gluten Free Fall Recipes

    The Best Gluten Free Cookie Recipes

    Gluten Free Pumpkin Recipes

    10 Easy Gluten Free Beef Recipes

    Easy Fried Frozen Corn

    This Easy Fried Frozen Corn is a quick, comforting side dish that turns everyday frozen corn into something special. Using a simple stovetop method, you'll learn how to cook frozen corn kernels so they're perfectly cooked frozen corn with golden edges and rich flavor.

    Inspired by southern fried corn, this recipe shows how to make fried corn that tastes homemade without any extra fuss.

    a white bowl of easy friend frozen corn next to small bowls of salt and pepper.

    Perfect for busy nights, this fried frozen corn pairs beautifully with weeknight dinners, holiday meals, or classic comfort food plates. It's a reliable corn side dish recipe that delivers buttery, pan fried goodness every time and answers exactly how to make frozen corn taste good.

    If you're looking for the best southern fried corn using frozen corn, this easy method is one you'll come back to again and again.

    If you are looking for more easy side dishes you might also enjoy my Cheesy Slow Cooker Creamed Corn, this Black Beans and Corn Salad, my Healthy Mexican Street Corn Salad, this Southwestern Style Coleslaw or my Crispy Garlic and Rosemary Smashed Potatoes recipes.

    You can find my side dishes here: Gluten Free Side Dish Recipes

    a white bowl of easy fried frozen corn next to small bowls of salt and pepper.
    [feast_advanced_jump_to]

    Ingredients

    • Frozen Corn
    • Unsalted Butter
    • Yellow Onion
    • Minced Garlic
    • Pimientos
    • Sea Salt
    • Coarse Ground Black Pepper

    Instructions

    In a frying pan or skillet over medium heat add the butter. Heat the butter until melted and starting to bubble. Add the onions and stir occasionally until the onions are starting to brown.

    Add the garlic and heat for 1 minute.

    Carefully add the frozen corn, pimentos, salt and pepper. Stir to combine.

    Cook over medium heat stirring occasionally until the corn is done, about 5-6 minutes.

    Remove from heat and serve immediately.

    Substitutions

    • Red Bell Pepper - instead of pimentos finely dice a red bell pepper and cook along with the onions
    • White Onion - white onions can replace the yellow onion
    • Frozen Mixed Vegetables - the corn can be replaced with a 12 ounce bag of mixed vegetables

    Supplies

    More Recipes You Might Enjoy

    • Cheesy Slow Cooker Creamed Corn
    • Healthy Mexican Street Corn Salad
    • Gluten Free Zucchini Squash and Corn Casserole
    • Black Beans and Corn Salad

    I get a lot of my ingredients from Thrive Market. Thrive Market has been a game changer for me eating gluten free. They have so many options I can't get at my rural grocery stores! Use this link to get 40% off your first order!

    Print
    clock clock iconcutlery cutlery iconflag flag iconfolder folder iconinstagram instagram iconpinterest pinterest iconfacebook facebook iconprint print iconsquares squares iconheart heart iconheart solid heart solid icon

    Easy Fried Frozen Corn


    5 Stars 4 Stars 3 Stars 2 Stars 1 Star

    No reviews

    • Author: Elaine VanVleck
    • Total Time: 20 minutes
    • Yield: 5 servings 1x
    • Diet: Gluten Free
    Print Recipe
    Pin Recipe

    Description

    This recipe for easy fried frozen corn is a delicious side dish. It's simple to make in a skillet with butter, onions, garlic and frozen corn. This pan roasted corn is perfect for Thanksgiving or weeknight meals.


    Ingredients

    Scale
    • 12 ounce bag Frozen Corn
    • ¼ cup Unsalted Butter
    • 1 small Yellow Onion, finely chopped
    • 1 Tbsp Minced Garlic
    • 4 ounce jar Pimientos, drained
    • ½ tsp Sea Salt
    • ¼ tsp Coarse Ground Black Pepper

    Instructions

    In a frying pan or skillet over medium heat add the butter. Heat the butter until melted and starting to bubble. Add the onions and stir occasionally until the onions are starting to brown.

    Add the garlic and heat for 1 minute.

    Carefully add the frozen corn, pimentos, salt and pepper. Stir to combine.

    Cook over medium heat stirring occasionally until the corn is done, about 5-6 minutes.

    Remove from heat and serve immediately.

    • Prep Time: 5 minutes
    • Cook Time: 15 minutes
    • Category: Side Dish, Vegetables
    • Method: Stove Top
    • Cuisine: Gluten Free

    Did you make this recipe?

    Tag @smallfarmbiglife on Instagram and hashtag it #smallfarmbiglife

    Storage

    Store in an air tight container in the refrigerator for up to 5 days.

    You can also freeze this side dish in a freezer safe container or bag for up to 1 month. To reheat either heat in a frying pan over medium low heat or in the microwave with a damp paper towel over the top for 2-3 minutes.

    FAQ

    Do you need to thaw corn before cooking?

    No. You can add the frozen corn right of the freezer to this recipe. Just be careful adding the frozen vegetable to hot butter that you don't get splashed with the sizzling.

    Can I use canned corn to make fried skillet corn?

    I would not use canned corn for this recipe. It can get mushy and over cooked easily. It is best to use frozen corn when you're making fried corn.

    Pumpkin Apple Baked Oatmeal with Streusel Topping

    This easy recipe for pumpkin apple baked oatmeal with streusel topping is the perfect breakfast! It's a healthy oatmeal casserole that can be made ahead to serve a crowd or for individual servings for meal prepping. The delicious pumpkin apple oats are topped with a sweet and salty crumble streusel with walnuts for crunch.

    a white casserole dish of pumpkin apple baked oatmeal with streusel topping.

    This Pumpkin Apple Baked Oatmeal with Streusel Topping is the ultimate cozy and nourishing fall breakfast. With the warm, spiced flavors of pumpkin and apple blended into a creamy, satisfying bake, this simple dish brings together everything you love about autumn mornings.

    It's a delicious way to start your day, whether you're enjoying a slow weekend brunch or need an easy oatmeal idea for busy weekdays.

    If you are looking for more breakfast recipes you might also enjoy my Gluten Free Pumpkin Cranberry Breakfast Cookies, this Gluten Free Tater Tot Breakfast Casserole, my Gluten Free Chia Pudding Breakfast Parfait, this Overnight Apple Pie Chia Pudding, my Gluten Free Oatmeal Raisin Overnight Oats or these Gluten Free Banana Oat Muffins recipes.

    a white casserole dish and two white breakfast bowls of pumpkin apple baked oatmeal with streusel topping.
    [feast_advanced_jump_to]

    Ingredients

    • Pumpkin Puree
    • Milk
    • Eggs
    • Brown Sugar
    • Maple Syrup
    • Vanilla Extract
    • Apples
    • Gluten Free Rolled Oats
    • Baking Powder
    • Sea Salt
    • Ground Cinnamon
    • Ground Ginger
    • Ground Cloves
    • Allspice
    • Gluten Free Flour
    • Unsalted Butter
    • Walnuts

    Instructions

    In a mixing bowl blend together the pumpkin puree, milk, eggs, brown sugar, maple syrup, vanilla and apples.

    Add the rolled oats, baking powder salt, cinnamon, ginger, cloves and allspice to the wet mixture and blend just until combined.

    Pour the oatmeal mixture into a 9x13 baking dish or a 3 quart baking dish.

    In the bowl of your stand mixer add the rolled oats, brown sugar, flour, salt, melted butter and chopped walnuts. Mix just until they are combined and small clumps form.

    Pour the streusel topping over the oatmeal mixture in the baking dish.

    Bake at 350 degrees for 40-45 minutes or until the top is browned slightly and the oatmeal is baked through.

    Serve immediately while warm or let cool to room temperature and store in the refrigerator for up to five days.

    Hint: This recipe is great for meal prepping. I baked the oatmeal, let cool to room temperature and then store in individual serving size containers in the refrigerator for up to five days.

    Substitutions

    • Pumpkin Pie Filling - if using pumpkin pie filling instead of pumpkin puree omit the cinnamon, ginger, cloves and allspice in the baked oatmeal
    • Pecans - replace the walnuts with pecans
    • Pumpkin Seeds - for a nut free version replace the walnuts with pumpkin seeds

    Supplies

    I get a lot of my ingredients from Thrive Market. Thrive Market has been a game changer for me eating gluten free. They have so many options I can't get at my rural grocery stores! Use this link to get 40% off your first order!

    Top tip

    I like this recipe the most the next day. The oatmeal has the best flavor after being in the refrigerator overnight. My favorite way to serve this recipe is to make it the day before and then reheat at 250 degrees in the oven or reheat individual servings in the microwave with a damp paper towel over top for 30 seconds at a time until it's warm.

    Print
    clock clock iconcutlery cutlery iconflag flag iconfolder folder iconinstagram instagram iconpinterest pinterest iconfacebook facebook iconprint print iconsquares squares iconheart heart iconheart solid heart solid icon

    Pumpkin Apple Baked Oatmeal with Streusel Topping


    5 Stars 4 Stars 3 Stars 2 Stars 1 Star

    No reviews

    • Author: Elaine VanVleck
    • Total Time: 55 minutes
    • Yield: 10 servings 1x
    • Diet: Gluten Free
    Print Recipe
    Pin Recipe

    Description

    This easy recipe for pumpkin apple baked oatmeal with streusel topping is the perfect breakfast! It's a healthy oatmeal casserole that can be made ahead to serve a crowd or for individual servings for meal prepping. The delicious pumpkin apple oats are topped with a sweet and salty crumble streusel with walnuts for crunch.


    Ingredients

    Scale

    Oatmeal:

    • 15 ounce can Pumpkin Puree
    • 2 cups Milk
    • 2 large Eggs
    • ¼ cup Brown Sugar
    • ¼ cup Maple Syrup
    • 1 tsp Vanilla Extract
    • 2 medium Apples, cored, peeled and finely diced
    • 3 cups Gluten Free Rolled Oats
    • 2 tsp Baking Powder
    • 1 tsp Sea Salt
    • 2 tsp Ground Cinnamon
    • ½ tsp Ground Ginger
    • ¼ tsp Ground Cloves
    • ¼ tsp Allspice

    Streusel Topping:

    • 1 ½ cups Gluten Free Rolled Oats
    • ¾ cup Brown Sugar
    • ½ cup Gluten Free Flour
    • 1 tsp Sea Salt
    • ½ cup Unsalted Butter, melted
    • ½ cup Walnuts, chopped

    Instructions

    In a mixing bowl blend together the pumpkin puree, milk, eggs, brown sugar, maple syrup, vanilla and apples.

    Add the rolled oats, baking powder salt, cinnamon, ginger, cloves and allspice to the wet mixture and blend just until combined.

    Pour the oatmeal mixture into a 9x13 baking dish or a 3 quart baking dish.

    In the bowl of your stand mixer add the rolled oats, brown sugar, flour, salt, melted butter and chopped walnuts. Mix just until they are combined and small clumps form.

    Pour the streusel topping over the oatmeal mixture in the baking dish.

    Bake at 350 degrees for 40-45 minutes or until the top is browned slightly and the oatmeal is baked through.

    Serve immediately while warm or let cool to room temperature and store in the refrigerator for up to five days.

    Notes

    Hint: This recipe is great for meal prepping. I baked the oatmeal, let cool to room temperature and then store in individual serving size containers in the refrigerator for up to five days.

    • Prep Time: 15 minutes
    • Cook Time: 40 minutes
    • Category: Breakfast
    • Method: Baking
    • Cuisine: Gluten Free

    Did you make this recipe?

    Tag @smallfarmbiglife on Instagram and hashtag it #smallfarmbiglife

    Top Tip

    I love to bake this pumpkin apple baked oatmeal with streusel topping recipe that day before serving and then reheat on low heat in the oven the morning I want to serve. This is also a great breakfast to bake and then store in individual containers to have breakfast ready to go.

    FAQ

    Can you bake oatmeal in the oven?

    Yes! It's really simple to make multiple servings of oatmeal by baking it in the oven at 350 degrees for 40-45 minutes or until the oatmeal is browned on top and cooked through.

    Do you put egg in baked oats?

    Yes. The egg will help hold the oatmeal mixture together and give a nice light and fluffy texture to your baked oatmeal.

    Why are my baked oats mushy?

    This could be because the baked oatmeal didn't cook long enough. If your oats are mushy try baking for 5-8 more minutes. Also, remember to use rolled oats and not quick cooking oatmeal for baked oatmeal.

    Creamy Sausage Bean Dip

    This easy recipe for creamy sausage bean dip is perfect to serve warm at parties. It is made with cream cheese, sausage and pinto beans. This cheesy dip is easy to make ahead and then put in the oven right before serving with tortilla chips.

    a 8x8 baking dish of creamy sausage bean dip next to a white bowl of tortilla chips.

    Creamy Sausage Bean Dip is the ultimate crowd pleasing appetizer, perfect for any party or game day gathering. This easy to make dip combines savory sausage, creamy cream cheese, and hearty pinto beans, all smothered in melted cheddar cheese to create a rich, cheesy dip.

    With its hearty combination of sausage and beans, it's not only filling but also full of flavor, making it an ideal choice for football party foods or any casual get together. Served warm with tortilla chips or corn chips, this dip is a guaranteed favorite and an easy finger food that everyone will love.

    If you are looking for more bean recipes you might also enjoy my Gluten Free Cowboy Baked Beans, this Black Beans and Corn Salad, my Gluten Free Cheesy Pinto Beans, this Gluten Free Instant Pot Italian Style Pasta and Bean Soup, my Instant Pot Beef and Bean Burrito Casserole or this Instant Pot Vegetarian Navy Bean Soup recipes.

    an 8x8 baking dish of creamy sausage bean dip with me holding a tortilla chip with the dip on top.
    [feast_advanced_jump_to]

    Ingredients

    • Italian Style Turkey Sausage
    • Sweet Onion
    • Red Bell Pepper
    • Minced Garlic
    • Sea Salt
    • Dried Thyme
    • White Vinegar
    • Cream Cheese
    • Pinto Beans
    • Cheddar Cheese
    • Parmesan Cheese
    • Tortilla Chips

    Instructions

    In a frying pan over medium heat cook the sausage, onion, pepper and garlic about 8-10 minutes or until the meat is no longer pink and the onion is translucent.

    Add the salt, thyme and vinegar. Stir to combine.

    Add the cream cheese in chunks. Cook while stirring until the cream cheese is completely melted and mixed in.

    Add the pinto beans and cheddar cheese. Stir to combine and remove pan from heat.

    Pour the bean mixture into an 8x8 baking dish or 2 quart baking dish. Top with the finely grated parmesan cheese.

    Bake at 375 degrees for 18-20 minutes or until golden brown and bubbling around the edges.

    Serve warm with tortilla chips or toasted gluten free bread.

    Supplies

    More Recipes You Might Enjoy

    • Gluten Free Cheesy Pinto Beans
    • Gluten Free Caramelized Onion Dip
    • Gluten Free Homemade Ranch Dip
    • 10 Gluten Free Game Day Snacks & Sweets

    I get a lot of my ingredients from Thrive Market. Thrive Market has been a game changer for me eating gluten free. They have so many options I can't get at my rural grocery stores! Use this link to get 40% off your first order!

    Print
    clock clock iconcutlery cutlery iconflag flag iconfolder folder iconinstagram instagram iconpinterest pinterest iconfacebook facebook iconprint print iconsquares squares iconheart heart iconheart solid heart solid icon

    Creamy Sausage Bean Dip


    5 Stars 4 Stars 3 Stars 2 Stars 1 Star

    5 from 1 review

    • Author: Elaine VanVleck
    • Total Time: 35 minutes
    • Yield: 8 servings 1x
    • Diet: Gluten Free
    Print Recipe
    Pin Recipe

    Description

    This easy recipe for creamy sausage bean dip is perfect to serve warm at parties. It is made with cream cheese, sausage and pinto beans. This cheesy dip is easy to make ahead and then put in the oven right before serving with tortilla chips.


    Ingredients

    Scale
    • 16 ounces Italian Style Turkey Sausage
    • 1 small Sweet Onion, diced
    • 1 Red Bell Pepper, diced
    • 1 Tbsp Minced Garlic
    • 1 tsp Sea Salt
    • ½ tsp Dried Thyme
    • 2 Tbsp White Vinegar
    • 8 ounce package Cream Cheese, cut into chunks
    • 15 ounce can Pinto Beans, drained and rinsed
    • ½ cup Cheddar Cheese, shredded
    • ½ cup Parmesan Cheese, finely shredded
      Tortilla Chips for serving

    Instructions

    In a frying pan over medium heat cook the sausage, onion, pepper and garlic about 8-10 minutes or until the meat is no longer pink and the onion is translucent.

    Add the salt, thyme and vinegar. Stir to combine.

    Add the cream cheese in chunks. Cook while stirring until the cream cheese is completely melted and mixed in.

    Add the pinto beans and cheddar cheese. Stir to combine and remove pan from heat.

    Pour the bean mixture into an 8x8 baking dish or 2 quart baking dish. Top with the finely grated parmesan cheese.

    Bake at 375 degrees for 18-20 minutes or until golden brown and bubbling around the edges.

    Serve warm with tortilla chips or toasted gluten free bread.

    • Prep Time: 15 minutes
    • Cook Time: 20 minutes
    • Category: Dips, Snacks
    • Method: Baking
    • Cuisine: Gluten Free

    Did you make this recipe?

    Tag @smallfarmbiglife on Instagram and hashtag it #smallfarmbiglife

    Top Tip

    This recipe is perfect for game days, parties or just when you want a warm cozy snack. I love to serve this dip with tortilla chips, but it would also be yummy on toasted bread.

    Storage

    Store in a sealed container in the refrigerator for up to 5 days.

    To reheat add a damp paper towel over the container and microwave in 30 second intervals until the dip is warm and ready to serve.

    FAQ

    Do I have to bake sausage bean dip?

    Yes. Even though the sausage, onion and peppers are fully cooked that sausage bean dip won't be as creamy or have as rich of a flavor if it's not baked.

    What is the best way to reheat sausage bean dip?

    Put the creamy sausage bean dip in a microwave safe container. Cover the container with a damp paper towel and heat for 30 second intervals until the bean dip is warm and creamy.

    What should I serve sausage bean dip with?

    I love to serve this creamy sausage bean dip with tortilla chips or small pieces of toasted bread.

    Gluten Free Peanut Butter Cup Cookies

    This easy recipe for gluten free peanut butter cup cookies is made with Reese's miniature peanut butter cups. Using a mini muffin tin to bake the dough you then put the peanut butter candy in the center after baking. These cookies are a perfect after school snack or delicious in lunches.

    a plate of gluten free peanut butter cup cookies next to a bowl of Reese's miniature peanut butter cups.

    These Gluten Free Peanut Butter Cup Cookies are the perfect combination of creamy peanut butter and rich chocolate, making them a delicious treat for any occasion.

    Using Reese's Peanut Butter Cups as the centerpiece, these homemade cookies feature soft and chewy peanut butter cookie cups that are gluten free and full of flavor.

    The easy recipe results in a simple yet indulgent dessert, perfect for a sweet craving or when you need a fast, tasty treat for a crowd.

    If you are looking for more yummy gluten free cookie recipes you might also enjoy my Gluten Free Peanut Butter Kiss Cookies, these Gluten Free Oatmeal Raisin Cookies, my Gluten Free Monster Cookies, these Gluten Free Old Fashioned Iced Oatmeal Cookies or my Gluten Free Double Chocolate Chip Cookies recipe.

    You can find all of my favorite cookie recipes here: The Best Gluten Free Cookie Recipes

    a gluten free peanut butter cup cookie cut in half to show the reese's minature peanut butter cup inside.
    [feast_advanced_jump_to]

    Ingredients

    • Unsalted Butter
    • Creamy Peanut Butter
    • Brown Sugar
    • Granulated Sugar
    • Egg
    • Milk
    • Vanilla Extract
    • Gluten Free Flour
    • Baking Soda
    • Sea Salt
    • Reese's Miniature Peanut Butter Cups

    Instructions

    Preheat your oven to 375 degrees.

    In the bowl of your stand mixer beat the butter, peanut butter, brown sugar and granulated sugar until combined and fluffy.

    Add the egg, milk and vanilla and beat just until they are combined into the mixture.

    Add the flour, baking soda and salt. Mix until just combined.

    Using a cookie scoop, scoop the dough, roll into a ball. Place the cookie dough ball into the cups of a miniature muffin tin and repeat these steps for the rest of the cookie dough.

    Bake at 375 degrees for 10 minutes or until the edges are just starting to get golden brown. Remove from the oven and immediately press Reese's miniature peanut butter cups in to the center of each cookie.

    Move the cookies to a cooling rack to cool completely. Store in an air tight container for up to a week.

    Hint: These cookies freeze really well in a freezer safe container or bag for up to a month. I love to double the batch and freeze half of the cookies for later.

    Supplies

    More Recipes You Might Enjoy

    • Gluten Free Peanut Butter Kiss Cookies
    • Gluten Free Peanut Butter Banana Muffins
    • The Best Gluten Free Cookie Recipes
    • Gluten Free Homemade Dog Biscuits

    I get a lot of my ingredients from Thrive Market. Thrive Market has been a game changer for me eating gluten free. They have so many options I can't get at my rural grocery stores! Use this link to get 40% off your first order!

    Print
    clock clock iconcutlery cutlery iconflag flag iconfolder folder iconinstagram instagram iconpinterest pinterest iconfacebook facebook iconprint print iconsquares squares iconheart heart iconheart solid heart solid icon

    Gluten Free Peanut Butter Cup Cookies


    5 Stars 4 Stars 3 Stars 2 Stars 1 Star

    No reviews

    • Author: Elaine VanVleck
    • Total Time: 25 minutes
    • Yield: 26 cookies 1x
    • Diet: Gluten Free
    Print Recipe
    Pin Recipe

    Description

    This easy recipe for gluten free peanut butter cup cookies is made with Reese's miniature peanut butter cups. Using a mini muffin tin to bake the dough you then put the peanut butter candy in the center after baking. These cookies are a perfect after school snack or delicious in lunches.


    Ingredients

    Scale
    • ¼ cup Unsalted Butter, at room temperature
    • ¾ cup Creamy Peanut Butter
    • 1 cup Brown Sugar
    • ¼ cup Granulated Sugar
    • 1 large Egg
    • 2 Tbsp Milk
    • 1 tsp Vanilla Extract
    • 1 ¼ cup Gluten Free Flour
    • 1 tsp Baking Soda
    • ½ tsp Sea Salt
    • 26 Reese's Miniature Peanut Butter Cups

    Instructions

    Preheat your oven to 375 degrees.

    In the bowl of your stand mixer beat the butter, peanut butter, brown sugar and granulated sugar until combined and fluffy.

    Add the egg, milk and vanilla and beat just until they are combined into the mixture.

    Add the flour, baking soda and salt. Mix until just combined.

    Using a cookie scoop, scoop the dough, roll into a ball. Place the cookie dough ball into the cups of a miniature muffin pan and repeat these steps for the rest of the cookie dough.

    Bake at 375 degrees for 10 minutes or until the edges are just starting to get golden brown. Remove from the oven and immediately press Reese's miniature peanut butter cups in to the center of each cookie.

    Move the cookies to a cooling rack to cool completely. Store in an air tight container for up to a week.

    Notes

    Hint: These cookies freeze really well in a freezer safe container or a freezer safe bag for up to a month. I love to double the batch and freeze half of the cookies for later.

    • Prep Time: 15 minutes
    • Cook Time: 10 minutes
    • Category: Cookies, Baking
    • Method: Baking
    • Cuisine: Gluten Free

    Did you make this recipe?

    Tag @smallfarmbiglife on Instagram and hashtag it #smallfarmbiglife

    Storage

    After the cookies have cooled completely store them in an air tight container for up to a week.

    These cookies freeze really well too. Store cookies in a freezer safe container or bag for up to one month in the freezer.

    Frequently Asked Questions

    Are Reese's peanut butter cups gluten free?

    Yes, the package is marked as gluten free and doesn't contain gluten in the ingredients list. Always remember to check the packaging in case this changes.

    Can I freeze peanut butter cup cookies?

    Yes! These cookies freeze really well. Use a freezer safe container or bag and store in the freezer for up to 3 months.

    Top Tip

    These cookies are perfect for serving at parties or for using up leftover Halloween candy. They are really simple to make and always a huge hit with everyone.

    • « Go to Previous Page
    • Page 1
    • Interim pages omitted …
    • Page 31
    • Page 32
    • Page 33
    • Page 34
    • Page 35
    • Interim pages omitted …
    • Page 96
    • Go to Next Page »

    Primary Sidebar

    Welcome! I'm Elaine

    I'm so glad you are here! I share easy gluten free recipes from my small farm in Washington.

    Be sure to sign up for my newsletter to stay up to date on all of my new recipes.

    More about me...
    • Instagram
    • Pinterest
    • Facebook
    • Twitter
    • Mail

    Load up on new recipes, exclusive goodies, + more!
    Sign up below to stay up-to-date on news, events, and special deals.
    Thank you for subscribing!

    Easy Meals Recipes

    • Gluten Free Instant Pot Chili Mac and Cheese
    • Gluten Free Taco Casserole
    • Gluten Free Cowboy Baked Beans
    • Gluten Free Walking Taco Casserole
    • Gluten Free Creamy Beef and Mushroom Pasta
    • Gluten Free Instant Pot Chicken & Dumplings
    • Instant Pot Mexican Style Beef and Rice
    • Gluten Free Chicken Parmesan Pasta Casserole
    • Gluten Free One Pot Hamburger Helper Copycat
    • Gluten Free Salisbury Steak with Mushroom Gravy
    • Gluten Free Air Fryer Fajitas
    • Gluten Free Sloppy Joe Casserole

    Footer

    Disclaimer:

    “We are a participant in the Amazon Services LLC Associates Program, an affiliate advertising program designed to provide a means for us to earn fees by linking to Amazon.com and affiliated sites.”

    Footer

    back to top

    About

    • Privacy Policy
    • Shop my Amazon Page
    • Follow me on LTK

    Newsletter

    • Sign Up! for emails and updates

    Contact

    • Contact
    • Media Kit
    • About Me

    As an Amazon Associate I earn from qualifying purchases.

    I may get commissions for purchases made through links on this site.

    Copyright © 2026 Brunch Pro on the Brunch Pro Theme