• Skip to primary navigation
  • Skip to main content
  • Skip to primary sidebar
  • Skip to footer
Small Farm Big Life logo
  • Recipe Index
  • Subscribe
  • Resources
  • Home Decor
  • Nav Social Menu

    • Email
    • Facebook
    • Instagram
    • Pinterest
menu icon
go to homepage
subscribe
search icon
Homepage link
  • Home
  • Recipe Index
  • Subscribe
  • My Story
  • Resources
  • Free Guides
  • Home Decor
    • Email
    • Facebook
    • Instagram
    • Pinterest
  • ×

    Gluten Free Slow Cooker Cranberry Meatballs

    This easy recipe for gluten free slow cooker cranberry meatballs is a perfect holiday appetizer! They are cooked in your crockpot for 2-4 hours on low and then ready to serve hot. I used ground beef, but you could easily use ground turkey for these tangy meatballs with cranberries and chili sauce.

    a large plate next to a smaller plate of gluten free slow cooker meatballs with parmesan cheese sprinkled on top next to a small wooden bowl of cranberries

    Gluten-free slow cooker cranberry meatballs are a delightful and savory addition to your holiday gatherings, making them an ideal appetizer for Christmas or Thanksgiving celebrations.

    This easy meatball recipe combines the richness of homemade meatballs with a sweet and tangy cranberry chili sauce, creating a dish that is sure to impress your guests.

    Perfect as a cocktail meatball option for serving at parties, these bite-sized treats are both satisfying and easy to prepare, allowing you to enjoy time with your loved ones rather than spending all day in the kitchen.

    For this recipe you can purchase whole cranberry sauce or you can make my recipe for gluten free cranberry jam. I like the convenience of purchasing cranberry sauce, but I also love to have extra of my cranberry jam for the holidays too.

    If you are looking for more meatball recipes try my Gluten Free Slow Cooker Hawaiin Meatballs, my Gluten Free Slow Cooker Barbecue Meatballs, my Gluten Free Swedish Style Meatballs or my Gluten Free Slow Cooker Meatballs.

    a large plate next to a smaller plate of gluten free slow cooker meatballs with parmesan cheese sprinkled on top next to a small wooden bowl of cranberries
    [feast_advanced_jump_to]

    Ingredients

    • Ground Beef
    • Gluten Free Bread Crumbs
    • Egg
    • Parmesan Cheese
    • Yellow Onion
    • Minced Garlic
    • Sea Salt
    • Coarse Ground Black Pepper
    • Dried Parsley
    • Whole Berry Cranberry Sauce or my Cranberry Jam
    • Chili Sauce
    • Brown Sugar

    Instructions

    In a mixing bowl using your hands or a large spoon mix together the ground beef, gluten free bread crumbs, egg, parmesan cheese, onion, garlic, salt, pepper and parsley until well combined.

    In a mixing bowl or large measuring cup whisk together the cranberry sauce, chili sauce, water and brown sugar until well combined.

    Pour enough of the sauce mixture on the bottom of your slow cooker to coat it. Then roll the meatball mixture into golf ball sized balls and place them touching, but not on top of each other on the bottom of the slow cooker.

    After all the meatballs are in the slow cooker pour the rest of the sauce on top of the meatballs.

    Set your crockpot to low and and cook 2-4 hours until the internal temperature is a minimum of 165 degrees.

    Move the meatballs to a plate and pour a bit of sauce over them to serve with toothpicks for an appetizer or over mashed potatoes or buttered noodles for a meal.

    Supplies

    Frequently Asked Questions

    How do I make gluten free meatballs from scratch?

    The key is gluten free breadcrumbs. There are several brands that have certified gluten free breadcrumbs. You can also use rice crumbs. I've used both and been happy with both options.

    The gluten free bread or rice crumbs along with the egg will help the meatballs to hold their shape. Once the meatballs are in the crockpot I don't stir them until they are fully cooked so they don't fall apart.

    What do you serve cranberry meatballs with?

    I like to use these meatballs as an appetizer during the holidays and I serve them on their own with toothpicks. They are also delicious served with mashed potatoes or buttered pasta for a meal.

    More Recipes You Might Enjoy

    • Gluten Free Slow Cooker Barbecue Meatballs
    • Gluten Free Slow Cooker Hawaiin Meatballs
    • Gluten Free Swedish Style Meatballs
    • Gluten Free Slow Cooker Meatballs

    I get a lot of my ingredients from Thrive Market. Thrive Market has been a game changer for me eating gluten free. They have so many options I can't get at my rural grocery stores! Use this link to get 40% off your first order!

    Print
    clock clock iconcutlery cutlery iconflag flag iconfolder folder iconinstagram instagram iconpinterest pinterest iconfacebook facebook iconprint print iconsquares squares iconheart heart iconheart solid heart solid icon

    Gluten Free Slow Cooker Cranberry Meatballs


    5 Stars 4 Stars 3 Stars 2 Stars 1 Star

    No reviews

    • Author: Elaine VanVleck
    • Total Time: 3 hours 20 minutes
    • Yield: 2 pounds meatballs 1x
    • Diet: Gluten Free
    Print Recipe
    Pin Recipe

    Description

    This easy recipe for gluten free slow cooker cranberry meatballs is a perfect holiday appetizer! They are cooked in your crockpot for 2-4 hours on low and then ready to serve hot. I used ground beef, but you could easily use turkey for these tangy meatballs with cranberries and chili sauce.


    Ingredients

    Scale

    Meatballs:

    • 2 pounds Ground Beef
    • ½ cup Gluten Free Bread Crumbs
    • 1 large Egg
    • ¼ cup Parmesan Cheese, finely grated
    • 1 small Yellow Onion, grated
    • 2 Tbsp. Minced Garlic
    • 1 ½ tsp. Sea Salt
    • 1 tsp. Coarse Ground Black Pepper
    • 1 Tbsp. Dried Parsley

    Sauce:

    • 1 - 14 ounce can Whole Cranberry Sauce or my Cranberry Jam
    • 1 - 6.57 ounce jar Chili Sauce
    • 1 cup Water
    • ½ cup Brown Sugar

    Instructions

    In a mixing bowl using your hands or a large spoon mix together the ground beef, gluten free bread crumbs, egg, parmesan cheese, onion, garlic, salt, pepper and parsley until well combined.

    In a mixing bowl or large measuring cup whisk together the cranberry sauce, chili sauce, water and brown sugar until well combined.

    Pour enough of the sauce mixture on the bottom of your slow cooker to coat it. Then roll the meatball mixture into golf ball sized balls and place them touching, but not on top of each other on the bottom of the slow cooker.

    After all the meatballs are in the slow cooker pour the rest of the sauce on top of the meatballs.

    Set your crockpot to low and and cook 2-4 hours until the internal temperature is a minimum of 165 degrees.

    Move the meatballs to a plate and pour a bit of sauce over them to serve with toothpicks for an appetizer or over mashed potatoes or buttered noodles for a meal.

    Notes

    I used ground beef in this recipe, but you could also use ground turkey.

    • Prep Time: 20 minutes
    • Cook Time: 3 hours
    • Category: Meatballs
    • Method: Slow Cooker
    • Cuisine: Gluten Free

    Did you make this recipe?

    Tag @smallfarmbiglife on Instagram and hashtag it #smallfarmbiglife

    Top Tip

    My favorite chili sauce is Thai Kitchen Red Chili Dipping Sauce. Their brand doesn't have any added artificial colors or flavoring. I checked several other brands and they all had artificial colors and added ingredients that I didn't want.

    Gluten Free Cornbread Stuffing

    This gluten free cornbread stuffing is easy to make homemade for Thanksgiving. This is the best recipe to make for a healthy, meatless stuffing. This savory stuffing is simple to make from scratch.

    a cream, oval casserole dish of gluten free cornbread stuffing next to a silver serving spoon

    This Gluten Free Cornbread Stuffing is a holiday casserole that brings all the cozy flavors of Thanksgiving to your table. Made with homemade cornbread for rich, authentic flavor.

    This easy cornbread stuffing recipe is the perfect side dish for your Thanksgiving dinner or any special Sunday gathering. It's Moist, flavorful, and comforting! It's the kind of stuffing recipe for Thanksgiving that pairs beautifully with turkey, gravy, and all your favorite holiday sides.

    Whether you call it stuffing or dressing, this dish delivers that nostalgic flavor you love while keeping it gluten free for everyone to enjoy.

    I love cornbread stuffing and was a little sad the first Thanksgiving that I thought I would be missing out. I was so happy to find gluten free cornmeal so I could make the cornbread for this recipe!

    If you are looking for more corn recipes try my Gluten Free Zucchini Squash and Corn Casserole, my Easy Fried Frozen Corn, my Cheesy Slow Cooker Creamed Corn or my Gluten Free Corn Pudding Skillet.

    You can find all of my side dish recipes here: Gluten Free Side Dish Recipes

    a cream, oval casserole dish of gluten free cornbread stuffing next to a silver serving spoon
    [feast_advanced_jump_to]

    Ingredients

    • Unsalted Butter
    • Celery
    • Yellow Onion
    • Dried Ground Sage
    • Dried Thyme
    • Sea Salt
    • Coarse Ground Black Pepper
    • Milk
    • Eggs
    • Gluten Free Cornmeal
    • Gluten Free Flour
    • Granulated Sugar
    • Baking Powder

    Instructions

    Make a batch of my Gluten Free Cornbread at least a few hours in advance. I like to make it a day or two in advance so it gets a bit stale for the stuffing.

    Preheat your oven to 325 degrees.

    Melt ¼ cup of butter in a skillet. Cook the celery and onions until they are tender and a bit translucent. Add the sage, thyme, salt and pepper. Stir until the spices are blended with the celery and onions. Cook a couple of minutes more until the spices become fragrant.

    Add the crumbled cornbread to the celery and onion mixture. I like big crumbles of cornbread, but it's up to you how much you want to crumble your cornbread.

    Place the mixture into a covered baking dish. Slice the remaining ¼ cup butter on top of the stuffing.

    Bake at 325 degrees for 30 minutes.

    Remove the lid from the baking dish and let cool slightly before serving.

    Supplies

    Frequently Asked Questions

    Does cornbread stuffing have gluten?

    Yes, it does if you don't use gluten free cornmeal. It is very important to make sure the cornmeal you use has the gluten free certified label. Regular cornmeal is usually processed with wheat flour and can be contaminated with gluten.

    Can I make cornbread stuffing ahead of time?

    Yes, you definitely can. You can make the cornbread a day or two in advance. Then, you can sautés the onions, celery and spices in butter and add that cornbread in. The cornbread can go in the fridge until you are ready to cook it before serving. Cook at 350 degrees for 30 minutes and then serve.

    What should I serve with cornbread stuffing?

    Traditionally cornbread stuffing is served at Thanksgiving with turkey, cranberry sauce, sweet potatoes, etc. At our house we also like to eat it with pork chops or steaks year round. Cornbread stuffing is a delicious side dish that doesn't have to be reserved for just your Thanksgiving dinner.

    More Recipes You Might Enjoy

    • Gluten Free Corn Pudding Skillet
    • Cheesy Slow Cooker Creamed Corn
    • Gluten Free Plum Cornmeal Cake
    • Easy Gluten Free Tamale Pie

    I get a lot of my ingredients from Thrive Market. Thrive Market has been a game changer for me eating gluten free. They have so many options I can't get at my rural grocery stores! Use this link to get 40% off your first order!

    Print
    clock clock iconcutlery cutlery iconflag flag iconfolder folder iconinstagram instagram iconpinterest pinterest iconfacebook facebook iconprint print iconsquares squares iconheart heart iconheart solid heart solid icon

    Gluten Free Cornbread Stuffing


    5 Stars 4 Stars 3 Stars 2 Stars 1 Star

    No reviews

    • Author: Elaine VanVleck
    • Total Time: 50 minutes
    • Yield: 8 servings 1x
    • Diet: Gluten Free
    Print Recipe
    Pin Recipe

    Description

    This gluten free cornbread stuffing is easy to make homemade for Thanksgiving. This is the best recipe to make for a healthy, meatless stuffing.


    Ingredients

    Scale
    • ½ cup Unsalted Butter
    • 6 Celery Stocks, chopped (approximately 2 cups)
    • 1 medium Yellow Onion, chopped
    • 3 tsp. Dried Ground Sage
    • 3 tsp. Dried Thyme
    • 2 tsp. Sea Salt
    • ½ tsp. Coarse Ground Black Pepper
    • Gluten Free Cornbread, crumbled

    Instructions

    Make a batch of my Gluten Free Cornbread at least a few hours in advance. I like to make it a day or two in advance so it gets a bit stale for the stuffing.

    Preheat your oven to 325 degrees.

    Melt ¼ cup of butter in a skillet. Cook the celery and onions until they are tender and a bit translucent. Add the sage, thyme, salt and pepper. Stir until the spices are blended with the celery and onions. Cook a couple of minutes more until the spices become fragrant.

    Add the crumbled cornbread to the celery and onion mixture. I like big crumbles of cornbread, but it's up to you how much you want to crumble your cornbread.

    Place the mixture into a covered baking dish. Slice the remaining ¼ cup butter on top of the stuffing.

    Bake at 325 degrees for 30 minutes.

    Remove the lid from the baking dish and let cool slightly before serving.

    Notes

    I like to make the gluten free cornbread a day or two in advance.

    If your celery and onion mixture gets too dry add a bit more butter or some olive oil.

    • Prep Time: 20 minutes
    • Cook Time: 30 minutes
    • Category: Side Dishes
    • Method: Baking
    • Cuisine: Gluten Free

    Did you make this recipe?

    Tag @smallfarmbiglife on Instagram and hashtag it #smallfarmbiglife

    Top Tip

    To make this recipe you will first need to make a batch of my Gluten Free Cornbread. This recipe for gluten free cornbread is super simple. I like to make mine a day or two in advance. The gluten free cornbread stuffing is better if the cornbread is a bit stale.

    Gluten Free Burger Sauce

    This homemade gluten free burger sauce is easy to make and great on burgers or fries. The recipe just takes minutes to mix together with simple ingredients. This special sauce is perfect to have in the fridge to got with a quick meal of burgers and fries.

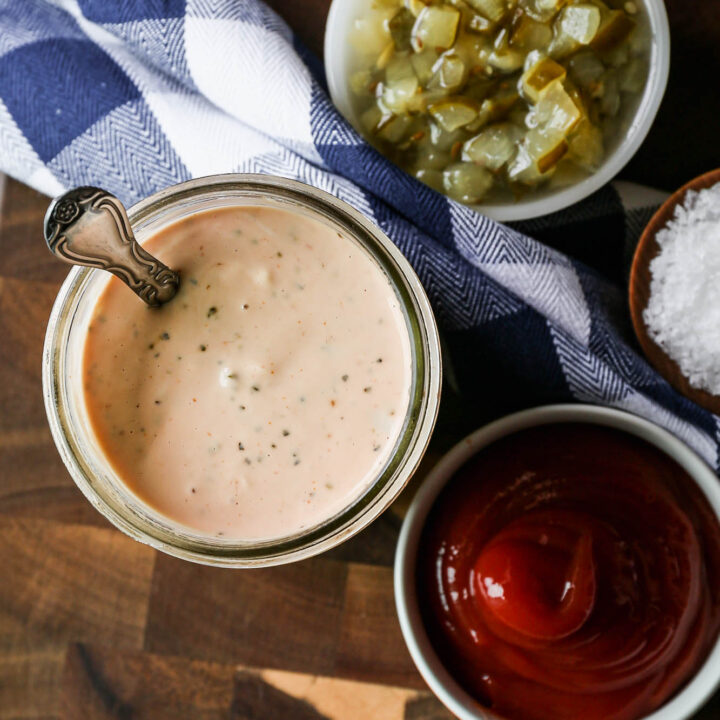
    a jar of gluten free burger sauce next to a bowl of dill relish, a bowl of ketchup and dish of salt

    I also use this sauce on my Gluten Free Cheeseburger Casserole recipe. Another favorite way to use this sauce is with our favorite frozen Alexia Sweet Potato Fries. I get them at Target or Walmart and air fry them at 400 degrees for 12 minutes.

    You might also enjoy my Gluten Free Homemade Ranch Dip or my Gluten Free Homemade Ranch Dip.

    a jar of gluten free burger sauce next to a bowl of dill relish, a bowl of ketchup and dish of salt
    [feast_advanced_jump_to]

    Ingredients

    • Mayonnaise
    • Ketchup
    • Dill Pickle Relish
    • Granulated Sugar
    • White Vinegar
    • Sea Salt
    • Ground Black Pepper

    Instructions

    In a jar or container mix together the mayonnaise, ketchup, dill pickle relish, sugar, white vinegar, salt and pepper with a spatula. You can also use a handheld mixer or an immersion blender to mix the ingredients together.

    Using an immersion blender will make a creamier sauce that is free of lumps from the relish.

    Supplies

    Frequently Asked Questions

    How do you make burger sauce from scratch?

    This recipe is so simple! You mix together the mayonnaise, ketchup, dill pickle relish, sugar, white vinegar, sea salt and black pepper in a jar or bowl. I find using my immersion blender or hand mixer is the easiest way to get the ingredients mixed together and to have a creamy sauce.

    How long does homemade gluten free burger sauce last?

    Honestly we go through this pretty quickly, but it should last in your refrigerator for up to a week. I like this sauce best after it's been in a refrigerator for a day and has really gotten flavorful.

    More Recipes You Might Enjoy

    Gluten Free Homemade Ranch Dip
    Gluten Free Caramelized Onion Dip
    Air Fryer Sweet Potato Wedges
    Gluten Free Cheeseburger Casserole
    10 Easy Gluten Free Beef Recipes

    I get a lot of my ingredients from Thrive Market. Thrive Market has been a game changer for me eating gluten free. They have so many options I can't get at my rural grocery stores! Use this link to get 25% off your first order!

    Print
    clock clock iconcutlery cutlery iconflag flag iconfolder folder iconinstagram instagram iconpinterest pinterest iconfacebook facebook iconprint print iconsquares squares iconheart heart iconheart solid heart solid icon

    Gluten Free Burger Sauce


    5 Stars 4 Stars 3 Stars 2 Stars 1 Star

    No reviews

    • Author: Elaine VanVleck
    • Total Time: 5 minutes
    • Yield: 1 cup 1x
    • Diet: Gluten Free
    Print Recipe
    Pin Recipe

    Description

    This homemade gluten free burger sauce is easy to make and great on burgers or fries. The recipe just takes minutes to mix together with simple ingredients. This special sauce is perfect to have in the fridge to got with a quick meal of burgers and fries.


    Ingredients

    Scale

    ½ cup Mayonnaise
    ¼ cup Ketchup
    2 tsp. Dill Pickle Relish
    1 tsp. Granulated Sugar
    1 tsp. White Vinegar
    ¼ tsp. Sea Salt
    ½ tsp. Coarse Ground Black Pepper


    Instructions

    In a jar or container mix together the mayonnaise, ketchup, dill pickle relish, sugar, white vinegar, salt and pepper with a spatula. You can also use a handheld mixer or an immersion blender to mix the ingredients together.

    Using an immersion blender will make a creamier sauce that is free of lumps from the relish.

    • Prep Time: 5 minutes
    • Category: Sauces
    • Cuisine: Gluten Free

    Did you make this recipe?

    Tag @smallfarmbiglife on Instagram and hashtag it #smallfarmbiglife

    Baked Kale and Zucchini Pilaf

    This easy recipe for gluten free baked kale and zucchini pilaf is made with jasmine rice and lots of green veggies. It's a perfect side dish with steak, chicken or on it's own for a light meal. This rice casserole has cream cheese and spices for a delicious, creamy flavor.

    a white bowl of gluten free baked kale and zucchini pilaf on a tan oven mitt next to two round zucchini and some kale leaves

    I'm always looking for ways to use all of the kale and zucchini I grow in our garden. It's my favorite to have savory recipes that aren't the typical baked goods. Don't get me wrong, I love a good gluten free zucchini bread or cookie, but adding more greens to a meal is always a win.

    If you are looking for more zucchini recipes try my Gluten Free Zucchini Squash and Corn Casserole, my Air Fryer Roasted Zucchini Squash, my Gluten Free Zucchini Chocolate Chip Cookies, or my Easy Gluten Free Zucchini Brownies.

    You can find all of my side dishes here: Gluten Free Side Dish Recipes

    a white bowl of gluten free baked kale and zucchini pilaf on a tan oven mitt next to two round zucchini and some kale leaves
    [feast_advanced_jump_to]

    Ingredients

    • Olive Oil
    • Yellow Onion
    • Minced Garlic
    • Jasmine Rice
    • Vegetable Stock
    • Cream Cheese
    • Dried Thyme
    • Dried Tarragon
    • Sea Salt
    • Ground Black Pepper
    • Zucchini
    • Kale

    Instructions

    Preheat your oven to 350 degrees.

    In an ovenproof, covered dutch oven or pot on medium heat saute the onions and garlic in olive oil until softened, 4-5 minutes. Add zucchini, thyme, tarragon, salt and pepper. Cook 4-5 minutes to soften the zucchini.

    Turn off the heat. Add the jasmine rice and vegetable stock to the pot. Stir to combine ingredients.

    Bake at 350 degrees for 30 minutes with the lid on the pot.

    Carefully remove the pot from the oven. Remove the lid and fluff the rice with a fork. Then add the cream cheese and kale. Stir the kale into the mixture and bury the cream cheese in the middle. 

    Place the dutch oven back in the oven and bake at 350 degrees for 2-3 minutes or until the cream cheese is softened and the kale is wilted.

    Remove from oven and stir the cream cheese into the mixture to create a creamy sauce. Serve immediately while still warm.

    Supplies

    Frequently Asked Questions

    What is pilaf?

    Pilaf is a rice dish that is usually cooked in stock or broth. It includes spices, vegetables and sometimes meat. The idea of pilaf is cooking the rice along with all the other ingredients. I love that pilaf makes for an easy side dish that can be cooking in the oven while I finish the rest of the meal.

    How do you keep kale and squash pilaf from getting watery?

    It's really important not to skip the step of cooking the zucchini on the stovetop before adding the rest of the ingredients and baking. Cooking down the vegetables will evaporate off some of the moisture. 

    Then you will add the rest of your ingredients and bake covered for 30 minutes. It's very important that you use a dutch oven or other dish with a tight fitting cover. This will allow the rice to absorb the vegetable stock and the excess moisture from the zucchini.

    More Recipes You Might Enjoy

    • Cheesy Gluten Free Summer Squash Casserole
    • Air Fryer Roasted Zucchini Squash
    • Gluten Free Zucchini Squash and Corn Casserole
    • Gluten Free Sausage, Kale and Potato Skillet

    I get a lot of my ingredients from Thrive Market. Thrive Market has been a game changer for me eating gluten free. They have so many options I can't get at my rural grocery stores! Use this link to get 25% off your first order!

    Print
    clock clock iconcutlery cutlery iconflag flag iconfolder folder iconinstagram instagram iconpinterest pinterest iconfacebook facebook iconprint print iconsquares squares iconheart heart iconheart solid heart solid icon

    Baked Kale and Zucchini Pilaf


    5 Stars 4 Stars 3 Stars 2 Stars 1 Star

    No reviews

    • Author: Elaine VanVleck
    • Total Time: 52 minutes
    • Yield: 8 servings 1x
    • Diet: Gluten Free
    Print Recipe
    Pin Recipe

    Description

    This easy recipe for gluten free baked kale and zucchini pilaf is made with jasmine rice and lots of green veggies. It's a perfect side dish with steak, chicken or on it's own for a light meal. This rice casserole has cream cheese and spices for a delicious, creamy flavor.


    Ingredients

    Scale

    1 Tbsp. Olive Oil
    1 small Yellow Onion, finely diced
    1 Tbsp. Minced Garlic
    1 cup Jasmine Rice
    2 cups Vegetable Broth
    2 ounces Cream Cheese
    1 tsp. Dried Thyme
    ½ tsp. Dried Tarragon
    ½ tsp. Sea Salt
    ½ tsp. Ground Black Pepper
    1 small Zucchini, seeds removed and diced into ½ inch chunks
    1 cup Kale, stem removed and chopped


    Instructions

    Preheat your oven to 350 degrees.

    In an ovenproof, covered dutch oven or pot on medium heat saute the onions and garlic in olive oil until softened, 4-5 minutes. Add zucchini, thyme, tarragon, salt and pepper. Cook 4-5 minutes to soften the zucchini.

    Turn off the heat. Add the jasmine rice and vegetable stock to the pot. Stir to combine ingredients.

    Bake at 350 degrees for 30 minutes with the lid on the pot.

    Carefully remove the pot from the oven. Remove the lid and fluff the rice with a fork. Then add the cream cheese and kale. Stir the kale into the mixture and bury the cream cheese in the middle. 

    Place the dutch oven back in the oven and bake at 350 degrees for 2-3 minutes or until the cream cheese is softened and the kale is wilted.

    Remove from oven and stir the cream cheese into the mixture to create a creamy sauce. Serve immediately while still warm.

    • Prep Time: 20 minutes
    • Cook Time: 32 minutes
    • Category: Side Dish
    • Method: Baking
    • Cuisine: Gluten Free

    Did you make this recipe?

    Tag @smallfarmbiglife on Instagram and hashtag it #smallfarmbiglife

    Cheesy Gluten Free Summer Squash Casserole

    This Gluten Free Summer Squash Casserole is one of those recipes that I look forward to making every single summer when the garden is overflowing with zucchini and yellow squash and I need a delicious way to use it all up. It is rich, creamy, and packed with sharp cheddar cheese in the most comforting and satisfying baked side dish that disappears fast at any dinner table or potluck.

    The combination of sour cream, mayonnaise, eggs, and cheese creates the most incredibly creamy filling and the gluten free bread crumb topping gets beautifully golden and crunchy under the broiler for the perfect finish.

    a cast iron skillet of gluten free summer squash casserole with some served onto a white plate

    The most important thing to know about this recipe is that you need to saute the squash and zucchini on the stovetop before baking. This step cooks out a lot of the moisture from the vegetables which is what keeps your casserole from getting watery. Do not skip it.

    After that the rest of the recipe comes together quickly and the oven does all the work. This is genuinely one of my favorite summer side dishes and I think once you make it you are going to feel the same way.

    If you are looking for more zucchini recipes try my Gluten Free Zucchini Squash and Corn Casserole, my Air Fryer Roasted Zucchini Squash, my Baked Kale and Zucchini Pilaf or my Easy Gluten Free Zucchini Brownies.

    You can find all of my side dish recipes here: Gluten Free Side Dish Recipes

    a cast iron skillet of gluten free summer squash casserole with some served onto a white plate
    [feast_advanced_jump_to]

    Ingredients

    • Yellow Squash
    • Zucchini
    • Unsalted Butter
    • Yellow Onion
    • Minced Garlic
    • Cheddar Cheese
    • Sour Cream
    • Mayonnaise
    • Eggs
    • Sea Salt
    • Ground Black Pepper
    • Gluten Free Bread Crumbs

    Instructions

    Preheat your oven to 350 degrees. 

    In an oven safe pan or cast iron skillet on medium heat add butter and allow to melt. Add the diced onions and cook until they're almost translucent. Add the minced garlic and cook 1-2 minutes more.

    Add the diced yellow squash and zucchini to the onion mixture. Saute on medium heat until the squash starts to soften and the onions are completely translucent.

    Add the eggs to the skillet and mix around until they are creamy and mixed into the vegetables. Add 1 cup of cheddar cheese, sour cream, mayonnaise, salt, pepper and 1 cup of gluten free bread crumbs. Stir thoroughly until everything is mixed together.

    This mixture will be very thick and almost paste like. This will allow for the squash to continue to cook down in the oven and release water.

    Top the mixture with the other ½ cup of cheddar cheese and ½ cup of gluten free bread crumbs.

    Bake at 350 degrees for 45-50 minutes. The edges will be bubbling, the cheese will be melted and the top will be slightly browned when the casserole is done.

    At this point, I like to turn my broiler on high and broil the casserole for 1-2 minutes. This will brown the top and give it a bit of crunch. Watch the casserole very closely as the browning will happen quickly. 

    Supplies

    Storage

    After the casserole has cooled completely store in an air tight container in the refrigerator for up to 5 days.

    Frequently Asked Questions

    How do you thicken summer squash casserole?

    This recipe has gluten free bread crumbs or rice crumbs in it for a thickener. After cooking the squash on the stovetop there is still a lot of liquid that hasn't evaporated you can add a bit more bread crumbs, but remember, that more moisture will evaporate as you bake this dish.

    How do you keep squash casserole from getting watery?

    It's really important not to skip the step of cooking the squash and zucchini on the stovetop before adding the rest of the ingredients and baking. Cooking down the vegetables will evaporate off some of the moisture.

    Then you will add the cheese, sour cream, mayonnaise, eggs, seasoning and bread crumbs. After adding these the casserole will be almost paste like and very thick. This is perfect because as the squash and zucchini continue to cook down and release water in the oven you will be left with a super creamy hot dish.

    How do I tell if this casserole is done?

    The edges will be bubbling and then cheese will be completely melted on top. The top will just be starting to brown a bit. I like to turn the broiler on high and finish browning the top of the casserole to give this dish a bit of crunch on top at this point.

    More Recipes You Might Enjoy

    • Gluten Free Zucchini Squash and Corn Casserole
    • Easy Gluten Free Zucchini Brownies
    • Gluten Free Zucchini Chocolate Chip Cookies
    • Air Fryer Roasted Zucchini Squash

    I get a lot of my ingredients from Thrive Market. Thrive Market has been a game changer for me eating gluten free. They have so many options I can't get at my rural grocery stores! Use this link to get 40% off your first order!

    Print
    clock clock iconcutlery cutlery iconflag flag iconfolder folder iconinstagram instagram iconpinterest pinterest iconfacebook facebook iconprint print iconsquares squares iconheart heart iconheart solid heart solid icon

    Gluten Free Summer Squash Casserole


    5 Stars 4 Stars 3 Stars 2 Stars 1 Star

    No reviews

    • Author: Elaine VanVleck
    • Total Time: 1 hour 15 minutes
    • Yield: 8 servings 1x
    • Diet: Gluten Free
    Print Recipe
    Pin Recipe

    Description

    This Gluten Free Summer Squash Casserole is a rich, creamy, and cheesy baked side dish made with fresh zucchini and yellow squash, sharp cheddar cheese, sour cream, and gluten free bread crumbs for the most delicious and satisfying summer vegetable casserole you will ever make. The squash is sauteed with butter, onion, and garlic before baking which prevents a watery casserole and creates incredible depth of flavor with a beautifully golden and crunchy bread crumb topping. Naturally gluten free and perfect for summer dinners, potlucks, and using up garden zucchini and yellow squash all season long!


    Ingredients

    Scale
    • 1 pound Yellow Squash, seeds removed and cut into ½ inch chunks
    • 1 pound Zucchini, seeds removed and cut into ½ inch chunks
    • 2 Tbsp. Unsalted Butter
    • 1 medium Yellow Onion, diced
    • 1 Tbsp. Minced Garlic
    • 1 ½ cups Cheddar Cheese, grated
    • ½ cup Sour Cream
    • ¼ cup Mayonnaise
    • 2 large Eggs, beaten
    • 1 tsp. Sea Salt
    • 1 tsp. Ground Black Pepper
    • 1 ½ cups Gluten Free Bread Crumbs

    Instructions

    Preheat your oven to 350 degrees. 

    In an oven safe pan or cast iron skillet on medium heat add butter and allow to melt. Add the diced onions and cook until they're almost translucent. Add the minced garlic and cook 1-2 minutes more.

    Add the diced yellow squash and zucchini to the onion mixture. Saute on medium heat until the squash starts to soften and the onions are completely translucent.

    Add the eggs to the skillet and mix around until they are creamy and mixed into the vegetables. Add 1 cup of cheddar cheese, sour cream, mayonnaise, salt, pepper and 1 cup of gluten free bread crumbs. Stir thoroughly until everything is mixed together.

    This mixture will be very thick and almost paste like. This will allow for the squash to continue to cook down in the oven and release water.

    Top the mixture with the other ½ cup of cheddar cheese and ½ cup of gluten free bread crumbs.

    Bake at 350 degrees for 45-50 minutes. The edges will be bubbling, the cheese will be melted and the top will be slightly browned when the casserole is done.

    At this point, I like to turn my broiler on high and broil the casserole for 1-2 minutes. This will brown the top and give it a bit of crunch. Watch the casserole very closely as the browning will happen quickly. 

    • Prep Time: 30 minutes
    • Cook Time: 45 minutes
    • Category: Side Dish
    • Method: Baking
    • Cuisine: American

    Did you make this recipe?

    Tag @smallfarmbiglife on Instagram and hashtag it #smallfarmbiglife

    If you made this Gluten Free Summer Squash Casserole I would love to hear what you thought! Please leave a star rating and a comment below. This is one of my favorite summer side dish recipes and I hope it becomes one of yours too!

    Top Tip

    Do not skip the step of sauteing the squash and zucchini on the stovetop before adding the remaining ingredients and baking. This is the most important step in the entire recipe. Summer squash holds a tremendous amount of water and cooking it down first allows that moisture to evaporate before the casserole goes into the oven. If you skip this step your casserole will be watery and soupy rather than creamy and set. Cook the squash until it has softened and the onions are completely translucent before moving on.

    • « Go to Previous Page
    • Page 1
    • Interim pages omitted …
    • Page 7
    • Page 8
    • Page 9
    • Page 10
    • Page 11
    • Interim pages omitted …
    • Page 15
    • Go to Next Page »

    Primary Sidebar

    Welcome! I'm Elaine

    I'm so glad you are here! I share easy gluten free recipes from my small farm in Washington.

    Be sure to sign up for my newsletter to stay up to date on all of my new recipes.

    More about me...
    • Instagram
    • Pinterest
    • Facebook
    • Twitter
    • Mail

    Load up on new recipes, exclusive goodies, + more!
    Sign up below to stay up-to-date on news, events, and special deals.
    Thank you for subscribing!

    Easy Meals Recipes

    • Gluten Free Instant Pot Chili Mac and Cheese
    • Gluten Free Taco Casserole
    • Gluten Free Cowboy Baked Beans
    • Gluten Free Walking Taco Casserole
    • Gluten Free Creamy Beef and Mushroom Pasta
    • Gluten Free Instant Pot Chicken & Dumplings
    • Instant Pot Mexican Style Beef and Rice
    • Gluten Free Chicken Parmesan Pasta Casserole
    • Gluten Free One Pot Hamburger Helper Copycat
    • Gluten Free Salisbury Steak with Mushroom Gravy
    • Gluten Free Air Fryer Fajitas
    • Gluten Free Sloppy Joe Casserole

    Footer

    Disclaimer:

    “We are a participant in the Amazon Services LLC Associates Program, an affiliate advertising program designed to provide a means for us to earn fees by linking to Amazon.com and affiliated sites.”

    Footer

    back to top

    About

    • Privacy Policy
    • Shop my Amazon Page
    • Follow me on LTK

    Newsletter

    • Sign Up! for emails and updates

    Contact

    • Contact
    • Media Kit
    • About Me

    As an Amazon Associate I earn from qualifying purchases.

    I may get commissions for purchases made through links on this site.

    Copyright © 2026 Brunch Pro on the Brunch Pro Theme