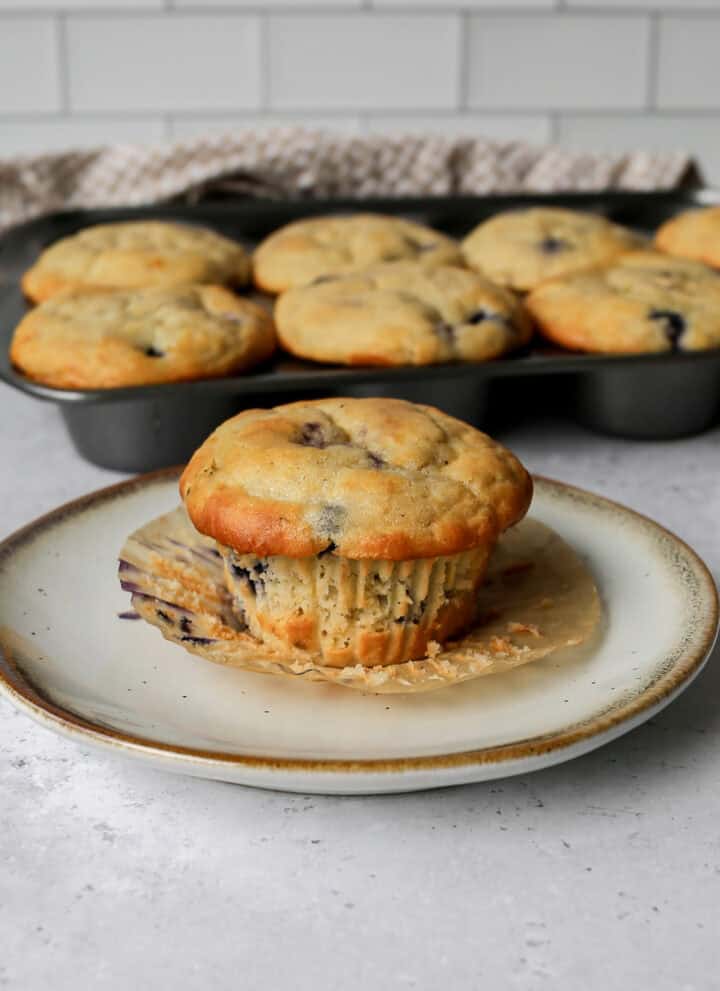
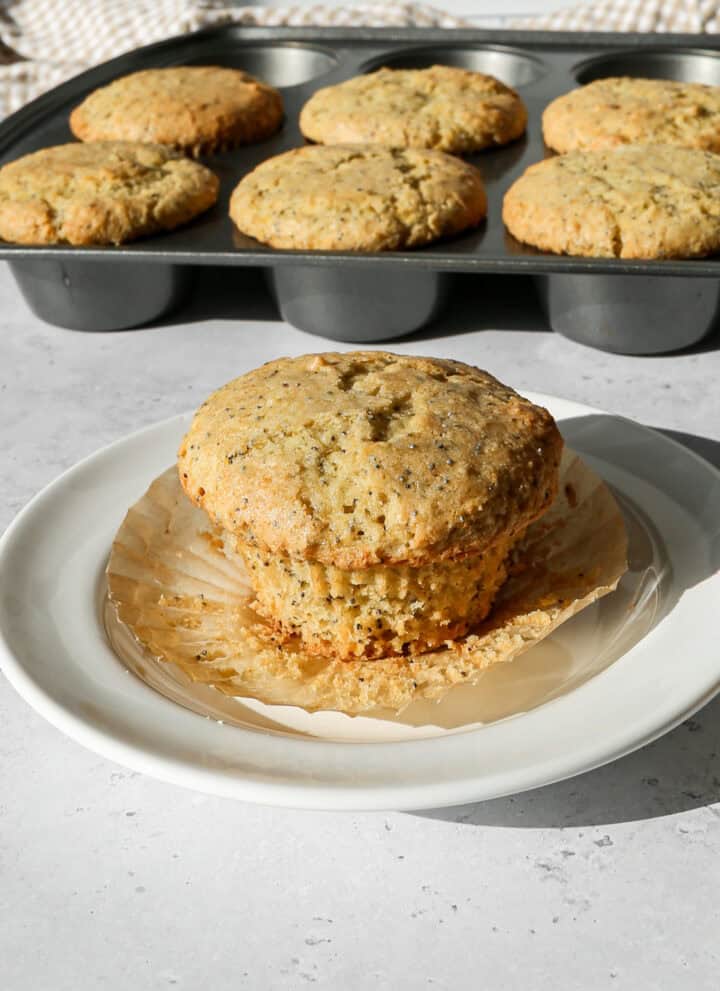
• Skip to primary navigation
  • Skip to main content
  • Skip to primary sidebar
  • Skip to footer

Small Farm Big Life logo

  • Home
  • Resources
  • Free Guides
  • Nav Social Menu

    • Email
    • Facebook
    • Instagram
    • Pinterest
    • Twitter
menu icon
go to homepage
subscribe
search icon
Homepage link
  • Home
  • Gluten-Free Recipes
  • Resources
  • Free Guides
    • Email
    • Facebook
    • Instagram
    • Pinterest
    • Twitter
  • ×

    Gluten Free Peanut Butter Banana Muffins

    Aug 15, 2022 · Leave a Comment

    This easy recipe for gluten free peanut butter banana muffins are a great breakfast or snack on the go option. These gluten free banana muffins use creamy peanut butter and have chocolate chips in them. They are full of flavor and are delicious with a cup of coffee.

    a metal muffin tin of gluten free peanut butter banana muffins next to a small wooden bowl of chocolate chips.

    I love gluten free muffins for a quick breakfast or snack to pack in lunches. It's a bonus that they are so easy to make! I like to use parchment baking liners to make clean up simple.

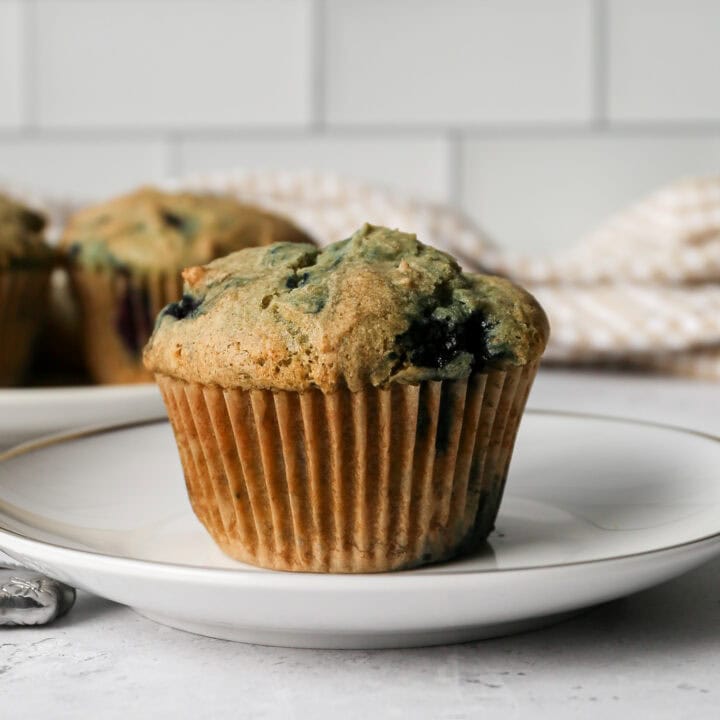
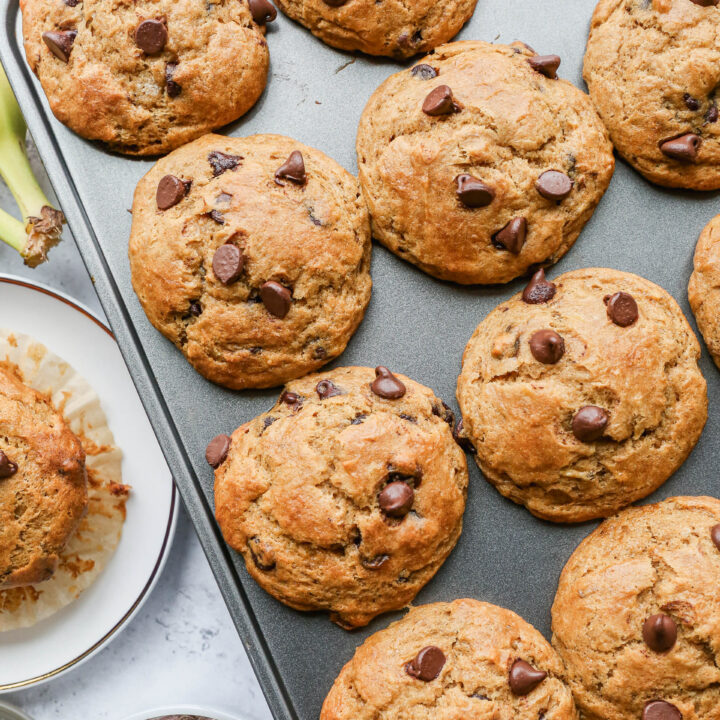
    If you are looking for more gluten free muffin recipes you might also enjoy my Gluten Free Banana Oat Muffins, Gluten Free Blackberry Oat Muffins, Gluten Free Cranberry Orange Muffins or these Gluten Free Apple Carrot Muffins recipes.

    [feast_advanced_jump_to]
    a metal muffin tin of gluten free peanut butter banana muffins with chocolate chips in them.

    Ingredients

    • Gluten Free Flour
    • Baking Powder
    • Flaxseed Meal
    • Sea Salt
    • Ground Cinnamon
    • Bananas
    • Brown Sugar
    • Creamy Peanut Butter
    • Unsalted Butter
    • Egg
    • Milk
    • Semi-Sweet Chocolate Chips

    Instructions

    Preheat oven to 350 degrees.

    Add bananas, brown sugar, peanut butter, melted butter, egg and milk to the bowl of your stand mixer. Beat until bananas are broken into little pieces. If the bananas aren't overripe you will need to mash them before adding them.

    Add the gluten free flour, baking powder, flaxseed meal, salt and cinnamon to the wet ingredients. Blend until just combined. Add the chocolate chips and blend just until they are mixed into the batter.

    Using a tablespoon place two heaping tablespoons in each cup of your muffin pan. I like to line my muffin tins for easy clean up.

    Bake at 350 degrees for 20-22 minutes.

    Substitutions

    • Raisins - you can replace the chocolate chips with raisins
    • Crunchy Peanut Butter - for some added crunch you can use crunchy peanut butter instead of smooth

    Supplies

    Storage

    Store the baked muffins in an air tight container for up to 5 days. If it's warm out I like to store mine in the refrigerator.

    You can also freeze these muffins in a freezer safe container for up to a month.

    Top tip

    If your bananas are really ripe you will want to mash them before adding them to the mixing bowl. Super ripe bananas can be added right to the mixing bowl with the wet ingredients.

    Print
    clock clock iconcutlery cutlery iconflag flag iconfolder folder iconinstagram instagram iconpinterest pinterest iconfacebook facebook iconprint print iconsquares squares iconheart heart iconheart solid heart solid icon

    Gluten Free Peanut Butter Banana Muffins


    ★ 5 Stars ☆ ★ 4 Stars ☆ ★ 3 Stars ☆ ★ 2 Stars ☆ ★ 1 Star ☆

    No reviews

    • Author: Elaine VanVleck
    • Total Time: 35 minutes
    • Yield: 12 muffins 1x
    • Diet: Gluten Free
    Print Recipe
    Pin Recipe

    Description

    This easy recipe for gluten free peanut butter banana muffins are a great breakfast or snack on the go option. These gluten free banana muffins use creamy peanut butter and have chocolate chips in them. They are full of flavor and are delicious with a cup of coffee.


    Ingredients

    Scale

    2 cups Gluten Free Flour
    2 teaspoon Baking Powder
    2 tablespoon Flaxseed Meal
    1 teaspoon Sea Salt
    ½ teaspoon Ground Cinnamon
    2 medium Bananas, very ripe
    ½ cup Brown Sugar
    ½ cup Creamy Peanut Butter
    ½ cup Unsalted Butter, melted
    1 large Egg
    ¼ cup Milk
    1 cup Semi-Sweet Chocolate Chips


    Instructions

    Preheat oven to 350 degrees.

    Add bananas, brown sugar, peanut butter, melted butter, egg and milk to the bowl of your stand mixer. Beat until bananas are broken into little pieces. If the bananas aren't overripe you will need to mash them before adding them.

    Add the gluten free flour, baking powder, flaxseed meal, salt and cinnamon to the wet ingredients. Blend until just combined. Add the chocolate chips and blend just until they are mixed into the batter.

    Using a tablespoon place two heaping tablespoons in each cup of your muffin pan. I like to line my muffin tins for easy clean up.

    Bake at 350 degrees for 20-22 minutes.

    • Prep Time: 15 minutes
    • Cook Time: 20 minutes
    • Category: Breakfast, Snacks
    • Method: Baking
    • Cuisine: Gluten Free

    Keywords: healthy, easy, chocolate chip, baking, creamy peanut butter, breakfast snacks

    Did you make this recipe?

    Tag @smallfarmbiglife on Instagram and hashtag it #smallfarmbiglife

    FAQ

    Can you freeze these muffins?

    Yes! I love to freeze these gluten free peanut butter banana muffins in a freezer safe container for up to a month. It makes it really easy to have a quick snack or breakfast ready to eat.

    How do you make gluten free muffins rise?

    Baking powder is key for making gluten free muffins rise. I like to use 1 teaspoon of baking powder for every cup of gluten free flour. This will help the muffins to be fluffy and light. It will also keep them from being too dense.

    How do I store gluten free muffins?

    They are best stored in an air tight container after they have cooled fully. They can be left out on the counter for 2 days, but after that I move them to refrigerator so they don't spoil. They can be stored in the refrigerator for up to 5 days.

    Easy Refrigerator Pickled Cauliflower

    Jul 18, 2022 · Leave a Comment

    This recipe for easy refrigerator pickled cauliflower is a quick way to make the best crunchy snack without any canning. With cauliflower florets, dill and a vinegar brined you can make these pickled veggies. I used a half gallon jar to prepare this keto friendly snack in.

    a half gallon jar of easy refrigerator pickled cauliflower.

    I love the ease of refrigerator pickled anything! You simply add your spices and vegetables to a jar and then pour the simple vinegar brine over top.

    I also have a yummy recipe for Refrigerator Bread and Butter Pickles. If you are looking for ways to use summer veggies you might also like my Gluten Free Homemade Walnut Pesto, this Air Fryer Roasted Parmesan Broccoli or my Healthy Mexican Street Corn Salad.

    [feast_advanced_jump_to]
    a half gallon ball canning jar of easy refrigerator pickled cauliflower.

    Ingredients

    • Half Gallon Jar
    • Minced Garlic
    • Mustard Seeds
    • Celery Seeds
    • Black Peppercorns
    • Dried Dill
    • Cauliflower
    • Water
    • White Vinegar
    • Sea Salt
    • Granulated Sugar

    Instructions

    Wash your jar in hot soapy water and dry or run through the dishwasher with the heat dry cycle to sanitize.

    Add the minced garlic, mustard seeds, celery seeds, peppercorns and dill to the jar. Add the cauliflower florets to the jar.

    In a 2-quart saucepan over medium high heat bring the water, vinegar, salt and sugar to a boil. Remove from heat and pour into jar over cauliflower mixture. If needed top the jar off with some water.

    Let the mixture cool slightly and then set the lid on the jar, but don't tighten it down. Let the cauliflower cool to room temperature and then move to the refrigerator.

    Refrigerate for at least 24 hours before serving. The pickled cauliflower gets better the longer it is left in the vinegar brine in the fridge.

    Store in the refrigerator for up to 4 weeks.

    Variations

    • Spicy - add 1 teaspoon red pepper flakes to the jar
    • Small Batch - cut this recipe in half to make a 2-quart jar
    • With Carrots - use a medium sized head of cauliflower and 1 cup chopped carrots

    Supplies

    Storage

    These easy refrigerator pickled cauliflower can be stored in an air tight jar in the fridge for up to four weeks. You can eat this recipe after 24 hours, but it gets better the longer it's in the fridge.

    Print
    clock clock iconcutlery cutlery iconflag flag iconfolder folder iconinstagram instagram iconpinterest pinterest iconfacebook facebook iconprint print iconsquares squares iconheart heart iconheart solid heart solid icon

    Easy Refrigerator Pickled Cauliflower


    ★ 5 Stars ☆ ★ 4 Stars ☆ ★ 3 Stars ☆ ★ 2 Stars ☆ ★ 1 Star ☆

    No reviews

    • Author: Elaine VanVleck
    • Total Time: 15 minutes
    • Yield: half gallon
    • Diet: Gluten Free
    Print Recipe
    Pin Recipe

    Description

    This recipe for easy refrigerator pickled cauliflower is a quick way to make the best crunchy snack without any canning. With cauliflower florets, dill and a vinegar brined you can make these pickled veggies. I used a half gallon jar to prepare this keto friendly snack in.


    Ingredients

    Scale

    1 - Half Gallon Jar
    2 Tbsp Minced Garlic
    2 tsp Mustard Seeds
    1 tsp Celery Seeds
    2 tsp Black Peppercorns
    2 tsp Dried Dill
    1 large head Cauliflower, washed and cut into florets
    3 cups Water
    1 ½ cups White Vinegar
    3 tsp Sea Salt
    2 tsp Granulated Sugar


    Instructions

    Wash your half gallon jar in hot soapy water and dry or run through the dishwasher with the heat dry cycle to sanitize.

    Add the minced garlic, mustard seeds, celery seeds, peppercorns and dill to the jar. Add the cauliflower florets to the jar.

    In a 2-quart saucepan over medium high heat bring the water, vinegar, salt and sugar to a boil. Remove from heat and pour into jar over cauliflower mixture. If needed top the jar off with some water.

    Let the mixture cool slightly and then set the lid on the jar, but don't tighten it down. Let the cauliflower cool to room temperature and then move to the refrigerator.

    Refrigerate for at least 24 hours before serving. The pickled cauliflower gets better the longer it is left in the vinegar brine in the fridge.

    Store in the refrigerator for up to 4 weeks.

    • Prep Time: 15 minutes
    • Category: Snacks, Vegetables
    • Method: Pickling
    • Cuisine: Gluten Free

    Keywords: easy, quick, best, keto, dill, jar, pickled veggies, brine, cauliflower florets, crunchy, no canning, vinegar, pickled refrigerator vegetables

    Did you make this recipe?

    Tag @smallfarmbiglife on Instagram and hashtag it #smallfarmbiglife

    Gluten Free Mango Pineapple Smoothie

    Jul 11, 2022 · Leave a Comment

    This healthy recipe for a gluten free mango pineapple smoothie is made without banana. It is easy to make this simple smoothie with frozen mango, pineapple, orange and with milk. I walk you through how to make what I think is the best smoothie!

    a ball jar of gluten free mango pineapple smoothie next to a fresh pineapple and frozen mango chunks.

    I love this smoothie for when I don't have a banana to add. The pineapple and honey give the smoothie plenty of sweet taste. I used almond milk, but you could use whatever kind of milk you have on hand.

    I used canned pineapple and packaged frozen mango chunks. It's easy to have these supplies on hand and not to have to worry about fresh ingredients going bad. Plus where I live it's not always easy to get fresh pineapple or mango.

    [feast_advanced_jump_to]

    How do I make a mango pineapple smoothie?

    Smoothies are such a simple meal replacement or treat to make! For this mango pineapple smoothie I combined frozen mango, pineapple chunks, pineapple juice, plain greek yogurt, milk, an orange and some honey in my blender and mixed until all the ingredients are well blended.

    I like to slowly raise the speed on my blender to make sure I'm getting all the chunks. I also like to stop the blender, let everything settle and blend again to make sure there aren't any frozen chunks missed.

    Ingredients

    • Frozen Mango Chunks
    • Pineapple Chunks
    • Pineapple Juice
    • Plain Greek Yogurt
    • Milk
    • Orange
    • Honey

    Notes: You could use fresh mango and/or fresh pineapple for this recipe. I used almond milk, but you can use whatever milk works for you.

    Can I make this mango pineapple smoothie with coconut milk?

    Yes! I used almond milk when I made mine, but whatever milk you have on hand will work.

    Supplies

    Are mango pineapple smoothies healthy?

    This smoothie recipe has a lot of nutrients with the fruits, yogurt and milk included. Both mangoes and pineapple have a lot of vitamin C, which is great for tissue repair, wound healing and collagen formation.

    More Drinks You Might Enjoy

    Lemon Lime Homemade Sports Drink
    Paleo Coconut Milk Iced Latte
    Homemade Raspberry Lemonade
    Cantaloupe Agua Fresca
    Instant Pot Ginger Ale Syrup

    I get some of my ingredients from Thrive Market. Thrive Market has been a game changer for me eating gluten free. They have so many options I can’t get at my rural grocery stores! Use this link to get 25% off your first order!

    Print
    clock clock iconcutlery cutlery iconflag flag iconfolder folder iconinstagram instagram iconpinterest pinterest iconfacebook facebook iconprint print iconsquares squares iconheart heart iconheart solid heart solid icon

    Gluten Free Mango Pineapple Smoothie


    ★ 5 Stars ☆ ★ 4 Stars ☆ ★ 3 Stars ☆ ★ 2 Stars ☆ ★ 1 Star ☆

    No reviews

    • Author: Elaine VanVleck
    • Total Time: 5 minutes
    • Yield: 1 serving 1x
    • Diet: Gluten Free
    Print Recipe
    Pin Recipe

    Description

    This healthy recipe for a gluten free mango pineapple smoothie is made without banana. It is easy to make this simple smoothie with frozen mango, pineapple, orange and with milk. I walk you through how to make what I think is the best smoothie! 


    Ingredients

    Scale

    1 cup Frozen Mango Chunks
    ½ cup Pineapple Chunks
    ¼ cup Pineapple Juice
    ¼ cup Plain Greek Yogurt
    ¼ cup Milk
    1 medium Orange, peeled
    2 tsp. Honey


    Instructions

    In your blender place the mango, pineapple, pineapple juice, yogurt, milk, orange and honey.

    Blend gradually increasing the speed to get all of the fruit chunks blended.

    Serve immediately.

    Notes

    I use canned pineapple chunks and the juice from the can.

    • Prep Time: 5 minutes
    • Category: Drinks
    • Method: Blended
    • Cuisine: Gluten Free

    Keywords: smoothie, mango, pineapple, orange, tropical, gluten free, easy, healthy, simple, without banana, with milk, best, how to make

    Did you make this recipe?

    Tag @smallfarmbiglife on Instagram and hashtag it #smallfarmbiglife

    Easy Fresh Pineapple Salsa

    Jul 5, 2022 · Leave a Comment

    a white bowl of easy fresh pineapple salsa next to a small wooden bowl of coarse salt, a bowl of gluten free tortilla chips and a glass of seltzer water.

    This recipe for easy fresh pineapple salsa is perfect with fish, chicken, tacos or as an appetizer. This homemade salsa is made with fresh pineapple, tomatoes, cilantro and jalapeno peppers. It has a mild flavor that is perfect for summer barbecues.

    a white bowl of easy fresh pineapple salsa next to a bowl of gluten free tortilla chips, a small wooden bowl of coarse salt and a glass with ice of seltzer water.

    What do I serve with pineapple salsa?

    This easy fresh pineapple salsa is perfect to serve with gluten free tortilla chips as a bbq appetizer. It is also delicious served with fish tacos, over pork tenderloin or with chicken.

    Should I use fresh or canned pineapple?

    For this recipe I would definitely use a ripe, fresh pineapple. The flavor is completely different and a lot more muted if you use canned pineapple. This salsa will turn out a lot better with a lot more flavor if you use finely diced fresh pineapple.

    Easy Fresh Pineapple Salsa Supplies

    How do I choose a fresh pineapple?

    To choose a fresh pineapple that is ripe you want the outside shell to be firm, but with a bit of give when you gently squeeze it. If the pineapple is completely hard it is likely not ripe. You also want to pull on the center leaves at the top. If there is give to the leaves or if one comes out the pineapple is ripe and ready to use now.

    Easy Fresh Pineapple Salsa Ingredients

    • Fresh Pineapple
    • Tomatoes
    • Sweet Onion
    • Cilantro
    • Jalapeno Pepper
    • Lime Juice
    • Minced Garlic
    • Ground Coriander
    • Ground Cumin
    • Sea Salt
    • Gluten Free Tortilla Chips

    If you like this recipe you might also enjoy:

    Gluten Free Pina Colada Cake
    Gluten Free Pineapple Upside Down Cake
    Slow Cooker Hawaiin Pork Tenderloin
    Gluten Free Slow Cooker Hawaiin Meatballs
    Gluten Free Mango Pineapple Smoothie

    I get a lot of my ingredients from Thrive Market. Thrive Market has been a game changer for me eating gluten free. They have so many options I can’t get at my rural grocery stores! Use this link to get 25% off your first order!

    Print
    clock clock iconcutlery cutlery iconflag flag iconfolder folder iconinstagram instagram iconpinterest pinterest iconfacebook facebook iconprint print iconsquares squares iconheart heart iconheart solid heart solid icon

    Easy Fresh Pineapple Salsa


    ★ 5 Stars ☆ ★ 4 Stars ☆ ★ 3 Stars ☆ ★ 2 Stars ☆ ★ 1 Star ☆

    No reviews

    • Author: Elaine VanVleck
    • Total Time: 15 minutes
    • Yield: 10 servings 1x
    • Diet: Gluten Free
    Print Recipe
    Pin Recipe

    Description

    This recipe for easy fresh pineapple salsa is perfect with fish, chicken, tacos or as an appetizer. This homemade salsa is made with fresh pineapple, tomatoes, cilantro and jalapeno peppers. It has a mild flavor that is perfect for summer barbecues.


    Ingredients

    Scale

    1 Fresh Pineapple, diced
    2 large Tomatoes, seeded and chopped
    1 small Sweet Onion, diced
    ⅓ cup Fresh Cilantro, minced
    1 large Jalapeno Pepper, seeded and diced
    1 tablespoon Lime Juice
    1 tablespoon Minced Garlic
    ½ teaspoon Ground Coriander
    ½ teaspoon Ground Cumin
    ½ teaspoon Sea Salt
    Gluten Free Tortilla Chips, for serving


    Instructions

    Combine all of the ingredients in a large bowl and stir to mix.

    Refrigerate in a sealed container for at least 2 hours before serving.

    Serve with gluten free tortilla chips, with fish tacos, on chicken or on pork.

    • Prep Time: 15 minutes
    • Category: Appetizers, Dips
    • Method: Chopped
    • Cuisine: Gluten Free

    Keywords: easy, fresh, for fish, for tacos, with cilantro, with tomatoes, without red peppers, homemade, jalapeno, simple, mild, summer appetizer, bbq appetizer, barbecue appetizer, summer dip recipe

    Did you make this recipe?

    Tag @smallfarmbiglife on Instagram and hashtag it #smallfarmbiglife

    Gluten Free Easy Homemade Garlic Hummus

    May 15, 2022 · Leave a Comment

    a small white bowl of gluten free easy homemade garlic hummus surrounded by celery sticks, sugar snap peas and rice crackers.

    This recipe for gluten free easy homemade garlic hummus makes the best snack! The recipe uses garbanzo beans (also known as chickpeas), olive oil, tahini and lemon juice. These ingredients give the hummus dip a creamy texture with a delicious flavor. I like to serve my homemade hummus with crackers and fresh veggies.

    a white bowl of gluten free easy homemade garlic hummus surrounded by celery sticks, sugar snap peas and rice crackers.

    Do I need to peel the chickpeas for hummus?

    I've made hummus both ways. I think when I do remove most of the chickpeas peel that the hummus is smoother. I don't think removing the skins changes the flavor at all.

    When I do remove the skins I wait until after I've boiled the chickpeas. Most of the skins will fall off in the water and can be skimmed off the top. After draining the chickpeas I quickly pick out any large skins in the strainer and then move on to make the hummus.

    Easy Homemade Garlic Hummus Supplies

    Is it better to make hummus in a food processor or a blender?

    Both will work, but I prefer using my food processor for making hummus. I think the hummus turns out smoother. I also think making the hummus is quicker in a food processor. But, if all you've got is a blender it will work. You may want to add the cold water sooner if you need more liquid for your blender to work.

    What do you serve hummus with?

    I like to serve hummus with fresh vegetables and with gluten free crackers. My favorite gluten free crackers are: Good Thins Rice Crackers, Nut-Thins Almond Crackers, Simple Mills Almond Flour Crackers and Crunchmaster Multi Grain Crackers.

    Easy Homemade Garlic Hummus Ingredients

    • Garbanzo Beans (chickpeas)
    • Baking Soda
    • Tahini
    • Minced Garlic
    • Sea Salt
    • Ground Cumin
    • Paprika
    • Olive Oil
    • Lemon Juice
    • Cold Water

    If you like this recipe you might also enjoy:

    Gluten Free Caramelized Onion Dip
    Gluten Free Homemade Ranch Dip
    Gluten Free Scotch Eggs with Honey Mustard Sauce
    Gluten Free Cheesy Pinto Beans
    Gluten Free Burger Sauce

    I get a lot of my ingredients from Thrive Market. Thrive Market has been a game changer for me eating gluten free. They have so many options I can’t get at my rural grocery stores! Use this link to get 25% off your first order!

    Print
    clock clock iconcutlery cutlery iconflag flag iconfolder folder iconinstagram instagram iconpinterest pinterest iconfacebook facebook iconprint print iconsquares squares iconheart heart iconheart solid heart solid icon

    Gluten Free Easy Homemade Garlic Hummus


    ★ 5 Stars ☆ ★ 4 Stars ☆ ★ 3 Stars ☆ ★ 2 Stars ☆ ★ 1 Star ☆

    No reviews

    • Author: Elaine VanVleck
    • Total Time: 21 minutes
    • Yield: 12 servings 1x
    • Diet: Gluten Free
    Print Recipe
    Pin Recipe

    Description

    This recipe for gluten free easy homemade garlic hummus makes the best snack! The recipe uses garbanzo beans (also known as chickpeas), olive oil, tahini and lemon juice. These ingredients give the hummus dip a creamy texture with a delicious flavor. I like to serve my homemade hummus with crackers and fresh veggies.


    Ingredients

    Scale

    15.5 ounce can Garbanzo Beans (chickpeas)
    ½ tsp. Baking Soda
    ½ cup Tahini
    2 Tbsp. Minced Garlic
    1 tsp. Sea Salt
    ½ tsp. Ground Cumin
    ¼ tsp. Paprika, plus more for garnish
    3 Tbsp. Olive Oil, plus more for garnish
    2 Tbsp. Lemon Juice
    ¼ cup Cold Water


    Instructions

    Drain and rinse the canned chickpeas.

    In a 2-quart saucepan bring 4 cups of water to a boil. Add the chickpeas and boil for 6-8 minutes until soft. If skins are floating strain those off. Drain the chickpeas and pick out any large skins.

    In a food processor or blender add the chickpeas, tahini, garlic, salt, cumin, paprika, olive oil and lemon juice. Blend until smooth stopping to scrape down the sides as needed between blending.

    Add 2 tablespoons of cold water and blend. If the hummus is too thick add another 2 tablespoons of cold water and blend until incorporated.

    Serve topped with a drizzle of olive oil and paprika sprinkled on top.

    • Prep Time: 15 minutes
    • Cook Time: 6 minutes
    • Category: Dips, Snacks
    • Method: Blending
    • Cuisine: Gluten Free

    Keywords: lemon, best, snacks, with tahini, garbanzo, chickpeas, olive oil, hummus dip, chickpea hummus, easy, garlic

    Did you make this recipe?

    Tag @smallfarmbiglife on Instagram and hashtag it #smallfarmbiglife

    • « Go to Previous Page
    • Go to page 1
    • Go to page 2
    • Go to page 3
    • Go to page 4
    • Interim pages omitted …
    • Go to page 7
    • Go to Next Page »

    Primary Sidebar

    • Instagram
    • Pinterest
    • Facebook
    • Twitter
    • Mail
    Follow Me on LTK


    Easy Meals Recipes

    • Gluten Free Instant Pot Chili Mac and Cheese
    • Gluten Free Taco Casserole
    • Gluten Free Cowboy Baked Beans
    • Gluten Free Walking Taco Casserole
    • Gluten Free Creamy Beef and Mushroom Pasta
    • Gluten Free Instant Pot Chicken & Dumplings
    • Instant Pot Mexican Style Beef & Rice
    • Gluten Free Chicken Parmesan Pasta Casserole
    • Gluten Free One Pot Hamburger Helper Copycat
    • Gluten Free Salisbury Steak with Mushroom Gravy
    • Gluten Free Air Fryer Fajitas
    • Gluten Free Sloppy Joe Casserole

    Footer

    Disclaimer:

    “We are a participant in the Amazon Services LLC Associates Program, an affiliate advertising program designed to provide a means for us to earn fees by linking to Amazon.com and affiliated sites.”

    Footer

    back to top

    About

    • Privacy Policy
    • Shop my Amazon Page
    • Follow me on LTK

    Newsletter

    • Sign Up! for emails and updates

    Contact

    • Contact
    • Media Kit
    • About Me

    As an Amazon Associate I earn from qualifying purchases.

    I may get commissions for purchases made through links on this site.

    Copyright © 2022 Brunch Pro on the Brunch Pro Theme