Small Farm Big Life

  • Gluten Free Recipe Index
  • Subscribe
  • Resources
menu icon
go to homepage
  • Home
  • Gluten Free Recipe Index
  • Subscribe
  • My Story
  • Resources
  • Free Guides
    • Email
    • Facebook
    • Instagram
    • Pinterest
  • subscribe
    search icon
    Homepage link
    • Home
    • Gluten Free Recipe Index
    • Subscribe
    • My Story
    • Resources
    • Free Guides
    • Email
    • Facebook
    • Instagram
    • Pinterest
  • ×

    Cantaloupe Agua Fresca

    This easy recipe for cantaloupe agua fresca makes the perfect drink for summer. Using the fruit, lime juice and water you can quickly have a tasty mocktail. I love this agua fresca plain or served with sparkling water.

    a glass of cantaloupe aqua fresca with ice and lime slice with a bottle of aqua fresca behind it

    If you aren't a fan of cantaloupe you can substitute watermelon or honey dew melon. If you are going to add another fruit that is more tart you may need to increase the amount of sweetener you add to the recipe.

    This recipe is a great way to use leftover cantaloupe that you sliced up and have in the refrigerator. The lovely orange color is perfect to serve at gatherings. This drink is always a hit served very cold over ice during the hot summer months.

    If you are looking for more tasty cold drinks try my Homemade Blueberry Lemonade made with Frozen Blueberries, my Pina Colada Mocktail, my Strawberry Daiquiri Mocktails, or my Homemade Raspberry Lemonade.

    You can find all of my drink recipes here: Gluten Free Drink Recipes

    a glass of cantaloupe aqua fresca with ice and lime slice with a bottle of aqua fresca behind it

    Cantaloupe agua fresca is a light, refreshing beverage that captures the sweet, mellow flavor of ripe melon in every sip.

    This cantaloupe drink is a staple summer beverage in many warm-weather regions, offering a naturally sweet and hydrating alternative to sugary sodas or heavy juices.

    With its smooth texture and vibrant color, this melon agua fresca recipe is a delightful way to enjoy cantaloupe in liquid form-perfect for cooling down on hot days.

    [feast_advanced_jump_to]

    Ingredients

    • Cantaloupe
    • Lime Juice
    • Granulated Sugar
    • Sea Salt
    • Water

    Instructions

    Put cantaloupe chunks, lime juice, sugar, sea salt and 1 cup of water into your blender. Blend until smooth. 

    Strain the cantaloupe mixture through a fine mesh strainer or cheese cloth into a jar, pitcher or bottle. Discard the solids.

    Add the remaining 2 cups of water and stir or shake to combine. 

    Refrigerate for at least one hour before serving.

    Serve over ice. You may want to serve with some sparkling water to add some fizz.

    Supplies

    Frequently Asked Questions

    What is agua fresca made of?

    Agua fresca is made of water, fruit, lime juice and a sweetener. For this version I used cantaloupe, granulated sugar and also added a bit of sea salt to cut the sweetness just a little. You could easily replace the cantaloupe with watermelon, honey dew or another fruit that you have.

    Depending on how sweet the fruit is you're using you will want to adjust the amount of sugar you add. For this recipe I used ripe cantaloupe which is naturally very sweet. If you want to use fruit that is less ripe or a fruit that is more tart you will want to add more sweetener.

    Does agua fresca have alcohol in it?

    No, this drink is water based and does not contain alcohol. It is very close to a juice and is great for non-alcoholic drinks and to serve to children. If you wanted to you could add alcohol to make a cocktail or sparkling water to cut down on the sweetness.

    How should I store cantaloupe agua fresca?

    I like to put mine in a bottle, but you could also store your agua fresca in a jar with a sealed lid. You can store this cantaloupe agua fresca in the refrigerator for 7-10 days.
    More Recipes You Might Enjoy

    • Dunkin Copycat Brown Sugar Cream Cold Brew
    • Easy Frozen Watermelon Margarita Mocktail
    • Lemon Lime Homemade Gatorade
    • Strawberry Daiquiri Mocktails

    I get a lot of my ingredients from Thrive Market. Thrive Market has been a game changer for me eating gluten free. They have so many options I can't get at my rural grocery stores! Use this link to get 40% off your first order!

    Print
    clock clock iconcutlery cutlery iconflag flag iconfolder folder iconinstagram instagram iconpinterest pinterest iconfacebook facebook iconprint print iconsquares squares iconheart heart iconheart solid heart solid icon

    Cantaloupe Agua Fresca


    5 Stars 4 Stars 3 Stars 2 Stars 1 Star

    No reviews

    • Author: Elaine VanVleck
    • Total Time: 10 minutes
    • Yield: 4 cups 1x
    • Diet: Gluten Free
    Print Recipe
    Pin Recipe

    Description

    This easy recipe for canteloupe agua fresca makes the perfect drink for summer. Using the fruit, lime juice and water you can quickly have a tasty mocktail. I love this agua fresca plain or served with sparkling water.


    Ingredients

    Scale
    • 1 Cantaloupe, peeled, seeds removed and cut into chunks
    • ⅓ cup Lime Juice
    • 1 Tbsp. Granulated Sugar
    • ¼ tsp. Sea Salt
    • 3 cups Water

    Instructions

    Put cantaloupe chunks, lime juice, sugar, sea salt and 1 cup of water into your blender. Blend until smooth. 

    Strain the cantaloupe mixture through a fine mesh strainer or cheese cloth into a jar, pitcher or bottle. Discard the solids.

    Add the remaining 2 cups of water and stir or shake to combine. 

    Refrigerate for at least one hour before serving.

    Serve over ice. You may want to serve with some sparkling water to add some fizz.

    • Prep Time: 10 minutes
    • Category: Drinks
    • Method: Blender
    • Cuisine: Gluten Free

    Did you make this recipe?

    Tag @smallfarmbiglife on Instagram and hashtag it #smallfarmbiglife

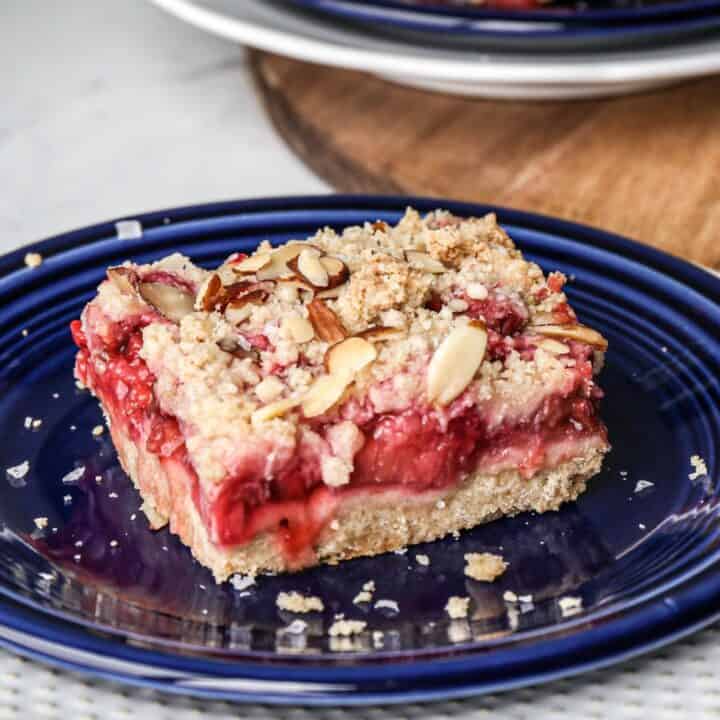
    Gluten Free Strawberry Jam Bars

    This simple recipe for gluten free strawberry jam bars uses fresh strawberries and strawberry jam over a shortbread like base with an oatmeal crisp topping. These are some of the best gluten free fruit bars for dessert, breakfast, or brunch.

    gluten free strawberry jam bars cut into squares on parchment paper with a bowl of fresh strawberries, a jar of strawberry jam and a bottle of milk

    I love these bars warm with homemade whipped cream or vanilla ice cream as a dessert. They also work well for breakfast or brunch, and are delicious served alongside a cup of coffee. They can easily be made the day before you want to serve them.

    If you are looking for more strawberry recipes try my Gluten Free Strawberry Rhubarb Crumble, my Gluten Free Strawberry Cobbler, my Gluten Free Strawberry Pretzel Dessert or my Gluten Free Strawberry Rhubarb Bars.

    You can find all of my dessert recipes here: Gluten Free Dessert Recipes

    Not sure which gluten free flour to reach for? Check out my guide: Bob's Red Mill 1 to 1 vs King Arthur Measure for Measure: Which Gluten Free Flour to Use and When

    gluten free strawberry jam bars cut into squares on parchment paper with a bowl of fresh strawberries, a jar of strawberry jam and a bottle of milk
    [feast_advanced_jump_to]

    Why You'll Love This Recipe

    • A buttery, shortbread like base
    • Works for dessert, breakfast, or brunch
    • Can be made a day ahead
    • Uses simple pantry staples

    Try a Different Jam

    This recipe works well with almost any jam you have on hand. Raspberry, blueberry, cherry, or mixed berry jam would all be delicious swapped in for the strawberry, making this an easy way to use up whatever is already in your fridge.

    Ingredient Notes

    • Gluten free flour: a 1 to 1 gluten free blend like Bob's Red Mill 1 to 1 or King Arthur Measure for Measure works well here.
    • Strawberry jam: use your favorite store bought or homemade jam. This is also a great way to use up jam you already have in the fridge.
    • Nuts: pecans, almonds, or walnuts all work well in the topping, so use whichever you have on hand or prefer.

    Top Tip

    I used fresh strawberries, but you could also use frozen strawberries. You will want to thaw the frozen strawberries completely and then drain any excess water or juice from them before adding them to the recipe.

    Frequently Asked Questions

    Can I use frozen strawberries with this recipe?

    Yes. Be sure to completely defrost the strawberries and then strain them so they don't have excess water or juice. Although, I think this recipe is the most delicious with fresh strawberries.

    Do gluten free strawberry jam bars need to be refrigerated?

    Yes. The fruit mixture in these bars needs to be refrigerated. They are ok out for a bit, but should be refrigerated when you are done serving them. It's especially important to refrigerate your bars during warm months. Without preservatives your bars can go badly quickly if left out on the counter.

    How should I store strawberry jam bars?

    You can place a lid or plastic wrap over the container you baked the bars in and store them like that. I also like placing each bar in a small glass container so they are ready for single servings.

    If they've been in the refrigerator for over three days I put the individual containers in the freezer for later.

    Can I use parchment paper instead of greasing the pan?

    Yes. Lining the pan with parchment paper, leaving a little overhang on the sides, makes it much easier to lift the whole batch out in one piece for cleaner slicing.

    Didn't find the answer you're looking for?

    Ask AI to answer based on this recipe:

    ChatGPT
    Google AI
    Perplexity
    Grok
    Claude

    Jam Bars Supplies

    Recipes You Might Also Enjoy

    • Gluten Free Pecan Pie Bars
    • Gluten Free Strawberry Icebox Bars
    • Gluten Free Pineapple Bars
    • Gluten Free Strawberry Rhubarb Bars

    I get a lot of my ingredients from Thrive Market. Thrive Market has been a game changer for me eating gluten free. They have so many options I can't get at my rural grocery stores! Use this link to get 40% off your first order!

    Print
    clock clock iconcutlery cutlery iconflag flag iconfolder folder iconinstagram instagram iconpinterest pinterest iconfacebook facebook iconprint print iconsquares squares iconheart heart iconheart solid heart solid icon

    Gluten Free Strawberry Jam Bars


    5 Stars 4 Stars 3 Stars 2 Stars 1 Star

    No reviews

    • Author: Elaine VanVleck
    • Total Time: 50 minutes
    • Yield: 9 bars 1x
    • Diet: Gluten Free
    Print Recipe
    Pin Recipe

    Description

    This simple recipe for gluten free strawberry jam bars layers fresh strawberries and strawberry jam over a buttery shortbread base, then tops it all with a crisp oatmeal crumble. They're just as good for dessert as they are for breakfast or brunch.


    Ingredients

    Scale

    Base Layer:

    • 2 cups Gluten Free Flour
    • 1 cup Unsalted Butter, at room temperature
    • ½ cup Granulated Sugar
    • 1 tsp. Vanilla Extract
    • ½ tsp. Sea Salt

    Filling:

    • 2 cups Fresh Strawberries, chopped (16 or 1 lbs. container)
    • 1 cup Strawberry Jam

    Topping:

    • ¾ cup Gluten Free Rolled Oats
    • ½ cup Brown Sugar
    • ¼ cup Brown Rice Flour
    • ½ tsp. Sea Salt
    • ¼ cup Unsalted Butter, melted
    • ½ cup Pecans, Almonds or Walnuts, chopped

    Instructions

    Preheat your oven to 350 degrees. Grease an 8x8 baking dish with butter or coconut oil. Set aside.

    In the bowl of your stand mixer add the room temperature unsalted butter, vanilla and granulated sugar. Beat until well blended together. Add the gluten free flour, and sea salt and mix until blended into a dough.

    Press the dough into the 8x8 baking dish. 

    Spread the strawberry jam over the dough mixture and then top with the chopped strawberries. Set aside.

    In your stand mixer blend the gluten free rolled oats, brown sugar, brown rice flour, sea salt, melted butter and chopped nuts until a crumbly mixture forms.

    Sprinkle the crumbly mixture over top of the strawberries.

    Bake at 350 degrees for 30 minutes. When done the edges will be bubbling and the top will be lightly browned.

    Let cool before cutting into bars.

    Serve on its own or with homemade whipped cream (recipe in notes) or vanilla ice cream.

    If you made this recipe please leave a star rating and comment below. It helps other readers find this recipe and means so much to me.

    Notes

    For homemade whipped cream add 1-2 cups of heavy whipping cream, ½ cup powdered sugar and 1 teaspoon of vanilla extract to your mixer. Using the whisk attachment beat on medium-high speed until stiff peaks form.

    • Prep Time: 20 minutes
    • Cook Time: 30 minutes
    • Category: Dessert
    • Method: Baking
    • Cuisine: American

    Did you make this recipe?

    Tag @smallfarmbiglife on Instagram and hashtag it #smallfarmbiglife

    If you make these gluten free strawberry jam bars, I would love to hear how they turned out. Leave a comment and a star rating below, and snap a photo to tag me on Instagram @smallfarmbiglife. Looking for more fruity desserts? Check out my other gluten free dessert recipes for more inspiration.

    Jam Bars Ingredients

    • Gluten Free Flour
    • Unsalted Butter
    • Granulated Sugar
    • Vanilla Extract
    • Sea Salt
    • Fresh Strawberries
    • Strawberry Jam
    • Gluten Free Rolled Oats
    • Brown Sugar
    • Brown Rice Flour
    • Pecans, Almonds or Walnuts

    Instructions

    Preheat your oven to 350 degrees. Grease an 8x8 baking dish with butter or coconut oil. Set aside.

    In the bowl of your stand mixer add the room temperature unsalted butter, vanilla and granulated sugar. Beat until well blended together. Add the gluten free flour, and sea salt and mix until blended into a dough.

    Press the dough into the 8x8 baking dish. 

    Spread the strawberry jam over the dough mixture and then top with the chopped strawberries. Set aside.

    In your stand mixer blend the gluten free rolled oats, brown sugar, brown rice flour, sea salt, melted butter and chopped nuts until a crumbly mixture forms.

    Sprinkle the crumbly mixture over top of the strawberries.

    Bake at 350 degrees for 30 minutes. When done the edges will be bubbling and the top will be lightly browned.

    Let cool before cutting into bars.

    Serve on its own or with homemade whipped cream (recipe in notes) or vanilla ice cream.

    Gluten Free Pasta Chips

    This air fryer recipe for gluten free pasta chips is a great snack idea! I used brown rice gluten free pasta to make this homemade treat. I like them plain or dipped in ranch dip for a healthy snacking option.

    a bowl of chili lime gluten free pasta chips and a bowl of salt and vinegar gluten free pasta chips next to a bowl of ranch dip

    If you are looking for more gluten free pasta recipes try my Gluten Free Ground Beef Pasta Casserole, my Easy Gluten Free Bow Tie Pasta Salad, my Gluten Free Creamy Beef and Mushroom Pasta or my Gluten Free Chicken Parmesan Pasta Casserole.

    You can find all of my snack recipes here: Gluten Free Snack Recipes

    a bowl of chili lime gluten free pasta chips and a bowl of salt and vinegar gluten free pasta chips next to a bowl of ranch dip
    [feast_advanced_jump_to]

    Ingredients

    • Jovial Farfalle Brown Rice Pasta
    • Olive Oil
    • Chili Lime Seasoning Blend
    • Sea Salt
    • Apple Cider Vinegar

    Instructions

    Cook the pasta per the instructions on the package.

    Drain the pasta and pour it into a mixing bowl. Immediately add olive oil and stir to help the pasta not clump together.

    Divide the pasta between two bowls and add the seasoning to each bowl. If you are only going to use one flavor you can use one bowl, but remember to divide the pasta into two batches for air frying.

    Add the first batch of pasta to the air fryer and air fry at 400 degrees for 10 minutes. At the five minute mark take the tray out and shake the pasta so it doesn't clump together. Place the tray back in the air fryer and let your pasta finish cooking.

    Pour the pasta chips into a bowl or onto a cookie sheet to let them cool.

    Follow the same instructions to cook the second batch of pasta chips.

    Serve plain or with your favorite dip. I served these with ranch dip.

    Supplies

    Frequently Asked Questions

    Can I make gluten free pasta chips in the air fryer?

    Yes! My favorite pasta to use is Jovial Gluten Free Brown Rice Farfalle pasta. The brown rice pasta holds together the best when I shake is half way through cooking in the air fryer basket to separate the pieces of pasta.

    How long does it take to make gluten free pasta chips in the air fryer?

    Like many gluten free foods it takes a bit longer to make gluten free pasta chips that it does using regular wheat pasta. I cooked these chips at 400 degrees for ten minutes. At the five minute mark I pulled the air fryer basket out and shook the chips so they weren't clumped together.

    I let the pasta chips cook for another five minutes and then poured them into a bowl to cool. They will be very hot and continue to cook a bit after you have poured them out to cool.

    More Recipes You Might Enjoy

    • Easy Gluten Free Bow Tie Pasta Salad
    • Gluten Free Creamy Beef and Mushroom Pasta
    • Gluten Free Instant Pot Chili Mac and Cheese
    • Easy Gluten Free Macaroni Salad

    I get a lot of my ingredients from Thrive Market. Thrive Market has been a game changer for me eating gluten free. They have so many options I can't get at my rural grocery stores! Use this link to get 25% off your first order!

    Print
    clock clock iconcutlery cutlery iconflag flag iconfolder folder iconinstagram instagram iconpinterest pinterest iconfacebook facebook iconprint print iconsquares squares iconheart heart iconheart solid heart solid icon

    Gluten Free Pasta Chips


    5 Stars 4 Stars 3 Stars 2 Stars 1 Star

    No reviews

    • Author: Elaine VanVleck
    • Total Time: 15 minutes
    • Yield: 12 ounces 1x
    • Diet: Gluten Free
    Print Recipe
    Pin Recipe

    Description

    This air fryer recipe for gluten free pasta chips is a great snack idea! I used brown rice gluten free pasta to make this homemade treat. I like them plain or dipped in ranch dip for a healthy snacking option.


    Ingredients

    Scale

    1 - 12 ounce package Jovial Farfalle Brown Rice Pasta, divided
    2-3 Tbsp. Olive Oil

    Chili Lime:
    1 ½ tsp. Chili Lime Seasoning Blend
    ½ tsp. Sea Salt

    Salt and Vinegar:
    2 Tbsp. Apple Cider Vinegar
    1 tsp. Sea Salt


    Instructions

    Cook the pasta per the instructions on the package.

    Drain the pasta and pour it into a mixing bowl. Immediately add olive oil and stir to help the pasta not clump together.

    Divide the pasta between two bowls and add the seasoning to each bowl. If you are only going to use one flavor you can use one bowl, but remember to divide the pasta into two batches for air frying.

    Add the first batch of pasta to the air fryer and air fry at 400 degrees for 10 minutes. At the five minute mark take the tray out and shake the pasta so it doesn't clump together. Place the tray back in the air fryer and let your pasta finish cooking.

    Pour the pasta chips into a bowl or onto a cookie sheet to let them cool.

    Follow the same instructions to cook the second batch of pasta chips.

    Serve plain or with your favorite dip. I served these with ranch dip.

    • Prep Time: 5 minutes
    • Cook Time: 10 minutes
    • Category: Snacks
    • Method: Air Fryer
    • Cuisine: Gluten Free

    Did you make this recipe?

    Tag @smallfarmbiglife on Instagram and hashtag it #smallfarmbiglife

    Top Tip

    You could really add any seasoning blend you want or omit the seasoning all together and just add some salt. It is key that you add enough olive oil so the pasta doesn't clump together. This will help when you open the air fryer half way through cooking and shake the pasta to separate it.

    Gluten Free Raspberry Cornmeal Cake

    This easy gluten free raspberry cornmeal cake is made with fresh raspberry and has a dense texture. This dessert is perfect on it's own or with a simple glaze overtop. I love a simple polenta cake for summer dessert or brunch.

    a gluten free raspberry cornmeal cake on a cake stand with a slice on a white plate with a bouquet of yellow flowers next to it

    I love the combination of cornmeal and summer fruits. This cake is also delicious with fresh strawberries or blueberries. For the tart fruits I like to add a simple powdered sugar and milk glaze. I put my recipe for a glaze in the notes.

    You can find all of my cake recipes here: Gluten Free Cake Recipes

    a gluten free raspberry cornmeal cake on a cake stand with a slice on a white plate with a bouquet of yellow flowers next to it
    [feast_advanced_jump_to]

    Ingredients

    • Fresh Raspberries
    • Gluten Free Flour
    • Gluten Free Yellow Cornmeal
    • Baking Powder
    • Xanthan Gum
    • Sea Salt
    • Granulated Sugar
    • Eggs
    • Milk
    • Vanilla Extract
    • Coconut Oil

    Instructions

    Preheat your oven to 350 degrees. Grease a 9-inch springform pan with coconut oil or butter and set aside.

    In a bowl whisk together the gluten free flour, yellow cornmeal, baking powder, xanthan gum and salt.

    In the bowl of your stand mixer beat together the granulated sugar and eggs. Add the milk, vanilla and melted coconut oil. Beat until combined.

    Add the dry ingredients to the wet ingredients and beat just until they are combined.

    Pour the cake batter into the greased 9-inch springform pan. Place the berries on top of the cake batter to cover the entire top.

    Bake at 350 degrees for 45-50 minutes or until a toothpick in the middle of the cake comes out clean.

    Let the cake cool for at least 10 minutes before releasing the outside of the pan.

    Serve plain or with a simple glaze on top.

    Supplies

    Frequently Asked Questions

    How do I make my gluten free cakes more moist?

    Gluten free baking tends to require more moisture or oil than when you are using regular wheat flour. For this gluten free raspberry cornmeal cake recipe I added milk and coconut oil to make it moist and delicious.

    If you are using a cake recipe that isn't turning out moist I would suggest adding a bit more oil or butter. You can also add mashed banana or applesauce to help your baked goods have more moisture.

    Do gluten free cakes take longer to bake?

    Yes, gluten free baking in general takes a little bit longer to bake than a cake made with regular wheat flour. However, gluten free baked goods tend to brown faster. So you will want to test the cake with a tooth pick in the center to make sure it's actually done even if it looks browned.
     
    Your cake should be a nice golden brown and a tooth pick inserted in the center of the cake should come out clean. You may need to bake your cake up to 5-8 minutes more. If your cake is already very brown, but not done in the center you will need to lower the oven temperature by 25 degrees and cook longer.

    More Recipes You Might Enjoy

    • Gluten Free Plum Cornmeal Cake
    • Gluten Free Pina Colada Cake
    • Gluten Free Angel Food Cake
    • Gluten Free Cream Cheese Pound Cake

    I get a lot of my ingredients from Thrive Market. Thrive Market has been a game changer for me eating gluten free. They have so many options I can't get at my rural grocery stores! Use this link to get 25% off your first order!

    Print
    clock clock iconcutlery cutlery iconflag flag iconfolder folder iconinstagram instagram iconpinterest pinterest iconfacebook facebook iconprint print iconsquares squares iconheart heart iconheart solid heart solid icon

    Gluten Free Raspberry Cornmeal Cake


    5 Stars 4 Stars 3 Stars 2 Stars 1 Star

    No reviews

    • Author: Elaine VanVleck
    • Total Time: 1 hour 5 minutes
    • Yield: 8 slices 1x
    • Diet: Gluten Free
    Print Recipe
    Pin Recipe

    Description

    This easy gluten free raspberry cornmeal cake is made with fresh raspberry and has a dense texture. This dessert is perfect on it's own or with a simple glaze overtop. I love a simple polenta cake for summer dessert or brunch.


    Ingredients

    Scale

    2 cups Fresh Raspberries
    1 cup Gluten Free Flour
    ½ cup Gluten Free Yellow Cornmeal
    2 tsp. Baking Powder
    1 tsp. Xanthan Gum
    ½ tsp. Sea Salt
    ¾ cup Granulated Sugar
    2 large Eggs
    ½ cup Milk
    1 tsp. Vanilla Extract
    ¼ cup Coconut Oil, melted


    Instructions

    Preheat your oven to 350 degrees. Grease a 9-inch springform pan with coconut oil or butter and set aside.

    In a bowl whisk together the gluten free flour, yellow cornmeal, baking powder, xanthan gum and salt.

    In the bowl of your stand mixer beat together the granulated sugar and eggs. Add the milk, vanilla and melted coconut oil. Beat until combined.

    Add the dry ingredients to the wet ingredients and beat just until they are combined.

    Pour the cake batter into the greased 9-inch springform pan. Place the berries on top of the cake batter to cover the entire top.

    Bake at 350 degrees for 45-50 minutes or until a toothpick in the middle of the cake comes out clean.

    Let the cake cool for at least 10 minutes before releasing the outside of the pan.

    Serve plain or with a simple glaze on top.

    Notes

    For a simple glaze combine ½ cup of powdered sugar with 1-2 Tbsp. of milk until you can drizzle the glaze over the cake.

    • Prep Time: 15 minutes
    • Cook Time: 50 minutes
    • Category: Cake
    • Method: Baking
    • Cuisine: Gluten Free

    Did you make this recipe?

    Tag @smallfarmbiglife on Instagram and hashtag it #smallfarmbiglife

    Gluten Free Taco Pasta Bake

    This easy recipe for gluten free pasta taco bake is the perfect casserole for dinner! It's simple to make with ground beef, cheese and homemade taco seasoning. I made this cheesy dish in a skillet, but you could also use a baking dish.

    a cast iron skillet and a small white plate of gluten free taco pasta bake with a pinch bowl of salt and pepper and a bowl of sour cream

    This Gluten Free Pasta Taco Bake is the ultimate comfort food, combining bold taco flavors with tender gluten-free pasta in a hearty, cheesy casserole.

    Perfect for busy weeknights, this quick and easy dinner with ground beef transforms simple pantry staples into a satisfying Mexican pasta casserole the whole family will love.

    If you are looking for more pasta recipes try my Gluten Free Ground Beef Pasta Casserole, my Gluten Free Creamy Beef and Mushroom Pasta, my Gluten Free Chicken Parmesan Pasta Casserole or my Gluten Free Instant Pot Italian Style Pasta and Bean Soup.

    You can find all of my gluten free meal recipes here: Gluten Free Meals Recipes

    a cast iron skillet of gluten free taco pasta bake with a pinch bowl of salt and pepper and a bowl of sour cream
    [feast_advanced_jump_to]

    Ingredients

    • Ground Beef
    • Chili Powder
    • Garlic Powder
    • Ground Coriander
    • Ground Cumin
    • Smoked Paprika
    • Sea Salt
    • Ground Black Pepper
    • Yellow Onion
    • Tomato Sauce
    • Diced Tomatoes
    • Water
    • Beef Broth
    • Gluten Free Penne Pasta
    • Sour Cream
    • Cheddar Cheese

    Instructions

    Preheat your oven to 350 degrees.

    Using a cast iron skillet or frying pan cook your beef on medium heat until there is very little pink and then add the chopped onions, chili powder, garlic powder, coriander, cumin, paprika, sea salt and pepper. Cook until onions are translucent. 

    Add the tomato sauce, diced tomatoes, water, broth, pasta, sour cream and ½ cup shredded cheddar cheese. Stir the mixture to combine.

    If you are using a cast iron skillet top the mixture with the rest of your shredded cheese and it's ready to bake. If you are using a frying pan pour the mixture into a 9x13 baking dish and then top with cheese.

    Bake at 350 degrees for 35-40 minutes. The dish will be bubbly and the cheese will be melted when it's done.

    Supplies

    More Recipes You Might Enjoy

    • Gluten Free Chicken Parmesan Pasta Casserole
    • Gluten Free Ground Beef Pasta Casserole
    • Gluten Free Cheesy Tater Tot Casserole
    • Gluten Free Sloppy Joe Casserole

    I get a lot of my ingredients from Thrive Market. Thrive Market has been a game changer for me eating gluten free. They have so many options I can't get at my rural grocery stores! Use this link to get 40% off your first order!

    Print
    clock clock iconcutlery cutlery iconflag flag iconfolder folder iconinstagram instagram iconpinterest pinterest iconfacebook facebook iconprint print iconsquares squares iconheart heart iconheart solid heart solid icon

    Gluten Free Taco Pasta Bake


    5 Stars 4 Stars 3 Stars 2 Stars 1 Star

    5 from 1 review

    • Author: Elaine VanVleck
    • Total Time: 55 minutes
    • Yield: 5 servings 1x
    • Diet: Gluten Free
    Print Recipe
    Pin Recipe

    Description

    This easy recipe for gluten free pasta taco bake is the perfect casserole for dinner! It's simple to make with ground beef, cheese and homemade taco seasoning. I made this cheesy dish in a skillet, but you could also use a baking dish. 


    Ingredients

    Scale
    • 1 pound Ground Beef
    • 1 Tbsp. Chili Powder
    • 2 tsp. Garlic Powder
    • 2 tsp. Ground Coriander
    • 1 tsp. Ground Cumin
    • 1 tsp. Smoked Paprika
    • ½ tsp. Sea Salt
    • ½ tsp. Ground Black Pepper
    • 1 small Yellow Onion, chopped
    • 15 ounce can Tomato Sauce
    • 14.5 ounce can Diced Tomatoes
    • ½ cup Water
    • ½ cup Beef Broth
    • 12 ounces Gluten Free Penne Pasta
    • ½ cup Sour Cream
    • 1 cup Cheddar Cheese, shredded

    Instructions

    Preheat your oven to 350 degrees.

    Using a cast iron skillet or frying pan cook your beef on medium heat until there is very little pink and then add the chopped onions, chili powder, garlic powder, coriander, cumin, paprika, sea salt and pepper. Cook until onions are translucent. 

    Add the tomato sauce, diced tomatoes, water, broth, pasta, sour cream and ½ cup shredded cheddar cheese. Stir the mixture to combine.

    If you are using a cast iron skillet top the mixture with the rest of your shredded cheese and it's ready to bake. If you are using a frying pan pour the mixture into a 9x13 baking dish and then top with cheese.

    Bake at 350 degrees for 35-40 minutes. The dish will be bubbly and the cheese will be melted when it's done.

    Notes

    If you don't have beef broth you can use whatever broth you have on hand or just use more water instead of broth.

    • Prep Time: 15 minutes
    • Cook Time: 40 minutes
    • Category: Meals
    • Method: Baking
    • Cuisine: Gluten Free

    Did you make this recipe?

    Tag @smallfarmbiglife on Instagram and hashtag it #smallfarmbiglife

    Top Tip

    Cast iron skillets are one of my favorite cooking essentials. I love how easily they go from the stovetop to the oven with everything all in one pan. When properly seasoned they are easily cleaned up with some water a bit of scrubbing with a chain scrubber or dish brush.

    Didn't find the answer you're looking for?

    Ask AI to answer based on this recipe:

    ChatGPT
    Google AI
    Perplexity
    Grok
    Claude

    Frequently Asked Questions

    Can I use chicken in this recipe?

    Yes. You could easily substitute chicken in this recipe if you would like. Cook the chicken completely and then add the onion to the pan to cook until it's translucent. Follow the instructions from there below in the recipe card. You could also omit meat completely if that's what works for you.

    How do I clean and season my cast iron skillet?

    I love to cook with cast iron. It evenly heats and is easy to clean. I like to use this U-picks Cast Iron Skillet Cleaner Chainmail Scrubber that I got from Amazon. I rinse the pan with hot water to remove any loose food and leftover oil. Then I use the chainmail scrubber to lift up any bits of food left. 

    I place the pan on the stove top at medium heat and let it dry completely. Then I pour a tablespoon of oil on the pan and rub it onto the entire inside of the pan with a paper towel. Remove the skillet from heat and it's ready for your next meal.

    Remember to never put your cast iron skillet into the dishwasher.

    What type of pasta should I use for this casserole?

    I'm a big fan of gluten free brown rice pasta. I like how well it holds up to being baked and doesn't get soggy. I also think brown rice pasta has a nice texture and is the closest thing I've found to regular wheat pasta. 

    Some of my favorite brown rice pasta brands are: Jovial, Tinkyada, Trader Joe's

    a cast iron skillet and a small white plate of gluten free taco pasta bake with a pinch bowl of salt and pepper and a bowl of sour cream
    • « Previous Page
    • 1
    • …
    • 60
    • 61
    • 62
    • 63
    • 64
    • …
    • 88
    • Next Page »

    Welcome! I'm Elaine

    I'm so glad you are here! I share easy gluten free recipes from my small farm in Washington.

    Be sure to sign up for my newsletter to stay up to date on all of my new recipes.

    More about me...
    • Instagram
    • Pinterest
    • Facebook
    • Twitter
    • email

    Free gluten free recipe ebook
    My most loved recipes in one download, plus new recipes every Friday.
    Check your inbox! Your ebook is on its way.

    Easy Meals Recipes

    • Gluten Free Instant Pot Chili Mac and Cheese
    • Gluten Free Taco Casserole
    • Gluten Free Cowboy Baked Beans
    • Gluten Free Walking Taco Casserole
    • Gluten Free Creamy Beef and Mushroom Pasta
    • Gluten Free Instant Pot Chicken and Dumplings
    • Instant Pot Mexican Style Beef and Rice
    • Gluten Free Chicken Parmesan Pasta Casserole
    • Gluten Free One Pot Hamburger Helper Copycat
    • Gluten Free Salisbury Steak with Mushroom Gravy
    • Gluten Free Air Fryer Fajitas
    • Gluten Free Sloppy Joe Casserole

    Footer

    back to top

    About

    • Privacy Policy
    • Shop my Amazon Page
    • Follow me on LTK

    Newsletter

    • Sign Up! for emails and updates

    Contact

    • Contact
    • Media Kit
    • About Me

    As an Amazon Associate I earn from qualifying purchases.

    I may get commissions for purchases made through links on this site.

    Copyright © 2026 Brunch Pro on the Brunch Pro Theme