Small Farm Big Life

  • Gluten Free Recipe Index
  • Subscribe
  • Resources
menu icon
go to homepage
  • Home
  • Gluten Free Recipe Index
  • Subscribe
  • My Story
  • Resources
  • Free Guides
    • Email
    • Facebook
    • Instagram
    • Pinterest
  • subscribe
    search icon
    Homepage link
    • Home
    • Gluten Free Recipe Index
    • Subscribe
    • My Story
    • Resources
    • Free Guides
    • Email
    • Facebook
    • Instagram
    • Pinterest
  • ×

    Clean Hair Care for Wavy Hair

    I've tried lots of products searching for clean hair care for wavy hair! These are the brands that I love and the routine that works for me. I give you tips to tame the frizz with natural products that will leave you with beautiful waves.

    a woman standing in front of a lake with sunglasses on with naturally wavy brown hair

    I look up all my products in the EWG app before making a purchase. It's amazing to have while I'm at the store and I want to try something new. Keep in mind the product will get dinged for fragrance and it's up to you to decide if that fragrance is from essential oils and safe for you.

    Most clean product sites are very forth coming with their ingredient list and you should be able to find the information easily. This will also help you to see if the products are gluten free. Most hair care brands aren't certified gluten free, but they should have a very clear list of ingredients.

    Best Shampoos & Conditioners for Wavy Hair

    I like to purchase shampoos and conditioners that don't weigh my hair down. With wavy hair it's a very fine line between enough product to keep the frizz under control and too much that flattens my waves. Here are my favorites:

    • Herbal Essences Apricot Oil Curl Defining Shampoo
    • Herbal Essences Apricot Oil Curl Defining Conditioner
    • SheaMoisture Curl and Shine Shampoo Coconut and Hibiscus
    • SheaMoisture Curl and Shine Conditioner Coconut and Hibiscus
    • Alaffia Beautiful Curls Curl Activating Cream Shampoo
    • Alaffia Beautiful Curls Curl Activating Leave-In Conditioner

    Favorite Wavy Hair Styling Products

    I get so excited when I find clean hair care for wavy hair that doesn't make my waves crunchy. If you have wavy hair, you know what I mean! I've tried some products that leave my hair dull and feeling like I put glue in it.

    If you find yourself with crunchy hair, but you love the product you can let your hair air dry partially and then using a blow dryer with a diffuser you can finish drying your hair. This will typically get rid of that crunchy feeling and help your hair to look more natural.

    Here are my favorites:

    • Herbal Essences Bio Renew Aloe and Mango Curl Cream
    • Alaffia Beautiful Curls Curl Defining Gel
    • Cantu Shea Butter for Natural Hair Curl Activator Cream
    • Alaffia Beautiful Curls Curl Activating Cream
    • Cantu Shea Butter Spray Come Back Curl Next Day Curl Revitalizer

    Favorite Wavy Hair Products

    How to Dry Your Wavy Hair

    After I've showered I wrap my hair in a cotton anti-frizz towel. I leave my hair in the towel while I apply face and body lotion. Then I take my hair down and run a wide tooth comb through it to remove knots. I then apply my Alaffia Beautiful Curls Curl Defining Gel. After that I gently part my hair and pull my bangs down.

    Then using the cotton anti-frizz towel I very gently scrunch my hair from the bottom to the roots to get excess moisture out. I'm careful not to disturb the clumps of waves that have formed.

    I let my hair air dry for at least one hour or until it's half way dry. Then using a blow dryer with a diffuser I flip my head over and gently blow dry by lifting the ends to the roots in the diffuser. When my hair is mostly dry I flip my head back up and finish drying any spots that feel damp.

    When my hair is dry I apply either the Herbal Essences Bio Renew Curl Cream or the Cantu Shea Butter Curl Activator Cream. If there are spots sticking out or that aren't laying down with the rest I twist them away from my face and let them fall into the other waves.
    Nutrition for Healthier Hair

    I've really noticed a difference in my hair regrowth, health and thickness since I started using Vital Proteins Collagen Peptides. I add a scoop into my coffee every morning. The collagen peptides dissolve easily and are flavorless.

    If I skip my morning coffee I will add the collagen to another meal. I like to put it in yogurt, my smoothie or tea. Since it's flavorless you won't even know it's there until you start to notice how heathy your hair is (and also how nice your nails look).

    If you like this article you might also enjoy:

    Steps for Switching to Natural Deodorant
    Winter Skin Care Mistakes That Cause Dry, Irritated Skin
    The Best Way to Curl Your Eyelashes
    The Perfect At Home Facial

    Gluten Free Sautéed Brussels Sprouts with Sausage

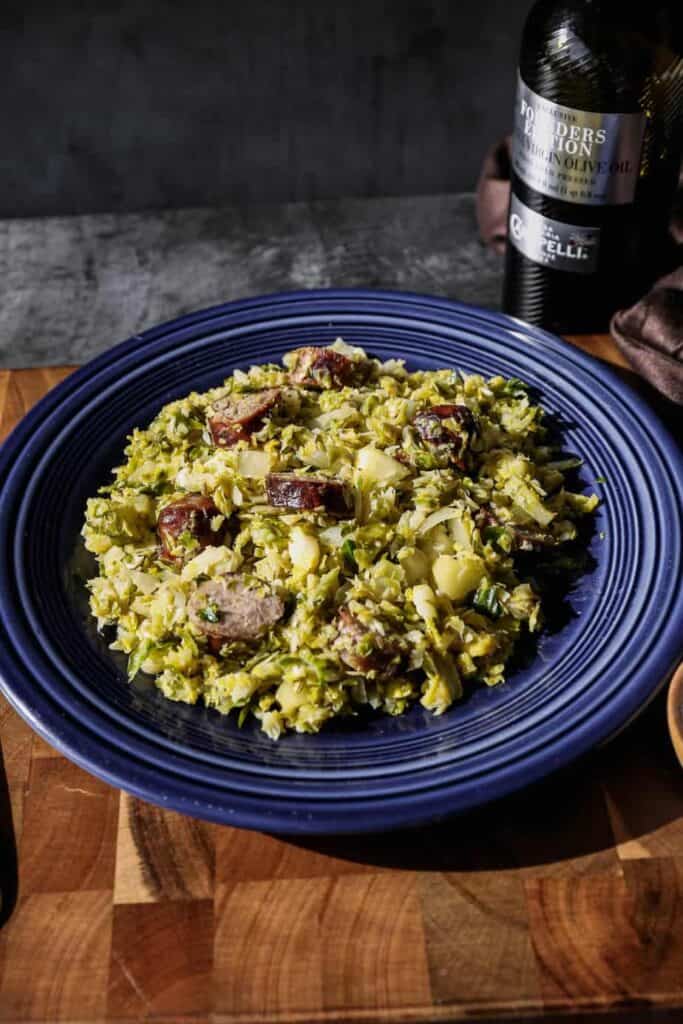
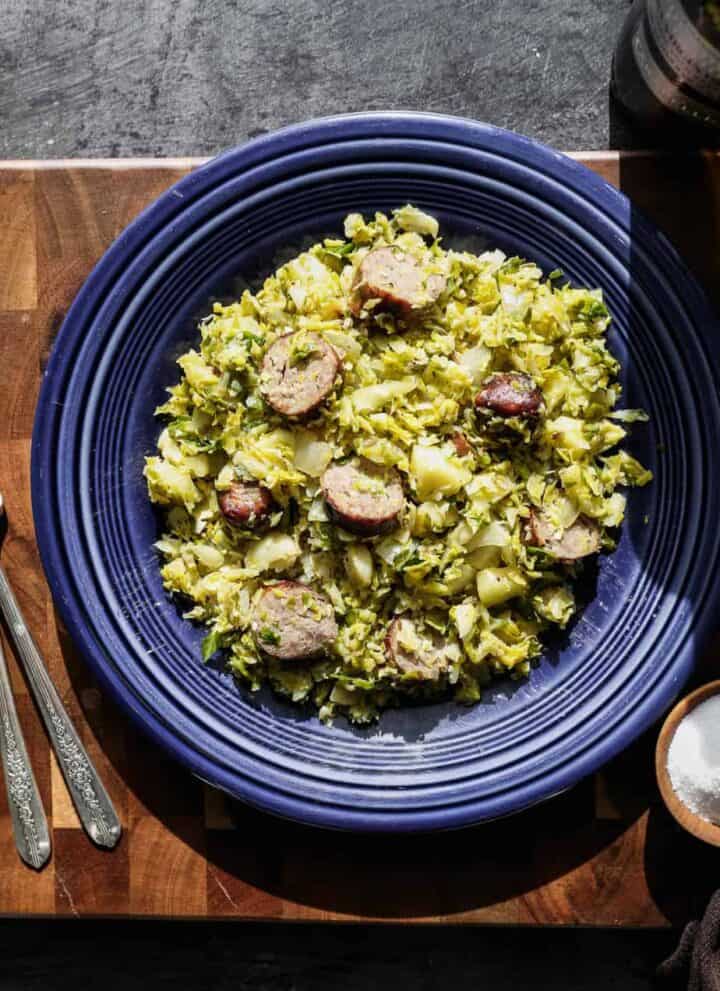
    This healthy recipe for gluten free sauteed brussels sprouts with sausage is a great weeknight meal. You can use kielbasa or chicken sausages along with shredded brussels sprouts and apple. It makes a delicious hash that is low carb and perfect for dinner.

    a blue fiesta ware plate sitting on a wood block cutting board with gluten free sautéed brussels sprouts and sausage on it

    If you are looking for more sausage recipes try my Creamy Sausage Bean Dip, my Gluten Free Instant Pot Sausage and Kale Soup or my Gluten Free Sausage, Kale and Potato Skillet.

    You can find all of my meal recipes here: Gluten Free Meals Recipes

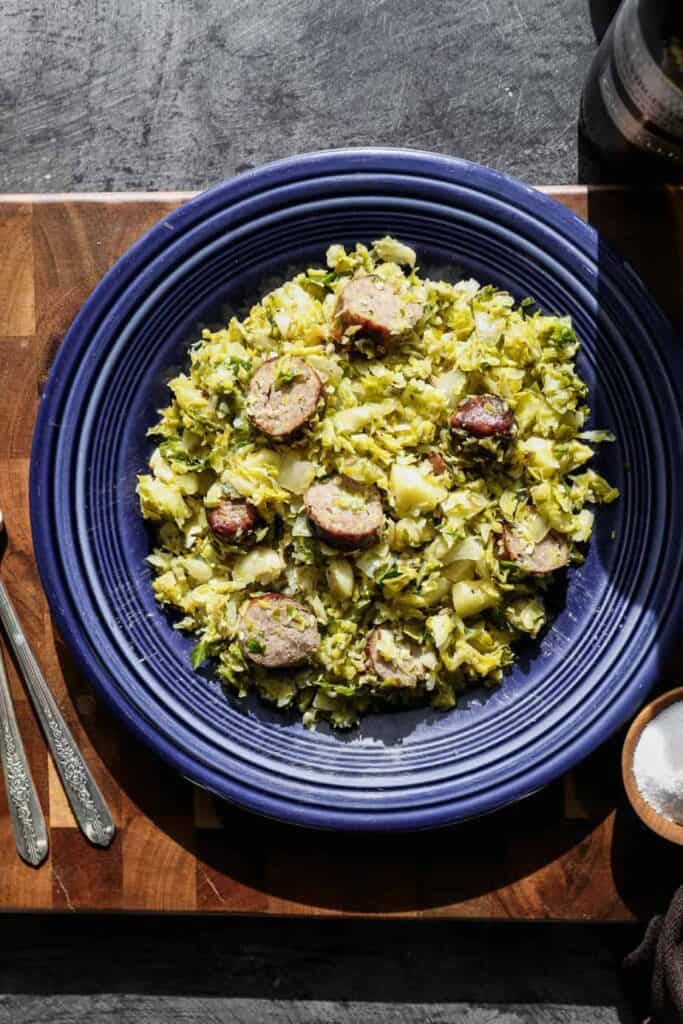
    a dark blue fiesta ware plate sitting on a wood block cutting board with gluten free sautéed brussels sprouts and sausage on it
    [feast_advanced_jump_to]

    Ingredients

    Brussel Sprouts
    Olive Oil
    Yellow Onion
    Fuji Apple
    Minced Garlic
    Sea Salt
    Coarse Ground Black Pepper
    Fennel Seeds
    Bratwurst Sausages
    Honey

    Instructions

    Chop the ends off of your brussels sprouts and toss them into your food processor. I do mine in three batches so I don't shred them too thin. Pulse the sprouts in your food processor until they are shredded.

    On medium heat in a skillet add your olive oil and let heat until warm. Add the Brussels sprouts, onion, apple and garlic. Cook 2-3 minutes and stir the ingredients until they are mixed together. 

    Place the lid on your skillet and steam the sprouts for 5-6 minutes until they are tender and the onion starts to become translucent. 

    Remove the lid and add the salt, pepper, fennel seeds, sausage rounds and honey. Stir to mix the ingredients together. Cook on medium for another 2-3 minutes until the sausages are heated.

    Serve immediately while the meal is still hot.

    Supplies

    Frequently Asked Questions

    How do you make Brussels sprouts not dry?

    Using enough oil and then steaming the shredded brussel sprouts with a lid on the pan will help them to not dry out. The apple and onion in this recipe are also going to add moisture.

    Heat the oil in your pan on medium high heat. Add the brussels sprouts, onion, apple and garlic. Cook with the lid off for 3-4 minutes. Stirring the ingredients so the oil is mixed in. Put a lid on your frying pan and cook for 5-6 minutes or until your brussel sprouts are wilted and the onion is starting to become translucent.

    Take the lid off of your frying pan and add the salt, pepper, fennel seeds, cooked sausages and honey. Stir to mix these ingredients into your brussels sprout mixture. Cook another 2-3 minutes or until the sausages are heated through. Serve immediately.

    Why are my Brussels sprouts soggy?

    Your gluten free sautéed brussels sprouts with sausage will become soggy if your steam the shredded brussels sprouts for too long. Be sure to keep checking them to make sure they still have a bit of crunch to them and are not becoming soggy.

    If the Brussels sprouts begin to get soggy immediately take the lid off your pan and cook some of the water off allowing the Brussels sprouts to get browned on the bottom before stirring them.

    Do you cut the bottom of Brussels sprouts?

    Most Brussels sprouts will come from the grocery store already trimmed, but if they still have some woody parts on the end or if the ends are a bit discolored you will want to trim them.

    Simple places the sprouts on a cutting board and slice the dense end off before tossing them in the food processor to be shredded. The ends can be bitter, so you will want to make sure they are removed.

    More Recipes You Might Enjoy

    • Creamy Sausage Bean Dip
    • Gluten Free Instant Pot Sausage and Kale Soup
    • Gluten Free Sausage, Kale and Potato Skillet
    • Cheesy Gluten Free Summer Squash Casserole

    I get a lot of my ingredients from Thrive Market. Thrive Market has been a game changer for me eating gluten free. They have so many options I can't get at my rural grocery stores! Use this link to get 25% off your first order!

    Print
    clock clock iconcutlery cutlery iconflag flag iconfolder folder iconinstagram instagram iconpinterest pinterest iconfacebook facebook iconprint print iconsquares squares iconheart heart iconheart solid heart solid icon

    Gluten Free Sautéed Brussels Sprouts with Sausage


    5 Stars 4 Stars 3 Stars 2 Stars 1 Star

    No reviews

    • Author: Elaine VanVleck
    • Total Time: 30 minutes
    • Yield: 4 servings 1x
    • Diet: Gluten Free
    Print Recipe
    Pin Recipe

    Description

    This healthy recipe for gluten free sauteed brussels sprouts with sausage is a great weeknight meal. You can use kielbasa or chicken sausages along with shredded brussels sprouts and apple. It makes a delicious hash that is low carb and perfect for dinner.


    Ingredients

    Scale

    1 pound Brussels Sprouts, shredded in food processor
    2 Tbsp. Olive Oil
    1 medium Yellow Onion, chopped
    1 medium Fuji Apple, chopped
    1 Tbsp. Minced Garlic
    1 tsp. Sea Salt
    1 tsp. Coarse Ground Black Pepper
    2 tsp. Fennel Seeds
    3 Bratwurst Sausages, cooked and sliced
    2 tsp. Honey


    Instructions

    Chop the ends off of your brussels sprouts and toss them into your food processor. I do mine in three batches so I don't shred them too thin. Pulse the sprouts in your food processor until they are shredded.

    On medium heat in a skillet add your olive oil and let heat until warm. Add the Brussels sprouts, onion, apple and garlic. Cook 2-3 minutes and stir the ingredients until they are mixed together. 

    Place the lid on your skillet and steam the sprouts for 5-6 minutes until they are tender and the onion starts to become translucent. 

    Remove the lid and add the salt, pepper, fennel seeds, sausage rounds and honey. Stir to mix the ingredients together. Cook on medium for another 2-3 minutes until the sausages are heated.

    Serve immediately while the meal is still hot.

    Notes

    You can omit the sausages and this recipe makes a great side dish.

    • Prep Time: 20 minutes
    • Cook Time: 10 minutes
    • Category: Meals
    • Method: Stove Top
    • Cuisine: Gluten Free

    Did you make this recipe?

    Tag @smallfarmbiglife on Instagram and hashtag it #smallfarmbiglife

    Top Tip

    I like to use my twelve inch cast iron pan to make this recipe. I love how even cast iron pans heat. What I didn't love about them was cleaning them until I found this chainmail scrubber. The rubber in the center saves my hands and gets my pan really clean.

    Gluten Free Homemade Enchilada Sauce

    This Homemade Enchilada Sauce is an easy red enchilada sauce that comes together quickly and tastes far better than anything store bought. Made completely from scratch, this simple homemade enchilada sauce has rich, bold flavor and the perfect consistency for enchiladas, casseroles, and Mexican inspired dinners.

    If you've ever wondered how to make enchilada sauce, this quick and easy homemade Mexican sauce is a reliable go to that delivers authentic flavor without complicated steps.

    a glass jar of bright red gluten free homemade enchilada sauce with little dishes of salt, poblano peppers, pepper and chili powder around it

    Perfect for busy weeknights, this easy enchilada sauce recipe is a healthy homemade option that lets you control the flavor and spice level. This DIY enchilada sauce works beautifully in a variety of recipes.

    Once you try this homemade enchilada sauce recipe, it's sure to become the best enchilada sauce you keep on hand for easy dinners.

    I use this gluten free homemade enchilada sauce in my Gluten Free Enchilada Skillet recipe. It is a super simple meal that is always popular at our house.

    If you are looking for more gluten free Mexican recipes try my Instant Pot Mexican Style Beef and Rice, my Easy Ground Beef Nacho Casserole, my Gluten Free Taco Casserole or my Healthy Mexican Street Corn Salad.

    a glass jar of gluten free homemade enchilada sauce with little dishes of salt, poblano peppers, pepper and chili powder around it
    [feast_advanced_jump_to]

    Ingredients

    Chicken Broth
    Tomato Sauce
    Chipotle Chiles in Adobo Sauce
    Chili Powder
    Ground Cumin
    Garlic Powder
    Onion Powder
    Sea Salt
    Coarse Ground Black Pepper

    Instructions

    In a blender, food processor or using an immersion blender blend the ingredients until they are smooth and there aren't any chunks of chipotle peppers left. 

    Use this sauce in my Gluten Free Enchilada Skillet or any other enchilada recipe.

    Supplies

    More Recipes You Might Enjoy

    • Gluten Free Enchilada Skillet
    • Easy Ground Beef Nacho Casserole
    • Gluten Free Taco Casserole
    • The Best Gluten Free Cinco de Mayo Recipes

    I get a lot of my ingredients from Thrive Market. Thrive Market has been a game changer for me eating gluten free. They have so many options I can't get at my rural grocery stores! Use this link to get 40% off your first order!

    Print
    clock clock iconcutlery cutlery iconflag flag iconfolder folder iconinstagram instagram iconpinterest pinterest iconfacebook facebook iconprint print iconsquares squares iconheart heart iconheart solid heart solid icon

    Gluten Free Homemade Enchilada Sauce


    5 Stars 4 Stars 3 Stars 2 Stars 1 Star

    No reviews

    • Author: Elaine VanVleck
    • Total Time: 5 minutes
    • Yield: approximately 4.5 cups 1x
    • Diet: Gluten Free
    Print Recipe
    Pin Recipe

    Description

    This easy recipe for gluten free homemade enchilada sauce is made in the blender with tomato sauce. It's simple to make your own enchilada sauce from scratch. I have a yummy recipe for skillet enchiladas to go with this sauce.


    Ingredients

    Scale
    • 1 cup Chicken Broth
    • 1 - 29 ounce can Tomato Sauce
    • 2 Tbsp. Chipotle Chilis in Adobo Sauce
    • 1 tsp. Chili Powder
    • 1 tsp. Ground Cumin
    • ½ tsp. Garlic Powder
    • ½ tsp. Onion Powder
    • ½ tsp. Sea Salt
    • ¼ tsp. Coarse Ground Black Pepper

    Instructions

    In a blender, food processor or using an immersion blender blend the ingredients until they are smooth and there aren't any chunks of chipotle peppers left. 

    Use this sauce in my Gluten Free Enchilada Skillet or any other enchilada recipe.

    Notes

    To adjust the spiciness of this recipe you can add less chipotle peppers.

    • Prep Time: 5 minutes
    • Category: Sauces
    • Method: Blended
    • Cuisine: Mexican

    Did you make this recipe?

    Tag @smallfarmbiglife on Instagram and hashtag it #smallfarmbiglife

    Top Tip

    If you don't have a blender you could also use a food processor or immersion blender to blend this sauce until the sauce has a smooth consistency. You want to be sure to get the chipotle chilis thoroughly blended. They give the sauce a nice smoky flavor.

    Frequently Asked Questions

    How do I make enchilada sauce from scratch?

    It's so simple to make gluten free homemade enchilada sauce in your blender, with an emersion blender or in your food processor. Simply add the ingredients and blend until you get a smooth consistency.

    Is enchilada sauce spicy?

    This sauce has a very mild, deep spiciness from the chipotle peppers in adobo sauce. If you would like your sauce to be less spicy you can add less chipotle peppers. You could also add less chili powder.

    This homemade gluten free enchilada sauce is spicier by itself straight out of the blender. Once you make your gluten free enchiladas the sauce will be less spicy.

    Steps For Switching to Natural Deodorant

    I walk you through the steps for switching to a natural deodorant and tell you how to come out smelling like roses (or lavender or coconut). These are the tips that worked for me! I talk about why natural, aluminum free deodorant is so much better for your body and the perfect charcoal mask to detox your underarms.

    a fuschia peony flower from my garden

    5 Steps for Making the Switch:

    Antiperspirant vs. Deodorant

    Antiperspirant is exactly what it sounds like, it works to stop you from perspiring or sweating.

    Antiperspirants typically use aluminum products to block your pores to eliminate or reduce sweating.

    Deodorants are designed to allow your body to sweat while eliminating the odor of the bacteria on your skin.

    Some deodorants will have baking soda, cornstarch or arrowroot powder to absorb your bodies sweat so your underarms stay dry.

    What's in Conventional Deodorant?

    Conventional deodorants you might purchase from you local drugstore have some alarming chemicals including phthalates, aluminum and fragrances.

    Phthalates disrupt our endocrine systems and have been found in studies to be associated with breast cancer.

    Aluminum can increase our cells tendency to mutate and increase the chance of tumor growth.

    Fragrance is considered a trade secret and companies don't have to disclose what they're using. It could be hundreds of potentially harmful chemicals.

    How do I Switch to Natural Deodorant?

    There are several ways you can support you body while you adjust to natural deodorants.

    Using a charcoal mask a couple of times a week for the first 3-4 weeks will help draw out trapped toxins and kill bacteria.

    Cleaning under your arms daily with a charcoal soap will help keep your underarms free of bacteria that cause odor.

    I like to use a facial scrub under my arm a few times a week to remove dead skin cells and keep my pores clean.

    Be sure to drink plenty of water during the 3-4 week process of detoxing your underarms

    Don't forget to Sweat!

    Exercising and getting a good sweat going is key during this process of detoxing your underarms.

    Sweat will naturally help your body release stored toxins. The first week or two might be smelly.

    Don't give up! Continue to cleanse with charcoal soap, use your charcoal mask and apply your natural deodorant daily.

    What if I Have Sensitive Skin?

    First, less is more with natural deodorant. You just need to apply a couple of swipes under each arm. You aren't trying to clog your pores.

    Second, don't apply your deodorants right after shaving. Finish getting ready and apply your deodorant last.

    Finally, if you get redness under your arm trying dabbing the deodorant on instead of rubbing. Use very light pressure dab the deodorant under your arm or apply to your finger and then dab on your underarm area.


    If you like this article you might also enjoy:

    Winter Skin Care Mistakes That Cause Dry Irritated Skin
    The Best Way to Curl Your Eyelashes
    The Perfect At Home Facial
    Gluten Free Homemade Dog Biscuits

    These gluten free homemade dog biscuits are super easy to make! This recipe for pup treats uses pumpkin and peanut butter. It's so simple to bake healthy cookies for your pets.

    a glass jar of gluten free homemade dog biscuits with a blue and white dog leash

    My gluten free homemade dog biscuits are a brighter orange because I used natural peanut butter and a duck egg. Duck eggs have very orange yolks that can make baked goods a bit darker orange. If your dog biscuits aren't this color that is completely fine and is based on the types of ingredients you choose to use.

    our black, white and tan basset hound Mario with a gluten free homemade dog biscuit
    [feast_advanced_jump_to]

    Ingredients

    Canned Pumpkin Puree
    Creamy Peanut Butter
    Egg
    Gluten Free Rice Flour
    Arrowroot Powder
    Milk
    Chicken Broth

    Instructions

    Preheat your oven to 350 degrees. Line three baking sheets with parchment paper and set aside.

    In the bowl of your stand mixer beat the pumpkin puree, creamy peanut butter and egg until mixed together. 

    Add the gluten free rice flour, arrowroot powder, milk and chicken broth. Beat until a dough forms and begins to stick together in the bowl of your mixer. 

    Place the dough between two pieces of parchment paper and roll out to your desired thickness. I rolled my biscuits out to about ⅛ of an inch, but you could do thicker. I used a small dog biscuit shaped cookie cutter . If you don't have a cookie cutter roll the dough into 1 inch balls and then press them out with the palm of your hand or a fork.

    The biscuits won't spread very much when baked, so you can place them fairly close together on the baking sheet. I did 6 biscuits high by 8 biscuits wide on my baking sheets.

    Bake at 350 degrees for 12 minutes. If you choose to make thicker biscuits they may take a bit longer. 

    When done the biscuits will be dry and slightly crisp to the touch, much like a pie crust. 

    Supplies

    If you like this recipe you might also enjoy:

    Gluten Free Creamy Pumpkin Pasta Sauce
    Gluten Free Baked Pumpkin Donuts
    Gluten Free Pumpkin Pie Granola
    Gluten Free Pumpkin Oatmeal Cake
    Gluten Free Pumpkin Cake with Cream Cheese Frosting

    I get a lot of my ingredients from Thrive Market. Thrive Market has been a game changer for me eating gluten free. They have so many options I can't get at my rural grocery stores! Use this link to get 40% off your first order!

    Print
    clock clock iconcutlery cutlery iconflag flag iconfolder folder iconinstagram instagram iconpinterest pinterest iconfacebook facebook iconprint print iconsquares squares iconheart heart iconheart solid heart solid icon

    Gluten Free Homemade Dog Biscuits


    5 Stars 4 Stars 3 Stars 2 Stars 1 Star

    No reviews

    • Author: Elaine VanVleck
    • Total Time: 42 minutes
    • Yield: 144 small biscuits 1x
    • Diet: Gluten Free
    Print Recipe
    Pin Recipe

    Description

    These gluten free homemade dog biscuits are super easy to make! This recipe for pup treats uses pumpkin and peanut butter. It's so simple to bake healthy cookies for your pets.


    Ingredients

    Scale
    • ½ cup Canned Pumpkin Puree
    • ¼ cup Creamy Peanut Butter
    • 1 large Egg
    • 2 cups Gluten Free Rice Flour
    • 1 Tbsp. Arrowroot Powder
    • 2 Tbsp. Milk
    • 2 Tbsp. Chicken Broth

    Instructions

    Preheat your oven to 350 degrees. Line three baking sheets with parchment paper and set aside.

    In the bowl of your stand mixer beat the pumpkin puree, creamy peanut butter and egg until mixed together. 

    Add the gluten free rice flour, arrowroot powder, milk and chicken broth. Beat until a dough forms and begins to stick together in the bowl of your mixer. 

    Place the dough between two pieces of parchment paper and roll out to your desired thickness. I rolled my biscuits out to about ⅛ of an inch, but you could do thicker. I used a small dog biscuit shaped cookie cutter . If you don't have a cookie cutter roll the dough into 1 inch balls and then press them out with the palm of your hand or a fork.

    The biscuits won't spread very much when baked, so you can place them fairly close together on the baking sheet. I did 6 biscuits high by 8 biscuits wide on my baking sheets.

    Bake at 350 degrees for 12 minutes. If you choose to make thicker biscuits they may take a bit longer. 

    When done the biscuits will be dry and slightly crisp to the touch, much like a pie crust. 

    Notes

    Be sure to use pumpkin puree and not pumpkin pie filling!

    • Prep Time: 30 minutes
    • Cook Time: 12 minutes
    • Category: Dog Treats
    • Method: Baking
    • Cuisine: Gluten Free

    Did you make this recipe?

    Tag @smallfarmbiglife on Instagram and hashtag it #smallfarmbiglife

    Storage

    Once the gluten free dog biscuits have cooled completely store them in an air tight container in the refrigerator for up to one month.

    Top Tip

    It is important to store these dog biscuits in the refrigerator or freezer! They are made without preservatives so they won't be shelf stable like store bought dog biscuits.

    Didn't find the answer you're looking for?

    Ask AI to answer based on this recipe:

    ChatGPT
    Google AI
    Perplexity
    Grok
    Claude

    Frequently Asked Questions

    Is peanut butter good for dogs?

    Yes. Peanut butter can be a good source of protein and healthy fats for your dog. Be sure to check the label and make sure there isn't any xylitol in the ingredients. I like to use all natural peanut butter that is simply peanuts ground into a butter.

    If your natural peanut butter is separated from the oil use a hand mixer with one beater to blend the peanut butter and oil back together. I prefer to use creamy peanut butter so there aren't any choking hazards.

    Is pumpkin good for dogs?

    Yes. Pumpkin is great for your canine's digestive system. Pumpkin is a great source of fiber and has prebiotic properties. It is also rich in Vitamin A, which is great for your pooches brain and eyes.

    Please be aware with any ingredients if your dog has an allergy or a reaction to stop using them immediately. I can only speak for what has been amazing for our basset hound, Mario.

    Cute Dog Supplies:


    • « Previous Page
    • 1
    • …
    • 65
    • 66
    • 67
    • 68
    • 69
    • …
    • 88
    • Next Page »

    Welcome! I'm Elaine

    I'm so glad you are here! I share easy gluten free recipes from my small farm in Washington.

    Be sure to sign up for my newsletter to stay up to date on all of my new recipes.

    More about me...
    • Instagram
    • Pinterest
    • Facebook
    • Twitter
    • email

    Free gluten free recipe ebook
    My most loved recipes in one download, plus new recipes every Friday.
    Check your inbox! Your ebook is on its way.

    Easy Meals Recipes

    • Gluten Free Instant Pot Chili Mac and Cheese
    • Gluten Free Taco Casserole
    • Gluten Free Cowboy Baked Beans
    • Gluten Free Walking Taco Casserole
    • Gluten Free Creamy Beef and Mushroom Pasta
    • Gluten Free Instant Pot Chicken and Dumplings
    • Instant Pot Mexican Style Beef and Rice
    • Gluten Free Chicken Parmesan Pasta Casserole
    • Gluten Free One Pot Hamburger Helper Copycat
    • Gluten Free Salisbury Steak with Mushroom Gravy
    • Gluten Free Air Fryer Fajitas
    • Gluten Free Sloppy Joe Casserole

    Footer

    back to top

    About

    • Privacy Policy
    • Shop my Amazon Page
    • Follow me on LTK

    Newsletter

    • Sign Up! for emails and updates

    Contact

    • Contact
    • Media Kit
    • About Me

    As an Amazon Associate I earn from qualifying purchases.

    I may get commissions for purchases made through links on this site.

    Copyright © 2026 Brunch Pro on the Brunch Pro Theme